December 29, 2011

Cheddar & Spinach Quiche

There are few things I love more than an easy crust. Especially an easy (and delicious) crust filled with gooey cheese and fluffy egg.


As I am not shy about admitting, homemade pastry crust terrifies me and I have definitely not mastered it. Mostly I just avoid it (which is probably also why I have not mastered it, too). That being said, the crust for this quiche can be pressed into the pan by hand. Thank goodness! It's also made half wheat and half white flour for a nutritious twist.

This quiche is fast for a weeknight, but also impressive enough to serve to dinner guests. The filling can certainly include your choice of cheeses and vegetables or even meats. Here I used onions, spinach, and cheddar because that was what I had on hand. A quiche is the perfect, foolproof canvas for customizing and getting creative.


It's also downright cozy and comforting on a cold winter's night like tonight. Even the dog was begging to join the table.

Cheddar & Spinach Quiche with Press-In Crust
Crust:
1 1/3 cups white-wheat flour
1 1/3 cup white flour
1 t. salt
2/3 cup canola/vegetable oil
4 T. cold water

Quiche Filling:
6 eggs
2 1/3 cups milk or heavy cream (I used a mix of 2% and 1%)
1 t. salt
1/4 t. ground black pepper
generous dash of ground nutmeg
6 oz. sharp cheddar cheese, shredded
1 T. oil for the pan
5 oz. (slightly less than half a bag) frozen chopped spinach
1 small Spanish onion, thinly sliced

Directions:
Crust: In a large mixing bowl combine the flours and salt. Then add the oil and water and mix with a fork or  your hands until it resembles coarse crumbs. Using a quiche pan with a removable bottom (If you use a pie plate, half the recipe for the crust) press the dough mixture into the bottom and evenly up the sides of the pan. Place in the oven at 450 degrees to pre-bake for about 10 minutes.

Filling: Meanwhile, heat the oil in a skillet and once hot, add the onions. Stir 2 minutes, then add the spinach and cover. Cook until tender, about 6-7 minutes.

In the meantime, whisk together the eggs, milk, and salt. Remove the onions and spinach from the heat and pour into the egg mixture. Stir to combine.

Remove the quiche pan from the oven and pour the egg mixture into the crust. Top with the shredded cheddar cheese. Bake at 350 for about 45 minutes or until the center is set and a knife inserted comes out clean. If the crust or top begins to brown too rapidly, cover with tin foil.

To remove the quiche from the pan with bottom intact, place the pan on top of a can and allow the sides of the pan to fall away from the crust. Slice and serve with a side of salad or other vegetable.

December 14, 2011

Quick Holiday Protien & Fiber Fix: Red Lentils with Sweet Potatoes and Broccoli

It's the holiday season, which means my regular food intake is easily composed of, and in excess of, the following: butter, sugar, white flour, and party appetizers. I am sure this is something you can also relate to.

As much as I enjoy all of the above items while I'm eating them, I do not enjoy it when my holiday pants don't fit, my stomach hurts, and I feel lethargic. Those are all unfortunate side effects. So I looked around and found an answer to this problem in my pantry: red lentils.


This is an easy, delicious, and deceivingly sweet tasting way to get a high protein, high fiber, and nutritious lunch or dinner in between all of those other goodies. It's ready in 20 minutes or less and can be portioned out in to lunch for the week, leaving you time and energy enough to deck the halls, scramble for that last minute gift, or simply relax in front of the fire!

Quick Simmered Red Lentils with Sweet Potatoes and Broccoli:
Ingredients:
2 T. canola oil
1 medium Spanish onion, diced
2 cloves garlic, minced
2 medium to large Sweet Potatoes, peeled and cut into 1/2" chunks
1 t. ground cumin
1/4 t. ground ginger
1/4 t. ground cinnamon
1 16oz. bag of red lentils, rinsed
4 cups water
1 bag or box of broccoli florets
Salt & Freshly ground pepper to taste

Directions:
Put the oil in a large saucepan over medium heat until it shimmers and can be spread around the pan. Add the onions, stir, and cover. Allow them to cook for a few minutes, then add the sweet potatoes, garlic, and spices. Stir and cook 1 minute, then add the lentils and water and bring to a boil. Reduce to a simmer and cook until the lentils are just soft, anywhere from 15-20 minutes, stirring occasionally. Add the broccoli florets and stir until heated through. Season with salt and pepper and serve either alone, with crusty bread, or as a side.

December 2, 2011

Maple Cinnamon Granola


Crunchy, nutty, and positively scrumptious in cold milk. I twisted a recipe for regular granola and incorporated the rich flavors of maple, cinnamon, and vanilla. M was asking me to get granola from the store so he could mix it into his favorite breakfast cereals. I knew I had whole rolled oats, and I also knew that store bought granola's are delicious but also fraught with fat and sugars. It was time to try my hand at a granola I had some control over.

The gently spiced sweetness of the cereal is balanced by its generous use of toasty nuts, including walnuts, peanuts, and sunflower seeds. Each time I've baked up a batch my mind has been exploring the creative possibilities. I plan to bake a batch that incorporates pureed pumpkin and another that involves peanut butter (two of my favorite flavors). It would be easy to do -- simply stir in the different flavors when mixing up the wet ingredients.

This granola is simple to make and the big batch will last you well throughout the week... which is good, because it will easily find its way into more than just your morning cereal bowl. Try it on top ice cream at dessert, or over Greek yogurt for lunch, too.


Maple Cinnamon Granola
Ingredients:
2 cups whole rolled oats
1 cup toasted walnuts, coarsely chopped
1/2 cup coconut
1/2 cup unsalted, shelled sunflower seeds
1/4 cup Fiber One original cereal, finely crushed, or wheat germ
1/4 cup roasted peanuts, chopped
1/4 cup honey
1/4 cup real maple syrup
1 t. cinnamon
2 t. pure vanilla extract
Optional: dried fruit such as blueberry, cranberry, and cherry

Directions:
Grease a 15x10 baking pan. In a large bowl combine the oats, walnuts, coconut, sunflower seeds, Fiber One or wheat germ, and peanuts. In another bowl whisk the honey, maple syrup, cinnamon, and vanilla extract. Stir the wet ingredients into the oat mixture. Pour into the baking pan and spread out evenly. Bake in a 300 degree oven for 30 minutes or until light golden brown, stirring after the first 20 minutes. If desired, stir in dried cherries, blueberries, or cranberries.

Spread on a large piece of foil to cool completely. Store in an airtight container for up to a week or freeze for two months.

November 20, 2011

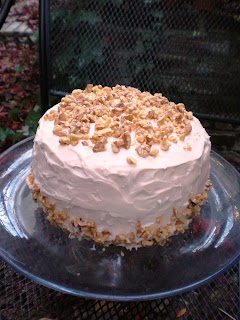
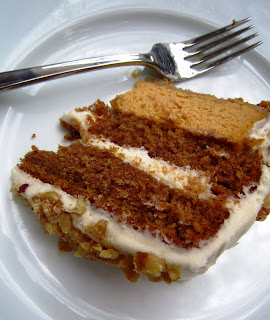
Pumpkin-Cheesecake Cake

I had no idea what to name this cake. What do you call two separate cakes when they get rolled into one dessert-bomb like this?


It's cheesecake and cake that's piled high on top of each other. Yep! As if it could get any better, this dessert was kind of amazing because... Well, I am afraid to tell you why. You're going to laugh and think I'm lying.


...This cheesecake-cake was kind of amazing because it was so very easy to make (!)
Stop being skeptical! I'll tell you why it was so easy and when we're done you're going to believe me and then go run and make one yourself. Two words: semi-homemade.

This cake is inspired by Junior's Cheesecakes, which is a New York-based company that layers their incredibly dense, New York Style cheesecakes between layers of moist cake and rich
frosting. If you like staring at photos of ridiculously delicious food almost as much as I do, click on the link to the website and salivate away.


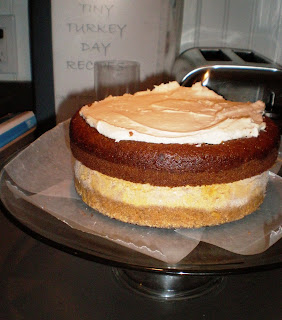
The best way to show you how I put this cake together is through photos. Here's what you need:

one quality store-bought frozen cheesecake
(I used Trader Joe's Frozen Pumpkin Cheesecake)

one box of store bought cake or bread mix
(I used Trader Joe's Pumpkin Bread mix)

Your favorite frosting recipe
(I made cream cheese frosting, recipe below)

First I baked the pumpkin bread according to the box directions, in a round cake pan the same size as the cheesecake. I cooled it completely, then froze it overnight. You don't have to freeze it, but it helped to cut it into two layers when it was very firm.

In the meantime, I made cream cheese frosting:
1 8oz. package of cream cheese, room temperature
1 stick of butter, room temperature
4 cups powdered sugar
2 t. pure vanilla extract

Then, I sliced the cake into two cake layers from one. I put one cake layer on top of the frozen cheesecake, as shown below. Keeping the cheesecake frozen keeps it firm and prevents it from getting squished while you're frosting and layering everything.


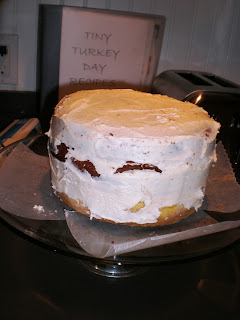
I topped that with about 1/3 of my frosting and spread it out. Then I added the second cake layer on top of that and frosted it with a thin layer all over to catch the crumbs (about another 1/3 of the frosting). I refrigerated that for one hour to set the crumb layer.


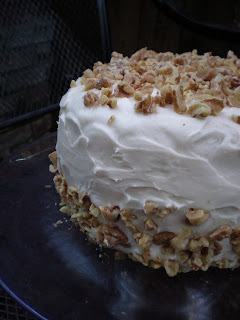
Then I used the rest of the frosting to frost the cake completely. I garnished it with toasted
walnut pieces.


Then I kept the whole thing in the fridge until an hour before it was time to eat it. The cheesecake had thawed itself out underneath the cake layers, just as it should. The cake layers were the perfect balance to creamy cheesecake and sweet frosting.

The whole thing was just plain fun to make, serve and enjoy with our friends. And if that's not what Thanksgiving is all about, I'm not sure what is!


November 5, 2011

Super Soft Peanut Butter Chocolate Chunk Cookies

Peanut butter and chocolate is a match made in heaven.


These cookies are the perfect homage to that divine pairing. When it comes to peanut butter, I don't want a subtle flavor. When it comes to cookies, I don't want something crunchy or dry. Thank God for these goodies.


They threaten soft collapse when handled, but mysteriously remain intact. They boast a flavor that is lusciously creamy and bold, with fragrant and salty peanut butter that is delightfully balanced with bursts of sweet chocolate and crystalline sugar.

If you want to get totally out of this world, mix in half peanut butter chips and half semisweet chocolate chips. I can't imagine that addition would be anything short of amazing. Whatever you do with these cookies, run, don't walk to the kitchen to whip up a batch. The secret to the softness is a very short baking time... and since they'll be devoured just as quickly it took to bake them, that's a very, very good thing.


Peanut Butter Chocolate Chunk Cookies: makes over 4 dozen small cookies, 2 dozen regular
Ingredients:
1/2 cup butter, softened
1/2 cup peanut butter (not natural)
1/2 cup granulated sugar, plus more for rolling
1/2 cup packed brown sugar
1/2 t. baking soda
1/2 t. baking powder
1 egg
1/2 t. vanilla
1 1/4 cups all-purpose flour
About 2 cups quality semi-sweet chocolate chips

Directions:
Beat the butter and peanut butter with an electric mixer on medium to high speed for 30 seconds. Add the granulated sugar, brown sugar, baking soda, and baking powder. Beat until combined, scraping the sides of the bowl. Beat in the egg and vanilla until incorporated. Beat in as much of the flour as you can with the mixer, then stir in the remaining flour. If the dough is too sticky, cover and chill until easy to handle.

Preheat the oven to 375 degrees. Roll 1" balls of dough between your palms, then roll in a small bowl of granulated sugar to coat. Place the balls 2 inches apart on an ungreased cookie sheet. Bake for 4-5 minutes. Even though it will not appear that the cookies are baked, allow them to cool on the sheet for 5 minutes, then carefully transfer to a wire cooling rack with a spatula to cool completely. Store up to 1 week in an airtight container.

October 29, 2011

Thai Pumpkin Curry

It's creamy and warming. A marriage of complex flavors without the complex effort.


This authentic tasting curry is healthy and satisfyingly flavorful. The coconut milk and pumpkin combine to create a luxurious and velvety sauce that is laced with bright bursts of lime balanced by the nutty, caramel tone of sauteed onions and spices. 

Best yet, it comes together in minutes. I used firm tofu because that is what I had on hand, but it's a versatile dish that would be equally wonderful with sauteed chunks of chicken or plump shrimp. Don't be deterred by the coconut milk, which is an ingredient many may not have on hand. It's an essential part of what makes this so authentically Thai. But once you whip up this curry, canned light coconut milk will surely become a pantry staple in your house as it now has in mine (and at about 99 cents a pop, it's a lot cheaper than a plane ticket to Thailand). 

Thai Pumpkin Curry: serves two generously
Ingredients:
Canola oil for pan
1/2 package of firm tofu, drained, patted dry, and cubed
1/2 large white or yellow onion, cut into small wedges
2 cloves garlic, pressed
1 T. curry powder
1 t. mustard
1 t. cumin
1 t. turmeric
2 dried chiles de arbol
1/2 cup roasted, salted cashews or almonds
1/2 14.5oz can Pumpkin (not pie filling)
1/2 14.5 oz. can light coconut milk
1/2 cup milk
2 T. dried coconut flakes
Zest of 1 lime
Juice of 1 lime
Sea salt to taste
Brown rice for serving

Directions:
In a large saucepan over medium heat, add enough oil to coat the skillet and heat until it shimmers. Add the onions and tofu, cooking until the onion is soft and golden, 10-15 minutes, stirring occasionally. Add garlic, curry, mustard, cumin, turmeric, chiles, and nuts, and stir, 1 minute. Add the coconut milk, pumpkin, milk, and coconut flakes. Bring to a boil, then reduce to a simmer. Simmer for two minutes until slightly thickened. Add the lime zest and lime juice and stir. Salt to taste. Serve over brown rice. 

October 25, 2011

Hazelnut Pesto Pasta with Brussels Sprouts


Roasted brussels sprouts are a warming and delightful way to enjoy one of the best flavors of Fall. When tossed with a non-traditional, earthy sauce of hazelnut pesto, the combination becomes a hearty nod to the lingering days of summer, too.

The hazelnut pesto is more grounded and mellow than the usual all-basil pesto due to its use of parsley instead. Since the flavors of the sauce are so balanced, the tender and toasty brussels sprouts really shine.
Sauteing the sprouts creates a delightful and mildly addicting brown crust on each bite. This delectable pasta dish is a welcome canvas for these often (sadly) misunderstood and too-often cast aside, but truly scrumptious, baby cabbages.

Pasta with Hazelnut Pesto and Brussels Sprouts: makes 4-6 servings
Ingredients:
1 3/4 cups packed fresh flat leaf parsley
1/4 cup packed basil
2/3 cups toasted hazelnuts
2 tablespoons fresh lemon juice
Zest of 1 lemon
2 garlic cloves, peeled
1/3 cup olive oil, plus additional as needed
1 recipe fresh egg pasta, prepared as linguine, or 1 box dried linguine
1 lb. fresh brussels sprouts (heads should be small, tight, with no brown)
Shaved Parmesan cheese

Directions:
Rinse the brussels sprouts and drain. Trim the bottom portion of each sprout, keeping the base intact, then quarter each. Heat 2 T. olive oil in a large pan over medium low heat. Once the oil shimmers, add the sprouts.
Gently toss the sprouts every few minutes to keep from burning. Saute until they are lightly browned and tender, 10-15 minutes.

Meanwhile, set a large pot of salted water to boil over high heat. While the water is heating, make the pesto by adding all of the ingredients from the parsley through the olive oil to the food processor. Process until completely blended, scraping down the sides as necessary. When the water has come to a boil, add the pasta and cook according to the directions until barely al-dente.

Using a pasta ladle, spoon all of the noodles directly into the pan with the brussels sprouts. Pour the hazelnut pesto sauce over the noodles and pesto and toss well. The pasta will finish cooking in the sauce. Add kosher salt to taste and serve topped with generous shavings of Parmesan cheese.

Fresh Egg Pasta

This is my go-to recipe for fresh egg pasta. I roll this pasta out with my Kitchen-Aid Pasta Roller Attachment. It's a wonderful way to produce big, beautiful sheets of lasagna noodles and supple tagliatelle and spaghetti. This recipe produces fresh noodles that are light and airy, but rich in flavor.

Fresh Egg Pasta: makes about 1 1/4 lbs pasta
Ingredients:
2.5 cups all purpose flour, plus extra as needed
1/2 t. fine sea salt
4 large eggs, room temperature
2 teaspoons olive oil
Optional: 4 T. fresh, finely chopped basil, parsley or spinach

In a food processor, add 2.5 cups of the flour and sea salt. Pulse to incorporate. Crack the eggs into a measuring cup to prevent shells from getting into your flour. Add the oil to the eggs, then pour this into the food processor. Process until the flour is evenly moistened and becomes crumb-like in texture. Add extra flour 1 tablespoon at a time until the dough is no longer sticky, processing between additions. The dough should form a ball around the blade of the processor. When you pinch it between two fingers it should not stick, but should not be dry.

Next, flour a clean work surface and set the dough down in the center of it. Knead the dough by pushing the dough away from you with the base of your palms, then folding it back on top of itself. Rotate the dough and repeat this motion. Knead for about 10 minutes, then shape the dough into a ball and allow it to rest for 15 minutes underneath a bowl. Do not allow it to rest longer than 15 minutes or it will dry out.

Cut the dough into four equal pieces, removing one and covering the rest once more. Set the pasta roller attachment set to the widest setting. Flatten your piece of dough and dust it with flour. Feed it through the rollers. Fold it into thirds like a piece of paper, dust with more flour, then feed it through the roller again. Repeat this twice. Start again with the next piece of dough, continuing with this same process until you have even sheets of pasta. Narrow the rollers to a thinner notch and repeat the process again. Continue with this process until you have reached the desired thinness.  The second to thinnest notch can be used for spaghetti or linguine. If desired, roll the pasta out to the thinnest notch to make tagliatelle or lasagna noodles.

For noodles, either add the appropriate attachment and cut the noodles, or cut them by hand with a knife.
Cook the fresh noodles in boiling salted water for approximately 5-8 minutes depending on the thickness of the noodle.

October 15, 2011

Spiced Beef and Sweet Potato Stew

It's warm, smothery, and perfect for a rainy night.


This braised beef and sweet potato stew tastes like Fall and hints at winter. I made this stew on a weekday, a Wednesday night to be exact. I was craving warmth and meat. I'd like to think this stew is kind of perfect for a Sunday night, though. Maybe passed around by a family or group of friends around a big oval table and eaten from big, shallow bowls.

It was just M and me, and our pot of beef stew. I've never made a beef stew before but my cash was a little tight and when I went to the butcher craving beef, I was met with all sorts of steep prices. The least expensive were these hunks of vibrantly red beef cubes. It would have to do. I adapted this recipe from Epicurious, and added lots of soft, sugary sweet potatoes and a bit more spice. Try adding chickpeas, or serving over couscous or egg noodles. This is an easy dish that has made me a stew convert.

When he tasted his first bite, M exclaimed, "you should call this 'Not your Mother's Beef Stew!" I imagine that this declaration was the result of this stew's unique, complex flavors... I still have no idea what M meant, but he was too busy eating to allow me get a decent explanation. Truly, the mark of a great dish.

Spiced Beef and Sweet Potato Stew (makes about 6 servings)
Ingredients:
2 tablespoons olive oil
2 lbs cubed beef (chuck roast)
2 cups chopped Spanish onion
2 large sweet potatoes, peeled and cut into 1/2 inch cubes
3 garlic cloves, chopped
1 tablespoon garam masala
1 tablespoon paprika
1 teaspoon ground cumin
1/2 teaspoon turmeric
1.2 teaspoon cayenne pepper
1 cup dry red wine
3/4 cup sweet white wine
1 Tablespoon rice wine vinegar
2 cups beef broth
1 14.5 ounce can diced tomatoes in juice
1/2 cup raisins
1/2 cup dried apricots, chopped
Salt to taste.
Rice to serve.

Directions:
Heat the oil in a dutch oven over medium high heat. Season meat with salt and pepper. Add the beef to the pot and saute about 5 minutes or until no longer pink. Remove with slotted spoon, and add onions and sweet potato to pot. Saute until onions are browned, about 8-10 minutes. Stir in garlic and all of the spices. Cook 1 minute, then pour in both wines, bring to a boil and cook about 10 minutes until it is reduced to a glaze. Pour in the vinegar, broth, and diced tomatoes. Stir to incorporate. Then add the beef and raisins and apricots. Bring to a boil then reduce to a simmer. Cover and cook for 45 minutes. Uncover and cook for another 45 minutes (1.5 hours total). Season with salt. Serve over rice.

October 13, 2011

Chewy Pumpkin Peanut-Butter Oatmeal Rounds

Do you remember these?


These fruit and nut energy rounds were awesome. But for some reason I never made them again after that one time. I guess I was off to fry other fish and tackle new adventures in the kitchen. I was fickle in those days.

Last week I was contemplating the issue of my new job... You see, this new job is not a "make oatmeal at your desk and enjoy it while you surf email" job. I've had those jobs before. I remember what that felt/tasted like. It's nice, so if you have one of those jobs, congratulations and please do enjoy it. My new job is more like "walk in door, try to make it to office before crisis arises (avoid eye contact with patients). Crisis averted. Sit down in chair, touch computer mouse. Crisis finds way to office and walks in.  There goes breakfast."

Enter back in these energy rounds. I knew I needed something that can keep me going, something high in protein and nutrients and low in added sugar or fat. It's also Fall, which means pumpkins, and pumpkins are loaded with nutrients and flavor. My brain started crafting a new energy round. I tweaked the original energy round recipe to further reduce the sugar and bump up the nutrients. 


Yes, they are that orange! Isn't it fun and festive? I pop one in a baggie in the morning before I head out the door. A few bites later I'm fueled up and ready to go. Best yet, this little nuggets are really keeping me full. And happy. Two of my favorite flavors (pumpkin and peanut butter) are rolled into the same place. 

So move aside Cliff and Luna..... there's a new, fresher bar (or round) in the office. It's chewy, nutty, and wholesome... I might even  venture far enough to say I think this breakfast is making me a better therapist.  

Pumpkin Peanut Butter Oatmeal Rounds (makes about 12-14 rounds)
Ingredients:
1 cup whole rolled oats
1 cup toasted walnut pieces
1/2 cup salted, roasted peanuts
1/4 cup honey
1/2 cup crunchy peanut butter (not natural)
1 cup packed canned pumpkin
1 T flax seeds
1 T. blackstrap or regular molasses
1.5 t. pumpkin pie spice
1 t. cinnamon
Zest of 1 lemon
1 cup dried cranberries or raisins
1/4 cup coconut flakes

Directions:
Preheat the oven to 325 degrees. Lightly grease a baking sheet. 
Pour boiling water over the dried fruit and allow them to sit. The fruit will plump up and re-hydrate. 
In the food processor, pulse the oats, walnuts, peanuts, honey, peanut butter, pumpkin, flax seeds, spices, and lemon zest until coarsely chopped. Drain the dried fruit from the water. Add the dried fruit and coconut flakes to the food processor and pulse a few times. Pour the mixture into a bowl and mix well. 

Using wet hands, roll balls of the dough into about 1 to 1.5 inch rounds, then flatten gently with your palm to form a round that is about 1/2 to 3/5 inch thick. Continue until all the dough is used. Bake in the oven until the sides are just golden, about 15-20 minutes. Check often and make sure not to burn the bottoms. Eat one hot out of the oven for fun, then cool the rest and store in an airtight container in the fridge for up to a week. 


September 21, 2011

Pumpkin Gingersnap Ice-Cream Cake

What I love most about this ice cream cake is that it's a celebratory marriage of seasons. Summer ends today, and fall begins tomorrow, so the timing is perfect. Here, summer's cool treat, ice cream, comes together with a couple of the spiced, warming favorites of fall: pumpkin and gingersnap.

Thin layers of cozy pumpkin bread and gingersnap cookies are enveloped by a brightly flavored lemon-gingersnap ice cream. This cake is simple, yet impressive. I do use specific brand ingredients in this recipe, but please feel free to use the technique of making this ice cream cake in order to make your own cake using brands and flavors of your choosing.

Pumpkin Gingersnap Ice-Cream Cake: makes one bread-loaf sized cake, with more pumpkin bread leftover if you desire to make a second cake. I use Trader Joe's brand pumpkin bread because it is the only boxed pumpkin bread I have found with a rich, molasses flavor and intense-enough spices to resemble homemade. To save calories and fat, swap the oil in the box recipe for apple sauce, in a 1:1 ratio.

Ingredients:
1 loaf Trader Joe's Pumpkin Bread, baked according to box directions and cooled completely
1/2 gallon container of Trader Joe's Lemon Gingersnap Ice Cream
1 box Anna's Cookies Ginger Thins or other gingersnap cookies (you will have cookies leftover)

Directions:
Place the ice cream in the refrigerator to soften, 30 minutes. Meanwhile, prepare to assemble your cake.

Using a serrated knife, gently and slowly cut the pumpkin bread in half (working from the side, not the top of the cake). Use a back and forth motion around the perimeter of the bread until you reach the middle, then carefully lift your layers apart. You will have two bread pieces: one is the bread's top half, the other is the bottom half. Use the same method of to cut each bread half into into approximately 1/2 inch thick layers. Set these layers aside.

Line your bread pan with enough plastic wrap to overhang on all sides. Place your bottom pumpkin bread layer into the bottom of the pan. Top with ice cream and gently smooth with a spatula or press with a meat mallet. Layer gingersnap cookies on top of the ice cream and press gently. Repeat method of spreading ice cream on top of the gingersnaps. Top with your next layer of pumpkin bread, and repeat the steps, ending with a layer of pumpkin bread once you reach the top of your pan. Cover completely with plastic wrap and place in the freezer.

Once it has frozen 2-6 hours, lift the cake out of the pan. You can store the cake completely wrapped in the freezer until you are ready to serve. When ready to serve, allow to sit in fridge for 30 minutes. This allows for better flavor. Remove cake from fridge, unwrap the plastic wrap, and slice 1-inch thick slices of cake. Serve with a cookie stuck in the top of each slice.

Sweet and Salty Chocolate Chunk Blondies

Excuse me, waiter, but there's salt on my dessert.


And underneath the salt there's this gently chewy blondie that's layered with ooey, gooey melted hunks of chocolate. But there's salt on top and that's a problem... or is it?

Not in the case of these decadent blondies. Throw out whatever Toll House chocolate chip recipe you've been wedded to over the years, and don't bother looking for another bar cookie again, either. These insanely scrumptious bars boast a ridiculous amount of semi-sweet chocolate in a light-as-air blondie batter. Then, every morsel is topped with a sprinkling of shining, crystalline sea salt.

Have you ever dipped your french fries in your milk shake or your potato chips in your fudge sauce? Then this is the dessert for you.


My only warning is this: don't think that you can cut them at 11:00 at night while they are still piping hot out of the oven and not eat almost half of the batch. When I arrived to bed with chocolate smeared into the corners of my mouth and on the side of my face ( I swear I thought I had cleaned up the evidence) M didn't even bother asking me where I'd been. That night I dreamed of chocolate chunks, buttery crumbs, and mouth-puckering salt. Now that is what sweet dreams are made of.

Sweet and Salty Chocolate Chunk Blondies: makes over 48 squares

Ingredients:
2 sticks salted butter, room temperature, wrappers saved
1/2 cup packed light brown sugar
1/2 cup packed dark brown sugar
1/2 cup granulated sugar
2 1/3 cup white flour
1 1/4 t. baking soda
1/8 t. salt
2 large eggs
2 t. pure vanilla extract
3 cups quality semi-sweet chocolate chips (don't skimp!)
1.5 T. coarse sea salt

Directions:

Preheat the oven to 350 degrees. Using your butter wrappers, grease a 9x13 jelly roll pan.

Using a standing mixer, beat the butter for two minutes until it is fluffy, then beat in the brown sugars and granulated sugars gradually. Scrape down the sides in between additions. Then, continue to beat butter and sugars together for 8-10 minutes until very fluffy and light.

Whisk the baking soda, flour, and 1/8 t. salt in a bowl. Add the eggs one at a time and stir each in completely with a wooden spoon. Now add your vanilla. Turn the mixer down to its lowest setting and gradually add the flour, egg, and vanilla mixture. Once it is fully incorporated with the butter, add all of the chocolate chips. The dough will become very densely packed with chocolate chips and it may be hard to mix, but allow them to continue to incorporate.

Once the chocolate chips are fully incorporated to the batter (don't overmix, though!) spread the batter out into the jelly roll pan. Use a spatula to evenly press the batter to the corners. Bake for 20-25 minutes or until the edges are barely browned and the center is no longer raw. Remove from oven immediately and allow to cool in the pan.

While blondies are still in pan, use a sharp plastic knife or regular knife to cut the blondies into 1" squares. The yield is a lot, but you will need all of them because they will get eaten fast! Try as you might, you will not be able to stop yourself from shoveling them in your mouth as you cut. However, any blondies that do not get eaten immediately can be stored in an airtight container for up to a week.

September 13, 2011

Slow Cooked Pulled Pork

It's dinner in minutes, but it cooks all day.


Slow cooked pulled pork is incredibly easy and intensely delicious. This is a must-have recipe. I was inclined to develop it after M requested pulled pork week after week. We usually get our pulled pork fix when we go out to a few of our favorite comfort food restaurants, and this request was one I knew was possible but wasn't ready to commit to.

Finally I looked up an initial recipe and discovered that pulled pork is made from Boston Butt. I didn't even know what a Boston Butt was. Sure enough my butcher had one huge hunk waiting for me when I visited the prime shop. He handed the giant, paper-wrapped package over to me with a smile and said, knowingly, "it's going to taste even better the next day."

Well, the pulled pork tasted amazing the day of and sure enough, even better a couple of days later when we got around to eating the leftovers. After hours of slow cooking in the crock-pot, the meat simply shredded itself into pieces with a gentle stir.


Every strand was juicy, tender, and finger-licking succulent. The house was filled all day with a deep, somewhat tangy aroma of smoky and sweet spices.

The first round of pork we took to our friend's house and served as little open-faced appetizers on sliced Tuscan bread. The second round we ate ourselves, at home, on big, soft potato rolls. Both were excellent. We vowed to make pulled pork again as as soon as possible. With a recipe this easy, there are simply no excuses.

Slow Cooked Pulled Pork
For the pork:
2 T. dark brown sugar
1 T. smoked paprika
1 T. chili powder
1 t. salt
2 t. ground cumin
1 t. ground black pepper
1/2 t. ground chili pepper
1 t. Dijon mustard
1 5lb. Boston Butt
1 large Spanish onion, thinly sliced
1/2 cup water
1/2 cup apple cider vinegar
1/3 cup ketchup

Sauce:
3/4 c. apple cider vinegar
1/2 c. ketchup
3 T. dark brown sugar
2 t. smoked paprika
1 t. chili powder

Directions:
Combine all sugar and spices for pork in a small bowl, then rub completely over the pork and allow to sit for about 30 minutes at room temperature. Place 1/2 of the onions in the bottom of the crock pot, then pour the water over the onions, then place the Boston Butt on top of the onions and cover with the remaining onions. Whisk together the
ketchup, apple cider vinegar, and mustard. Set on LOW and cook for 8-10 hours, and about halfway through cooking pour apple cider mixture over the pork and stir gently. Meat is done when it falls apart when touched. (Can also be cooked on high 5-7 hours).

To make the sauce, whisk all ingredients in a small saucepan and cook on medium-low heat until thickened. Serve pork on soft buns with 1 T. sauce each.

September 6, 2011

Soy Chorizo Sopes

It's a little weeknight trip to South America.


I was first exposed to sopes at my favorite Philadelphia Mexican restaurant, Tacqueria Veracrusana. This place is the real deal... I was obsessed immediately with pulled pork and pineapple tacos enveloped soft, fluffy just-made corn tortillas, the crispy, double-thick corn chips straight from the fryer, and their perfectly creamy guacamole.... It took me a few visits to venture out of my ordering routine and out into the territory of sopes.

Sopes are corn patties that are lightly fried and topped with the filling of your choice. The first bite was instant love. The cornmeal patties are slightly creamy in taste but firm in texture, which makes them satisfying and comforting at once. The gently fried cornmeal is the perfect light and delicate flavor vehicle for an infinite number of delicious toppings. But, I was nervous. I doubted I could re-create this at home. But I craved it so much I just had to try.

My discovery: they were easy. And healthful. In this case, I simply topped each patty with warmed soy chorizo, which took little effort beyond punching a few minutes into the microwave and stirring halfway. Feel free to get creative with toppings like beans, steak, pork, and chicken cooked in Mexican spices and a little broth for moisture. Garnished mine with lime, a little sour cream, and cheddar cheese, these sopes were a completely manageable weeknight dinner... and I saved myself a trip to the tacqueria. Enjoy!

Sopes: corn patties
Ingredients:
2 cups masa harina (corn flour)
4 T. flour
.5 t. baking powder
1/2 t. salt
1 1/4 cup warm water (add more if necessary)
vegetable oil for pan-frying
Toppings of choice, such as chorizo, soy chorizo, or other Mexican meats or vegetables

Directions:
Mix the dry ingredients together, then add the water slowly while mixing. Stop adding water when the mixture gets to be moist and well-incorporated, but still a firm dough texture. Either refrigerate covered in plastic or immediately begin to form small 2" size balls with floured hands. Gently press down each ball on an oiled surface until 1/4 inch thick rounds are formed. Heat a skillet to medium-low heat and add enough oil to well-coat the pan. Once oil is hot, gently add each sopes and cook about 4-minutes per side, until slightly crispy and golden brown on each side. Serve immediately with desired filling.

August 28, 2011

Catching Summer in a Mixed Fruit Pie


Catch summer before it's gone. Just a slice of this sweet and tangy mixed-fruit pie will have your mouth puckering into a smile, filled with thoughts of candlelit patios, dripping popsicles and wide-brimmed sun hats. All of the good things of these fleeting, wonderful months.

Be creative with the fruits you use, it's okay to put in what you have on hand. I used blueberries, strawberries and even a few diced mangoes and peaches. The result was bright, yet complex in the marrying of various textures and flavors. This oozey, gooey layer is complimented by the irresistible crunch of cinnamon brown sugar cobbler topping.

Just be ready with a pint of vanilla ice cream to top it off.... and maybe a camera to capture the smiles for a few months from now, when you'll need to escape into a daydream of summer.

Summer Fruit Pie
Ingredients:
1 frozen pie crust, thawed
5 cups of mixed berries and fruits, larger fruits diced to about 1/2" pieces
1/2 cup sugar
1/3 cup all-purpose flour
2 t. lemon zest

crumb topping: stir together 1/2 cup all-purpose flour, 1/2 cup packed brown sugar, 1 t. cinnamon, and 1 t. vanilla extract. Using a pastry blender or your fingers, cut in 3 T. butter until the mixture resembles coarse crumbs.

Directions:
Preheat oven to 375 degrees. Line a 9" pie plate with the pie crust and place on a cookie sheet to catch drips while baking. In a saucepan, combine the sugar, fl
our, and half of the fruits. Simmer over low heat for about 5 minutes or until the fruit filling has slightly thickened. Stir in the rest of the fruit and the lemon peel. Pour filling into the pie crust. Evenly sprinkle the crumb topping over the pie to about 1/2 inch from each ed
ge. Cover the edge of the pie crusts with foil to prevent browning, and bake for 25 minutes. Remove foil and bake for 25-30 more minutes or until filling is bubbly and pastry golden. Cool on a wire rack, and serve while warm.


August 16, 2011

Mini Peanut-Crunch Ice Cream Sandwiches

I really went MIA there for a few weeks. Sorry. You see, we decided to move, then had to find a new house, then we actually had to move. And that means weeks of packing and then unpacking again. Needless to say, I am exhausted, and have just begun to use my new kitchen. Hurrah! How I did miss the stove.

These are some goodies that don't require the stove. On the contrary, they require only the freezer.

Start with a pint of ice cream. Not frozen yogurt, but ice cream, the good stuff.
I used chocolate gelato. You want it to be firm enough to hold its own. Got it? Good.

Now finely chop a handful of roasted peanuts. Put them in a small dish.

Take a box of vanilla wafers, a spoon, and get to work. Spoon a heaping tablespoon of ice cream and spread it high and evenly on one vanilla wafer. Top with a second cookie and gently press down to make a sandwich.

Roll the sides of the sandwich in the peanuts. Peanuts should be sticking to the ice cream. Perfect! Now place the cookie gently in a plastic tupperware and into the freezer, keeping the tupperware open for easy access as you add cookies.

Repeat until one of your ingredients are gone. Now cover the cookies and freeze overnight. The next day they will be firm, yet gently yielding when eaten, with deliciously nutty crunches in every bite. The best part is that the vanilla wafers get even better with time, as they become softer.

Enjoy these frozen few-bite treats as often as you like! They're a perfectly portioned snack or dessert, waiting and ready for those warm nights when the stove is taking a rest.

July 18, 2011

Crispy Falafel with Tangy Yogurt Dressing

I had never made falafel before this, and in fact, I had only eaten falafel once. That was just a tiny, hesitant taste taken off a friend's place. To be honest, the idea of falafel was strange to me. What were these mystery nuggets that claimed to be made of chickpea? As much as I expected not to, I liked what I tried.


Hot summer nights call for dinners that are light and crisp, but hearty and interesting, as this falafel-salad is.

It's okay to lightly fry the falafel in oil. After all, these spicy, fragrant, and crispy nuggets are nesting atop a bed of healthy greens. The falafel's dominant flavors of smoky cumin and earthy turmeric instantly brighten with the zing of lemony yogurt sauce. Here, I drizzled the whole salad with generous dollops of the cool and creamy dressing, which is healthy and high in protein due to its yogurt base and takes barely a minute to whip together.

Admittedly, the only reason I ventured to try this recipe was that I had a bag of chickpea flour I wanted to get rid of. I am so glad I tried these falafel, though. Eating this salad was fun, and delicious, too. I know I'll be making them again, so it looks like I'll be buying more chickpea flour to replenish that supply I had wanted so badly to finish!


Crispy Falafel Patties: makes about eight 3-4 inch patties, or enough for 2-3 dinner salads.

1.5 cups chickpea flour plus extra for dusting
1 T. sea salt
2 t. cumin
1.5 t. turmeric
1 T. crushed garlic
1/4 cup hot water
1 t. baking soda
1 T. chili pepper, ground
1 t. mustard seed (a dollop of regular mustard will suffice)
1 t. garam masala
1 t. fresh ginger
2 T. finely chopped white or yellow onion
1/2 cup frozen spinach, defrosted and drained well

Vegetable oil for frying
Chopped lettuce and diced plum tomatoes for salad

Mix all of the ingredients except for the garlic, ginger, onions, and spinach in a bowl. Add the hot water and stir. Mix in the garlic, ginger, onions, and spinach and stir. Place in the fridge to cool until the mixture is slightly firm and easier to work with. Preheat a large skillet to medium heat with about 1 inch of oil. Meanwhile, dust a work surface with extra chickpea flour and scoop out a few tablespoons of mix at a time to form patties that are about 3/4 inch thick and 3 inches wide. Gently lower the patties into the oil and lightly fry until golden brown, about 3 minutes per side. Meanwhile, mix the yogurt dressing, as follows. To assemble salad, place diced tomatoes atop lettuce, then top with 3-4 falafel patties and drizzle generously with dresssing.

Creamy yogurt dressing: 6 oz. container plain non-fat yogurt, zest and juice of 1/2 a lemon, 1 t. dried basil or dill (or fresh if you have it), salt and freshly ground pepper to taste. Whisk together until well blended.

Chef's Note: Next time I may try a hybrid of fresh chickpeas coarsely chopped in the food processor, and chickpea flour. This combination may lend itself to a somewhat meatier texture.

Breakfast Delight: Blueberry-Wheat Power Muffins

I am taking a break from my updates about eating in Italy because I've been cooking too many other things I want to share. But I'll be back with that, because boy have I got the best of recipes straight from the Amalfi Coast (think freshly made gnocchi in bright lemon-basil cream sauce, homemade vegetarian ravioli in pumpkin sauce, and delightful lemon cream desserts).

In the meantime I thought I'd share my daily breakfast. I recently started a new job and what I don't have time for is a sit-down bowl of cereal or oatmeal. What I do have time for is a deliciously soft, huge nugget of muffin. Healthy muffin that is. I can't imagine starting my day any other way.


These muffins are incredibly satisfying, and at the same time, extremely healthy. Healthy muffins can often turn out like dense, inedible hockey pucks... These are not so. They have a light, moist crumb, and a spongey texture laced with bursting and juicy fresh blueberries. Crunchy walnuts are the perfect hearty topping (no fattening sugar streusel here).


Plus, mine are baked in heart-shaped muffin molds, which brings just a little smile to my breakfast.


Oozing, fresh blueberries pop in every mouthful....


These muffins are made entirely from white-wheat flour, which I buy at Trader Joes, which is high in fiber and nutrients. Each muffin also contains barely any fat and is low in sugar, as the recipe uses two whole cups of yogurt for its sweet flavor and moisture. These are no-guilt muffins with all of a muffin's delights.


It's definitely a breakfast my day (and time crunch) can get behind.

Blueberry-Wheat Power Muffins:

Ingredients:
2.5 cups white-wheat flour
1 cup quick cooking or instant oats
1/2 cup granulated sugar
1 T. baking powder
1 t. baking soda
1/4 t. salt
2 t. cinnamon
4 T. ground flaxseed (optional)
2 6-oz. containers vanilla non-or low-fat yogurt
1 6-oz. container blueberry non- or low-fat yogurt
1/2 cup reduced-fat milk
3 T. canola oil
2 t. vanilla extract
1 large egg
1.5 cups fresh blueberries
walnut pieces

Directions:
Preheat the oven to 350 degrees. Place cupcake liners in cupcake tin and lightly spray with non-stick cooking spray. Sift together all dry ingredients in a large bowl. Make a well in the middle of the dry ingredients. In another bowl, whisk together all of the rest of the ingredients (wet), except blueberries and walnuts. Pour the wet mixture into the dry mixture well and mix lightly until barely incorporated. Gently fold in the blueberries.

Portion out tablespoons of mixture 3/4 of the way high in each cupcake tin. Lightly press walnut pieces on top of each muffin batter and bake until lightly golden and puffy, about 20 minutes. Cool on a wire rack 5 minutes, then carefully remove each muffin and cool completely on the rack.

July 6, 2011

Pasta Carbonara: A Beautiful Indulgence

While traveling in Italy we ate as many different bowls of Pasta Carbonara as places we visited. Carbonara refers to pasta traditionally tossed in the pan with egg yolks, parmesan cheese, and bacon or ham. Is there anything to complain about with that combination?

Here are two of my absolute favorites... these are the two carbonaras that made my heart truly skip a beat with every bite. Interestingly, they are both very different from each other.

The first is a creamy, utterly indulgent carbonara from enjoyed on Ischia:

Oh how wonderful it was! Each perfectly al-dente noodle of linguine was thickly coated with parmesan cream and speckled with fresh parsley. Each bite hid huge hunks of smoky, savory guanciale. Yes, this portion was pretty much family-sized, and yes, I did eat the entire plate myself. 

Then, my other favorite carbonara was vastly different and yet still almost caused me to cry out in declaration that it was, indeed, the ultimate and best carbonara. But, I still felt I could not forget the carbonara I had enjoyed in Ischa. And so they ended in a tie.

This carbonara was eaten at Hosteria Romana, our last meal in Rome. The restaurant is praised here in the New York Times, and now praised here again on Pumpkin Prose. Everything from our quirky waiter (who had enough antics up his sleeve to star in his own Broadway show) to the Italian locals enjoying a Friday night dinner made it a meal to remember. The carbonara came piping hot, and as the Times suggested, "originale". That is, served in the bowl the pasta is tossed in. 


The deep orange yellow sauce was strikingly beautiful (but not too beautiful to eat). Tiny chunks of crisp and crunchy, almost burnt, and intensely salty bacon had Matt and I rolling our eyes to heaven in disbelief and wonder. I was delighted when the bowl "originale" was served to me. I even made the ultimate sacrifice and generously shared the end of the bowl with Matt (that is love!)

It was clear that this carbonara focused on a yolk-heavy sauce base while the carbonara in Ischia focused on the parmesan and may have even used cream. I did discover that while I loved both, I do enjoy carbonara best when it is served with a flat and wider noodle such as lingine or fettucine rather than spaghetti. This way, the sauce is able to cling to the surface of every noodle, which truly is the ultimate goal of this Italian dream dish.

Basic Pasta Carbonara: (adapt as you like)
1/2 lb. fresh fettucine or linguine (store bought or home-made)
8 oz. pancetta or guanciale, cut into 1/4 inch slices
2 whole eggs or 4 egg yolks, room temp.
6 tablespoons or more Parmesan or Pecorino Romano cheese
1 t. freshly ground pepper
2 t. salt
2 t. butter
2 t. olive oil
Fresh parsley, chopped

Heat a pot of salted water over high heat. When the water boils, add the pasta and cook until barely al-dente. Meanwhile, melt the butter and olive oil over medium heat in a large saute pan, then add the pancetta and cook until it is barely crisped. In a bowl, whisk together the eggs, cheese, and pepper. Keep the bowl near the stove to keep the eggs warm. When the pasta is just al-dente, reserve a small amount of cooking liquid and drain the rest. Add the pasta into the saute pan with the pancetta, then pour the egg mixture in at once, tossing very quickly to combine. The sauce should be thick and creamy. Add more cheese and pepper, and some reserved cooking liquid if necessary, to thin the sauce. Top with parsley. Eat immediately.

June 26, 2011

A Pizza A Day

While M and I were honeymooning in Italy we ate at least one pizza a day. Here, I highlight our favorite pies. Perhaps it's partly the hunger brought on by the activity and excitement of travel, but this pizza tasted fresher, lighter, crisper, and far more delicious than any I've ever had in the states (no offense to Pepe's or Modern in New Haven or Colony in Stamford).

Perhaps these pies will give you ideas for your own homemade creations! One thing they are sure to do is bring on major cravings....

A popular pizza, offered almost everywhere and which we enjoyed in multiple cites and restaurants has red sauce, mozzarella and fresh prosciutto:


The above pie was enjoyed in a quiet but beautiful restaurant on the Island of Ischia, where we sat along a huge wall of sliding glass windows and looked out over the ocean while having pizza and pasta carbonara. We happened upon the restaurant on our way to the beach. We were starving, and it was open. It ended up being one of our best meals in Italy. It was unexpected and perfect.

Next I'll share the most delicious pizza we ate in Italy. It was at Da Bafetto in Rome, a pizzeria made famous by its thin, crisp, and inexpensive pies. It's a favorite for both locals and tourists alike. It's certainly a no-frills place. They usher you in, demand your order, and throw your pie at you as fast as possible. Don't expect to linger, and you may have to share your table with other diners, as we did. At least our dining companions were able to take this photo of us:


We had our pie with red sauce, mozzarella, and slices of spicy salami. It was everything I had hoped it would be and more. We stopped at Da Bafetto on our last night in Rome, right before heading to another restaurant where we actually had dinner reservations... after all, we had to try this pizza before leaving Rome! I am so glad that we did.


The final pies I felt were worth sharing are those we enjoyed in Ravello, a tiny town on the top of the hillside overlooking the Amalfi coast. I was feeling absolutely nauseous from having been driven from Positano on the famous cliffside "Amalfi Drive." I needed to eat, and fast. I ordered a white pie with mozzarella, potatoes and mushrooms:


The mushrooms were juicy, the potatoes tender, and the cheese plentiful and oozing. I didn't come up for air until I had finished the entire pizza.


But it was M who ordered the most amazing pizza of all. His pie had red sauce, mozzarella, and was completely covered in FRENCH FRIES.


Every single fry was perfectly crisped on the outside and soft-savory potato on the inside... It was unbelievable. I didn't know it was possible to pull of something that satisfied the American and Italian palates at the exact same moment. I simply could not keep my fork out of M's plate. It was too irresistible.


Now that I've shown you enough carbs to last you a few days, I'll be back to share some of the favorite pasta dishes I ate. The pizzas we ate on our travels in Italy were all unique and every restaurant made theirs in a slightly different way than the last, but each pie tasted wonderfully fresh, the way a pizza should. 

On occasion, I find my mind wandering mid-workday to what it tasted like to take a piping hot, smothery bite of pizza in Italy. Particularly, these favorite pizzas I've shared with you here. While I am not sure I'll be as adventurous as topping my pizzas with french fries in the future, I am glad I have enough delicious memories to last me a lifetime.

Links

Related Posts Plugin for WordPress, Blogger...