Showing posts with label Vegetarian. Show all posts

November 23, 2013

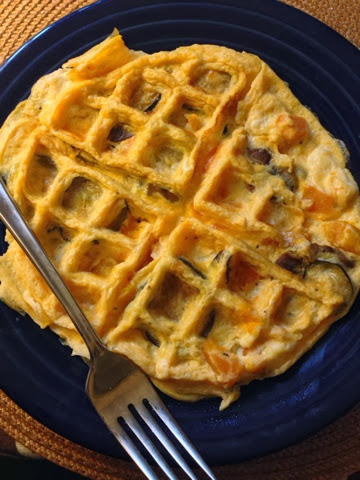
Waffle-Maker Fritatta


I tried it! Using my waffle maker for eggs that were deliciously fluffy, veggie and cheese laden, and piping hot.

This was not my idea -- I saw it this past Wednesday morning on a segment of the Today Show. I am so glad I saw it because I was about to toss my waffle maker for lack of versatility. It seemed to take up too much space while lacking versatility. I'm kind of just over one-purpose gadgets (except for you, coffee maker).

Now I know my waffle maker is a secret multi-purpose gadget! I'm so excited, and so is the waffle maker since he won't end up on the curb in this week's trash pick up.


Ingredients:
2 large eggs, beaten together with 1 T. water and a pinch of salt
1/2 cup of cooked veggies of choice (or well diced raw veggies)
2 big tablespoons crumbled feta cheese
Non-stick spray 

Directions: preheat waffle maker (I used setting 4) then spray the top and bottom with non stick coating. Meanwhile, whisk together the eggs, veggies, and cheese. Pour evenly over the waffle pan and move the veggies around if they all landed in one spot. Close the top gently and don't turn it over, just let it cook an both sides. After 3-4 minutes you've got a wonderful, quick Fritatta to enjoy.

September 6, 2013

Cheesiest Cottage Cheese Baked Rigatoni


Oh, hi there. Have you noticed the weather cooling down?
 
Each day this week a breezy, cool evening sinks into a downright chilly night, which blooms into a crisp, sunny morning.
 
I have to put my sweater on to walk the dog. It's delicious.


I get excited in my bones for the change of the seasons. I'm sure you do, too.
And I get all giddy at the thought of piping-hot comfort food dinners. Like this one.
 
Don't call it low-fat, that's a term that makes me say, "boo, no flavor." It's got the hiss of that word "insipid." Call it lusciously sensible. There's no sacrifices here, and due to pureeing the cottage cheese into a ricotta-like texture, you don't even have to mention that you used the cheese that comes with a bland, bad rap and usually gets a boost from an odd pairing with pineapple.
 
Nope, let's just not mention it. Except for putting it smack in the recipe's title.


Your ooey, gooey secret's safe with me.

Cheesiest Cottage Cheese Baked Rigatoniserves 6-8

First, prepare the sauce. Of course, you can always use a quality jarred:
Sauce: In a medium saucepan, heat 2 T. olive oil over medium heat. Add 1/2 a largely diced red onion. Saute until slightly golden, 5-6 minutes, then add 6 cloves minced garlic and stir. Push onions and garlic to the sides to make a clearing in the middle of the pan, and add a heaping tablespoon of tomato paste. Caramelize the paste a minute, then add 1 t. dried basil, 1/2 t. dried oregano, 2 t. kosher salt, and 1 t. dried red pepper flakes. Stir, then add 1/4 cup red wine, 2 t. white sugar, and 1 28-oz. can Tuttorosso crushed tomatoes w/basil. Simmer 1 hour on low, stirring occasionally. Add up to 1/4 cup pasta water after cooking to thin it out a little bit, and season with salt + pepper to taste.

Then, boil 1 lb. rigatoni to very al-dente, about 4 minutes less than the suggested time on the bag. Drain. Meanwhile, prepare the cottage cheese "ricotta":

Cottage Cheese Ricotta: Food process together 1 16-oz container lowfat cottage cheese, 2 large eggs, a pinch nutmeg, generous pinches of dried basil, salt, pepper, and 3 T. grated parmesan cheese.

Shred: 1/2 lb mozarella cheese and 1/2 lb fontina cheese
Have some torn fresh basil on hand, too!

Once you've got all of the above on hand, coat an 8X8 inch baking dish with oil. Add a few scoops of red sauce to bottom of dish and spread. Add 1/3 of the pasta, 1/3 white sauce, and 1/3 shredded cheese. Repeat this, ending with a last layer of white sauce topped with shredded cheese and fresh basil. Spray top generously with cooking spray and bake 375 degrees covered with non-stick coated tin foil, then uncovered for 10-15 minutes or until bubbly and browned. Enjoy!

August 12, 2013

Pearl Couscous with Mint, Basil, and Gigantes


This recipe is for everyone with an abundance of summer herbs. Please, please don't let your beautiful basil or mint overheat in the sun or go to seed -- chop those beauties and toss them into this light, fragrant pasta.

The whole dish is ready in minutes, with the couscous taking less than ten as it simmers away in broth. Chop the herbs while the pasta plumps, then stir in veggies and beans, salt to taste, and sprinkle with some feta cheese if it's on hand.

Since I used frozen corn and peas, this dish is largely a pantry and herb garden creation. Perfect for busy weeknights when flavor can't be sacrificed for time and relaxation.


Ingredients: (serves 2)
1 T. olive oil
1/2 large Spanish onion, largely diced
2 cups chicken broth (vegetable broth for vegetarian)
3/4 cup pearl couscous
red wine dressing (recipe follows)
1 cup frozen corn
1 cup frozen peas
1 can gigante beans, rinsed and drained
1/3 cup basil, chopped
1/3 cup mint, chopped
salt and pepper to taste

red wine vinegar dressing: 1/4 cup red wine vinegar, 2 T. fresh lemon juice, 1 T. honey, 1/4 t. freshly ground black pepper, 1/2 t. salt, 1/2 cup olive oil whisked together)

Directions:
Bring a large saucepan to heat over medium low, then add the olive oil to coat. Add the chopped onions and cover, stirring a couple of times, until turning just golden. Pour in the chicken broth and couscous and cover, turning up the heat to bring to a boil. Reduce to a simmer and stir occasionally. When the couscous is tender but still firm to the bite add the red wine dressing and stir. Add in the frozen corn, peas, and beans and heat through. Stir in the basil and mint and salt and pepper to taste. Add feta cheese on top if desired and serve warm or room temperature.


June 4, 2013

Fried Brown Rice with Tofu


That tofu in the fridge was creeping toward its "use by date." It was in stiff competition with the remaining BBQ leftovers from Memorial Day -- packages of hot dogs, hamburgers, buns, all begging to be cooked and eaten -- along with leftover pizza and pastas from a night out to dinner where Matt and I managed to grossly over-order, as if we might never eat again.

There simply weren't enough dinner-times in the week to give all those items a rightful spot in the repertoire! Sorry burgers and dogs, you're getting re-located to the freezer for use another day. Pizza, you'll get taken for lunch until you're done. As for dinner, it's tofu's time to shine.

It has been a while since we had Chinese food so I decided on fried rice. It's a one dish meal that seemed simple to make while satisfying major cravings for takeout. Add in tons of healthy veggies and protein packed tofu, and it was a dinner winner.

I think you'll really enjoy  my version, which uses the more toothsome and nutty brown rice instead of traditional white. Brown rice also has more nutrients, so it's a better bang for your meal buck. The coating on this fried rice is a bit more robust, too, with the use of dark soy sauce.

Needless to say, I made heaps of it with the intention of creating (yet more) leftovers.... and we ended up with barely any! That empty fry pan speaks volumes!


Fried Brown Rice with Tofu: serves 4-6
Ingredients:
3 cups uncooked brown rice, rinsed thoroughly
vegetable oil (keep the bottle handy)
1 package extra-firm tofu, rinsed and patted dry
2 tablespoons regular reduced-sodium soy sauce
3 eggs + 1 tablespoon water, lightly beaten
1 teaspoon Sriracha, divided
1 white onion, cut into large dice
8 garlic cloves, minced
1 bag of frozen mixed Chinese vegetables
2 cups frozen peas
1/4 cup dark soy sauce
1/4 cup Mirin
2 tablespoons hoisin
1 tablespoon (plus more to taste) sesame oil
salt to taste

Directions:
Cook the brown rice according to the package directions. I used a rice cooker, but a pot works just as well. Once the rice is just-cooked and chewy in texture, spread out on a baking sheet to cool and dry out slightly.

While the rice is cooking, prepare your tofu by cutting it into 16 equal cubes and pressing to dry. In a small bowl, mix the low-sodium soy sauce and 1 teaspoon of Sriracha. Toss the tofu in this mixture and set aside to absorb.

While your rice is cooling, in a very large skillet or a wok, heat 2 tablespoons oil over medium-low heat. Add the eggs and cook as a flat omelet for 2 minutes, then break up into pieces. Remove from skillet into a medium sized bowl and set aside.

Heat the skillet to medium-high again. Add about 1/4 cup oil, or enough to generously coat the pan. Add the tofu and allow to cook until browning and crisping on the sides, stirring only every few minutes. Add the onions halfway through and allow to cook until golden and soft. Add the garlic and stir one minute. Remove tofu and onions to the bowl with the eggs.

Heat another 1/4 cup oil in the skillet and now add the rice, frozen vegetables, peas. Stir often, allowing the rice to crisp and the vegetables to heat through. Whisk together the dark soy sauce, Mirin, hoisin, sesame oil, and remaining Sriracha. Pour over the rice and stir to coat, salting to taste, as well.

Add the tofu, onions, and eggs back in and stir to combine well and heat through before serving.

March 25, 2013

Warm Harvest Fruit & Nut Wild-Rice Salad


This wild-rice salad is warm, hearty, and full of protein and nutrition. It's a one-bowl, one pan meal that's ready in mere minutes. I love healthy but sumptuous dishes like this, where you can serve yourself a giant, heaping bowl and scoop up every last bite without regret. It's food at its best, doing what it should do -- fill you and energize you.

I adore this dish because it's a great mixture of flavors and textures. It's got sweet and chewy dried cranberries, the earthy crunch from toasted pecans, hunks of soft and juicy chicken, crisp asparagus, and nutty, wonderfully toothsome wild rice. Plus the zing of chopped mint on top, balanced with the creaminess of feta cheese, is far far better than finding the prize in box of cereal for dinner.


Use your favorite vinaigrette dressing or make your own. Play with goat cheese versus feta, maybe toss in some chopped dried apricots with the cranberries, or use slivered almonds for your crunch factor. Omit the chicken for a great vegetarian dish. 

Like I always say, the kitchen is for playing and personalizing... Don't take it too seriously. After a long day at work, it's time to find delight in dinnertime.


Warm Harvest Fruit & Nut Wild-Rice Salad: serves two generously
Ingredients:
1 T. olive oil
1 boneless skinless chicken breast, cubed (optional)
1 cup wild rice
4 cups water
1/4 cup dried cranberries
12 spears frozen asparagus, defrosted and cut into 1" pieces
1/2 cup chopped red onion
1/2 t. Chinese 5 Spice
2 T. creamy vinaigrette dressing of choice
salt & pepper to taste

1/3 cup crumbled feta or goat cheese
1/4 cup toasted pecan pieces

1 t. chopped mint leaves

Directions:
In a medium saucepan over medium heat, preheat olive oil. Add the chicken breast and cook 4-5 minutes or until just cooked through. Remove from heat and set aside. Add the wild rice and stir 1 minute to toast, then pour in the water and bring to a boil. Reduce to a simmer and cover to cook as directed, about 40 minutes. 20 minutes in, add the dried cranberries. When the rice is barely done cooking, add the asparagus, onion, diced chicken and stir to heat through. Add the five spice and dressing, then salt and pepper to taste. Stir in the cheese, then divide into two bowls. Top with pecans and mint leaves and serve warm.

March 10, 2013

Homemade Soft Pretzels


I might not believe someone if they told me these soft-baked pretzels were super easy to make. I might think, Who makes soft-baked pretzels unless they have an inordinate amount of time on their hands? 

I'd probably be super skeptical of the whole thing, though very interested. But since I made these soft, chewy, salty pretzels myself for our German-inspired book club menu, I can vouch first-hand that they are in fact simple, streamlined, and quite easy -- so, listen up beginner cooks!

For all the writing and talking I do, it's surprising that I'm actually a "show, don't tell" type of learner. I'd rather see what I'm getting into before diving into the task, so I'll do the same for you here. You'll see how easy it really is to make these soft-baked pretzels. The only thing I can't share with you first-hand is the scrumptious and warm end result!

So gather all your ingredients....


Test that water temperature to be about 115 degrees....
I've killed yeast too many times for that!


Add the water, sugar, and kosher salt in the mixing bowl and stir to combine, then pour the yeast on top. 


Add the flour and butter and let the dough hook do its work. 
Put away you ingredients in the meantime. Hum a tune. Wipe your counter.

When that dough is nice and smooth, take it out of the bowl, spray the bowl with cooking spray, return it to the bowl and cover it to let it rise in a warm place.


Get ready for the fun part!!

Divide that dough up into 16 pieces, then roll each piece out into a rope and cross each end over each other to make cute little pretzel bows. 

Guess what? It doesn't matter if they're not perfect. Or if they're pretzel nuggets, rolls, or rods instead.

I put mine on a baking sheet and froze since I wouldn't be baking them until a couple days later. Once they were frozen on the sheet I piled them all into a plastic freezer bag, but you can just skip that step and put them straight onto an oiled baking sheet instead. 


Preheat your oven to 450.... Get your egg wash ready and your Kosher salt on the side....

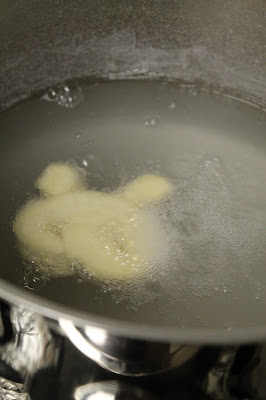
Pour 2/3 cup baking soda into 10 cups of boiling water. Check out that crazy foam!!


Drop those pretzel babies into the bath one at a time! All right, I admit my impatience made me do it two at a time.

Once they float to the top, rescue them back onto the baking sheet.


Once they're all out of the bath and back on the baking sheet, work your egg wash magic and sprinkle with salt.


Bake for 15-18 minutes or until deep golden, or looks like the picture below....

Cool on racks for 5 minutes before gorging on them while they're still hot!


See, you can do it, too! It's well worth the effort (pretend it was very involved and arduous, and you'll impress your friends and family to no end).

Maybe you'd like some spicy brown mustard with that? Cheese dip? Pants with an elastic waistband?
I'd recommend being prepared with all of the above.


Homemade Soft-Pretzels: makes about 16 palm-sized knots.
Ingredients:
1.5 cups water, warmed to about 115 degrees
1 T. sugar
2 t. kosher salt
1 package active dry yeast
4.5 cups all-purpose flour
2 oz. butter, melted
Vegetable oil spray
10 cups water
2/3 cup baking soda
1 large egg yolk, beaten
extra kosher salt

Directions:
Combine water, sugar, and kosher salt in the bowl of a standing mixer with dough hook attached. Stir to combine, then add the yeast on top and allow to foam, about 5 minutes. Add the flour and butter and mix on low speed until well combined.

Change to medium speed and knead until smooth and pulling away from sides of the bowl, about 5 minutes. Add more flour, 1 T. at a time, if the dough seems too sticky. 

Remove the dough from the bowl, spray the bowl with cooking spray, and return the dough to the bowl. Cover with plastic wrap and allow to rise in a warm place for about an hour or until doubled in size.

Preheat oven to 450 and line 2 baking sheets with parchment paper. Lightly spray with cooking spray. 

Bring 10 cups water to a rolling boil. In the meantime, divide the dough into 16 pieces and roll into a long rope. Hold each end of the rope and cross them over each other to create a pretzel knot. Press the center of the knot to adhere dough and ensure it keeps its shape in the boiling water. Place on the baking sheet, and repeat until all 16 are created. 

Pour 2/3 cup baking soda into the boiling water, then add the pretzels 1-2 at a time. Remove from the water after 30 seconds or it rises to the top. Return to the baking sheet. Brush each pretzel with egg wash and sprinkle generously with salt.

Bake for 15-18 minutes, turning to evenly brown if necessary. Cool 5 minutes on a wire rack, then enjoy! Best eaten immediately, but if you must store them do so in a brown paper bag. 


March 6, 2013

Feel-Good Carrot Cake with Cinnamon-Pecan Frosting for One


It was exactly what I needed on this terrible, horrible, no-good, very-bad, day.  

Oh, and it was ready in just minutes! And I made it in the microwave! Best yet, it was actually healthy... because who needs more guilt or upset on a no-good-bad day? On the emotional side, I contemplated stopping by the bake shop on my way home from work, promptly changing into my PJ's, and gorging on sweets on the couch. But the rational side of me thought this idea through... I realized a sugar binge would make me feel even more yucky. 

Sometimes being an addictions counselor is just plain tough!

I only needed good feelings, delicious indulgence, and the comfort that could only be provided by layer cake.  But how? I Googled around, and ultimately adapted an already healthy and fast carrot cake recipe into this recipe below. 


I included everything I love about carrot cake: the sweetness of carrots and brown sugar, the tropical tang of pineapple, the hint of coconut... and obviously the best part: thick cinnamon-pecan cream cheese frosting! 

I'm sitting down to my personalized plate of layered carrot cake now, and I'm thinking about how my day just got so much better. No guilt, emotional spikes, or regret in sight. I can leave all of that at the office., thank you! Tonight's dessert experience is pajama attire only. 

Feel-Good Carrot Cake for One
Ingredients:
2 T. white whole wheat flour
2 T. white flour
1/2 t. cinnamon
1/4 t. pumpkin pie spice
1/8 t. salt
1/8 t. baking soda
1/4 t. baking powder
1 packet stevia or Truvia
1.5 T. dark brown sugar
1 T. vegetable oil
carrots and pineapple, food processed into 1/3 cup worth
(I used baby carrots I had on hand, and frozen pineapple chunks)
1 T. shredded coconut
1 T. milk
1/4 t. vanilla extract
1 egg white, lightly beaten

Directions:
In a small bowl combine all dry ingredients through dark brown sugar. In a medium bowl, add all wet ingredients through egg white and stir to combine thoroughly. Add the dry ingredients to the wet and stir to barely combine (do not overmix). Spray two small ramekins (one is fine, too!) with cooking spray and evenly divide the batter between them. Microwave on high for about 3 minutes, using less or more time depending on your microwave wattage, until the cakes are firm. Remove and allow to cool before gently prying out of the ramekins. Frost with frosting below, and eat immediately!!

Cinnamon-Pecan Frosting:
1.5 t. Truvia or more to taste
1/3 cup 2% or whole-fat Fage greek yogurt
1 T. cream cheese, room temp
a couple drops vanilla extract
pinch cinnamon
1 T. chopped pecans

Directions: Beat together the Truvia and Greek yogurt, then beat in the cream cheese and vanilla extract. Stir in the cinnamon and pecans and slather on your cake!


March 3, 2013

Whole-Wheat Parmesan Croutons


In 20 minutes you'll arrive at the perfect, fresh, and healthy topping for any soup or salad. These whole wheat croutons are wonderfully crunchy, flavorful, and make use of the ends of the loaves of sandwich bread that might otherwise go to waste.

Whole-Wheat Croutons: makes about 2 cups
Ingredients:
4 slices of whole wheat bread (stale, or the ends, it doesn't  matter!)
4 T. olive oil
1/2 t. salt
1 T. grated Parmesan cheese
1/4 t. crushed dried basil

Directions:
Preheat the oven to 325 degrees. Stack the bread and cut it into about 1" hunks. In the bottom of a large bowl, add the olive oil, salt, Parmesan  and basil and stir to combine. Add the bread to the bowl and stir to coat evenly with the olive oil. Spread evenly on a baking sheet and bake 10-15 minutes, then stir, and bake another 10-15 minutes or until crispy and golden. Serve immediately and store any leftovers in an airtight container for up to 3 days.

February 21, 2013

Warm and Creamy Quinoa Salad with Chickpeas and Mint over Chopped Spinach


This creamy quinoa is the best of sweet and salty. Cardamom, mint, and dates add the sweet notes, while feta cheese, chickpeas, toasted nuts, and onions give it a savory balance. I loved serving this hot, velvety quinoa over finely diced spinach leaves... Giving it all a stir in my bowl brought the flavors together and gently wilted the spinach to the perfect consistency. 

Best yet, dinner was on the table in about 25 minutes. I'm looking forward to keeping this as a weeknight staple, swapping out the dates for dried cranberries, raisins, or currants, and interchanging different nuts, beans, and cheeses. Enjoy a big warm bowl as a respite from the work week and the winter cold!


Ingredients: serves 2
1/4 cup pine nuts or cashews
1 T. butter
3 cloves garlic, pressed
1/4 heaping teaspoon ground cardamom
2/3 cup quinoa, rinsed and drained
1 cup chicken stock (vegetable for vegetarians)
1 cup water (+  more as needed)
6 pitted dates, chopped
2 T. cream cheese
1/4 to 1/2 cup feta cheese (or goat cheese)
1/2 cup chickpeas
1/2 cup diced red onion
1/8 cup chopped fresh mint
salt + pepper to taste

2 T. olive oil
2 lemon wedges or 2 t. fresh lemon juice
4 cups finely chopped curly leaf spinach

Directions: Heat a small saucepan over medium heat and toast the nuts until just golden and fragrant. Set aside. Turn heat down to medium low and melt the butter, then stir in the garlic and cardamom for one minute. Add the quinoa, chicken stock, and water. Cover and turn to a boil, then add the dates and reduce to a simmer for 15 minutes or until the quinoa has softened and a white germ is visible around the outsides.

Meanwhile, divide two cups each spinach in two bowls. Drizzle with 1 T. olive oil each and 1 lemon wedge or t. of lemon juice each.

Then, into the quinoa stir the the cream cheese, feta cheese, then the nuts, chickpeas, red onion, and mint. Allow to warm through thoroughly. Season to taste with salt and pepper and serve atop the spinach in the bowls.

February 17, 2013

Chocolate-Mint Bread: A Healthy Answer to Thin-Mint Cravings


This year for Valentine's Day, Matt was on call at the hospital. This meant that when he quietly crept out of the house in the dark, early hours of Valentine's morning, I wouldn't see him again until two days later. Of course I wanted to leave him a treat that would make him think of me during his long, exhausting, and hunger-inducing shift.... A snack that would be like a giant Valentine's hug to both the stomach and heart.

Cue these delightfully moist, rich chocolate-mint breads. I baked them in small heart-shaped spring-form pans that I use for all love-related baking. The batter an easily be used in any size from cupcake to loaf. In fact, I used some left over batter to pop out a few cupcake sized breads that I ate warm out of the oven. I needed to taste test and make sure that they were as delicious as I hoped they would be!


You might be thinking, "chocolate-mint bread? You mean cake, right?" Nope. Bread it is. It's got the perfect hint of sweetness from a touch of sugar, as well as chocolate chips folded into the batter, but otherwise this bread is wonderfully spongy and dense like any other breakfast loaf... Oh, and I've been withholding the best part. It's healthy. 

What? I don't want to contribute to fatigue, weight gain, or clogged arteries in my husband? Surprise! Let's feed the man a snack he can really dig into and never know it's made without any fats from oil or butter.

Chocolate and mint are one of M's favorite flavor combinations. This bread is spot on. The chocolate flavor pervades, while the little bit of peppermint extract hits the right cooling note there at the end. Every bite is filled with the flavor of classic Thin Mint cookies, just in a soft, super-comforting texture.

And isn't that what love is? Comforting, cool, sweet, delicious, and good for you.


Chocolate-Mint Bread
Ingredients:
1 cup plain unsweetened Greek yogurt
1/2 cup granulated sugar
2 eggs
1 T. pure vanilla extract
1/4 t. peppermint extract
1/4 cup milk (I used 2%)
1/2 cup white whole-wheat flour
1/2 cup minus 2 T. white flour
2 T. cornstarch
1/2 cup unsweetened cocoa powder, plus extra for dusting pan
2 t. baking powder
1/2 t. baking soda
1/2 t. salt
1/4 to 1/3 cup each of semi-sweet and dark chocolate chips

Directions: Preheat oven to 350 degrees. Spray or wipe pan of choice with cooking spray, then dust with cocoa powder. In a medium bowl stir together the Greek yogurt, sugar, eggs, vanilla and peppermint, and milk. Combine thoroughly. In a large bowl combine white-wheat flour, white flour, cornstarch, cocoa powder, baking powder, baking soda, and salt. Make sure they are blended completely, then make a well in the dry ingredients and pour in the wet. Stir to combine, making sure not to over-mix. Gently fold in the semi-sweet and dark chocolate chips.

Pour into the pan and even out the top with a spatula, then drop the pan on the counter from about 6" high a few times to release air bubbles. Bake 20-25 minutes for cupcakes or mini-loaf pan, and 45-50 minutes for a large loaf. Cool 10 minutes on wire rack in the pan, then release from the sides with a knife and cool completely on a wire rack. Wrap tightly in plastic wrap to store.

February 2, 2013

Pasta with Spicy White Clam Sauce


I'm going to apologize in advance for the rather gnarly-colored photo of this dish. I was in a rush to eat it (hungry, dinnertime, delicious, etc.) so I carelessly snapped a picture under the harsh lighting of my kitchen counter.

But it was oh-so-hot and tasty so I am sorry, friends, but the poor picture was worth the rush. I do hope that you make it despite lack of photo appeal. It was incredibly wonderful and amazingly easy. I'm very, very glad that I finally cooked this dish even though the canned clams had been sitting in my pantry for about two years now (don't worry, expiration date was like, 2019 or something!).

While growing up I'd get very excited when my mom would crank open a couple cans of white clam sauce to pour over linguine. There was something very luxurious about the buttery, white-wine-tinged, chewy clam laden sauce that I absolutely adored. I'd beg her for it. And then, just like that, I grew up and never had white clam sauce again. It also may have had something to do with the fact that my husband really does not enjoy dinners with fish in it. I felt unable to recreate my childhood classic out of fear that he'd starve at dinnertime.

Last week, I decided to risk his starvation. It had been far too long! Rather than open a can of sauce I cross-referenced a bunch of different homemade clam sauce recipes. It was too easy to be true, and all the ingredients were right there in my fridge and pantry. It's likely they're also in  yours. Simple canned clams steal the show here, but they are made truly divine with the backdrop of a velvety, savory white sauce.

Oh, and just in time for Valentine's Day, I should probably mention that clams fall under the "food aphrodisiac" category!

Pasta with Spicy White Clam Sauce: serves 4
12 oz. pasta of your choice
1/4 cup olive oil
1/2 large white onion, cut into 1" dice
3 large cloves garlic, minced
1 t. crushed red pepper (or more to suit taste)
1/4 cup dry white wine
1/8 cup cream or milk
1 t. Worcestershire sauce
1/4 cup freshly squeezed lemon juice
3 6-oz. cans chopped clams, drained with juice reserved
1 cup grated Parmesan cheese
1/2 cup freshly sliced basil
1 t. salt
1/2 t. freshly ground black pepper

Cook pasta in a large pot of boiling salted water until slightly more firm than al-dente (take about 2 minutes off the box-preparation time listed). Reserve pasta water.

Meanwhile, heat a large heavy skillet over medium heat. Add olive oil and saute' onions, covered, until golden and soft, 8-10 minutes. Push onions to one side of the pan and add the garlic and crushed red pepper. Allow both to bloom in the hot oil, 1 minute, then stir. Add white wine, cream, Worcestershire sauce, and lemon juice. Stir and bring to a rapid simmer. Add the pasta, then the reserved clam juice, and continue to simmer the sauce down a couple of minutes. Add pasta water to boost the sauce if necessary. Add the clams, Parmesan cheese, basil, salt, and black pepper. Stir, and adjust seasonings to taste. Serve immediately.


January 19, 2013

Pumped-Up Vegetarian Chili


Some vegetarian chilis are watered down, rather non-cohesive, and lack that savory heft of meat chili. 
This vegetarian chili is everything but.

I was on the search for a veggie chili that could stand up to its meaty counterparts, and I found it. It's loaded with nutritious ingredients that deliver on both flavor and texture, like lentils, soy chorizo, and creamy beans. By the way, I absolutely love lentils and had never thought to put them in a chili until now. It adds an earthy, chewy depth I'm officially hooked on. 

On a side note, one trick I use to make my chilis delightfully thick is to stir in refried beans. I didn't use that method here, but I still wanted to pass it along in case you want a foolproof short cut in time for Super Bowl Sunday.... It works every time, whether in beef, turkey, or veggie chilis. 

Enjoy getting creative with this chili -- use the basic method but feel free to adjust the spice level, toppings,  and even bean types, to what you enjoy the most. After all, the fun of cooking is in the flexibility, and the joy of eating is in the comfort of having exactly what you crave the most. 


Pumped-Up Vegetarian Chili: serves 8-10 
Ingredients:
4 dried de-arbol chiles
4 teaspoons dried oregano
1/4 cup walnuts, toasted
1/4 cup cooking oil
1 large red onion, diced
6 cloves garlic, minced
1 bell pepper, chopped
28 oz. diced tomatoes in juice
4 T. tomato paste

4 cups water
2 T. cornstarch

1-2 jalepeno chiles
8 oz. dried lentils, rinsed and picked over
1 can corn, rinsed and drained
1 can chickpeas, rinsed and drained
1 can canellini beans, rinsed and drained
1 package of soy chorizo (I prefer Trader Joe's brand)
3 T. soy sauce
1 T. ground cumin
optional: fresh chopped cilantro, diced avocado, sour cream, shredded cheese for topping

Directions:
Heat a large pot over medium heat, then add the chiles and walnuts and toast until fragrant and the chiles have gently puffed. Remove from heat and allow to cool. Remove tops and inside seeds from the chiles. Add the chiles, oregano, and walnuts to a spice grinder and grind finely. Meanwhile, heat 1/8 cup oil in the pot, then add the red onion and cook until soft and golden, then add the garlic and stir, 1 minute. Push the onions and garlic to one side of the pot. Add the final 1/8 cup oil to the empty space, then pour the spice mixture into the oil, allowing the flavors to bloom in the oil, 1 minute, then stir together with the onions and garlic. Add the bell pepper and saute 2-3 minutes, then add the diced tomatoes and tomato paste. Stir. In a separate bowl, whisk together 2 T. cornstarch with 1/2 cup of the water to make a slurry. Pour this, as well as the remaining 3.5 cups of water, into the pot. Add the jalepenos and lentils. Bring to a boil, then reduce to a simmer. Simmer until the lentils are soft but still have a slight bite to the edges, about 35-40 minutes. Add in the corn, chickpeas, canellini beans, soy chorizo, soy sauce, and cumin. Stir to incorporate and cover to bring back to a simmer. Salt and pepper to taste, then serve with toppings of choice.

November 18, 2012

Candied Lemon Peel


Last Halloween, M dressed up as a lemon head. I never eat lemon heads, but that night he carried around a box full and I ended up nabbing a few. My first thought when I tasted these tart, sweet candied lemon peels was, "Hey! These are like an all-natural, way more delicious, homemade lemon head!"

These lemon peels pack lots of pucker. As tangy as they are, don't get me wrong -- they're definitely 100% sweet treat. I love the slight outer crunch that gives way to a chewy center. I also love knowing that these are homemade. Once you make these lemon peels you'll start to get obsessed with candying all sorts of citrus peels... I can't eat an orange or grapefruit without saving the rind for candying!

A few ideas.... Dip each slice in melted dark chocolate, set on wax paper to cool, and dole out in favor baggies as hostess gifts or a thoughtful present this season. Chop them coarsely and sprinkle atop holiday cakes for an element of decorative shimmer and texture. Create beautiful crunchy and sweet chocolate bark with lemon peels and pistachios. Or simply keep a bowl out on the mantel for nibbling through the season. Next time you're using a lemon for its juice, reconsider tossing the peel. There's so much more to create!


Candied Lemon Peels
Ingredients:
8 lemons (washed in fruit & veggie wash, or organic)
4 cups sugar, plus extra for coating

Directions:
Cut top and bottom off each lemon. Use a vegetable peeler to peel off strips of skin, lengthwise from top to bottom. Place peels in a saucepan and cover with water. Bring to a boil, then reduce to a simmer for one minute. Drain and repeat two more times. Remove peels to a separate bowl. Combine four cups sugar with three cups cold water in the saucepan and bring to a boil. Add the lemon peels and reduce to a simmer. Simmer for one hour over low heat. Drain peels from liquid, reserving liquid for later use in drinks or recipes as desired.

Spread out the lemon peels on a baking sheet to cool. Allow to cool for 10 minutes, then toss with the extra sugar. Dry 8-10 hours or overnight, then store in an airtight container.

October 27, 2012

Quinoa, Spinach and Poached Egg Skillet

This recipe uses the filling from the Quinoa and Black Bean Stuffed Peppers. It's a delightful meal that's cozy, rustic, and substantial while still being light. I love any meal with a soft, barely oozing egg on top. It adds a layer of richness, like velvet, to every bite. 

"Next Night" Quinoa, Spinach, and Poached Egg Skillet: serves 2
Ingredients:
6 cups of raw spinach, chopped
Any amount of leftover filling from the stuffed peppers. (See recipe to make from scratch
Optional: 1 chicken breast cut into 1" pieces
Two eggs, room temperature
1/2 cup quality white cheddar cheese

Directions
Heat a large cast-iron skillet or dutch oven to medium. Add the spinach, filling, and chicken breast if using. Cover. Allow the spinach to cook down and the chicken to just cook through, stirring occasionally, about 8-10 minutes. Distribute the ingredients evenly throughout the skillet, then use a spoon to move some mixture aside to create two shallow "wells." Crack one egg carefully into each "well." It's okay if the whites run over and onto everything else. Cover and allow to cook until the egg is firm around the edges but still soft and runny in the middle. Turn off heat. Use a spatula to transfer half the filling and intact egg on top to each of two bowls. Top with cheddar cheese and serve. 

Slow-Cooker Quinoa Stuffed Peppers


It's been a crazy week. The kind of week where I left work every day and papers were still scattered across my desk. I don't do scattered papers. The scattered papers were like a big red flag -- relax! slow down!  

Enter slow-cooker and these quinoa stuffed peppers, a dish that allowed me to both slow down and relax for an evening. These incredibly nutritious veggie bowls are packed with protein-rich quinoa, meaty black beans, and salty-good cheese. To round it all out, the sweet packaging of bright bell pepper and tomato sauce topping balance those savory flavors perfectly. 

Hmm... Balance. That's another welcome feeling at the end of my day. 

Ingredients:
2 T. butter
1/2 onion, diced
2 cloves garlic, minced
1 small yellow zucchini, diced
1/2 cup uncooked quinoa
1.5 cups quality chicken or vegetable stock
1 can black beans, rinsed and drained
1/2 t. garam masala
1 t. salt
1/2 t. pepper
dash of cumin
1/2 cup quality white cheddar cheese
1 can diced tomatoes in puree
2 t. tomato paste.
2 red or yellow bell peppers, tops cut off and seeds removed inside

Directions:
Preheat a large saucepan over medium-low heat. Add and melt the butter, then add the onion and cook until translucent and soft. Add the garlic and stir, one minute, then the zucchini, and cook another minute more. Add the quinoa and stir to toast lightly, 2-3 minutes, then add the stock, beans, garam masala, salt, pepper, and cumin. Stir and turn the heat to high. Bring to a boil, then reduce to a simmer 15-20 minutes, or until the quinoa grain is translucent and the grain has developed a "tail" off the end. Stir in cheddar cheese at the last moment.

Inside the crock pot, stir together the diced tomatoes and tomato paste. Use a spoon to fill each bell pepper with mixture. Carefully place each pepper into the crock pot and set to low 7-8  hours or high 3-4 hours. Spoon tomato sauce over pepper and serve.

Use leftover filling to create "Next Night Quinoa, Spinach, and Poached Egg Skillet." It's delicious!


October 4, 2012

Chocolate Chip Walnut Blondie Thins.... With No Butter or Flour in Sight


Okay, I did it. I made dessert out of beans and other healthy things.   

"Gross! Ew!" my sister groaned on the phone when I told her my plan, "I like my dessert to be dessert and healthy stuff to be healthy."

I get you sister-friend, I really do.

But first you have to try these blondie thins. You'll want your dessert to be healthy and your healthy stuff to be dessert, and then you'll be so mixed up you'll have no choice but to agree with me when I say that these chocolate-chip walnut bad boys are too darn tasty to care what's in 'em.


The only thing I'll change next time is to double the batter and make them thicker, like traditional dessert bars. But then they wouldn't be thins (okay, I had to call them thins because I spread the batter thinly into the pan.... This was likely because I couldn't stop eating the raw batter, which is totally safe to eat and I'll probably make just a batch of that next time, too). We could just call them cookie bars, because they're soft, gooey, and chewy, just like the blondie's cousin, cookie.

Semantics aside, whether you bake them thin or thick you'll certainly be glad you did in the first place. Looks like I'll be having these (healthy) cookies at breakfast, lunch, and dinner!

Chocolate-Chip Walnut Blondie Thins: makes 16 squares. Inspired by Deep-Dish Cookie Pie. This recipe has less sugar and a few more taste-boosting ingredients.)
Ingredients:
1 can garbanzo beans (chickpeas), rinsed and drained
1/2 cup quick-cooking oats
1/4 cup cinnamon or regular applesauce
1.5 tablespoons canola oil
1.5 teaspoons pure vanilla extract
1/4 teaspoon baking soda
1/4 teaspoon salt
1/3 cup brown sugar
1 heaping tablespoon cinnamon
1/2 cup walnut halves, toasted and coarsely chopped
1/2 cup dark chocolate chips, coarsely chopped

Optional delicious-boosting ingredients:  *note: If not using, decrease applesauce by half
1 tablespoon ground flax-seed
1 tablespoon unsweetened coconut
1 tablespoon PB2 peanut butter powder or regular peanut butter

Directions:
Set aside an 8x8 non-stick baking pan. Preheat oven to 350 degrees (toast walnuts in there as it preheats as a time and energy saver). Meanwhile, add all ingredients except walnuts and chocolate chips to a food processor and process until smooth. Consistency and taste will be like a sweet, thick hummus. Stir in the walnuts and chocolate chips. Spread evenly into the pan, using damp fingers or spatula for greater ease. Bake 20 minutes. Cool 5-10 before cutting into 16 squares.

September 23, 2012

Homemade Whole-Egg Mayonnaise


Making homemade mayo was surprisingly easy and fast. I now only make it from scratch -- it only takes a few minutes, so it's ready and available right when I need it. Mayonnaise is a condiment that I use both sparingly and infrequently, so it is especially helpful to be able to make a small amount on demand.

And don't worry about not having the ingredients... other than the use of a lone egg (highly likely you've got one lurking in the fridge), this recipe exclusively calls for pantry-only ingredients. Plus, many mayo recipes call for only the egg yolks, but I hate waste so this one uses the whole egg. No fussing and separating required.

I'd much rather whip this mayo up in a few minutes than take ten to run to the store for a big jar that will sit there taking up fridge space for months! You'll find this homemade spread to be far fresher and creamier than anything you'll find on the shelf. Enjoy!

Ingredients:
1/4 t. dry mustard powder (or 1/2 t. dijon mustard)
1/4 t. salt
1 whole egg
1-2 tablespoons white or cider vinegar
1 cup canola or vegetable oil

Directions: Using a food processor (or immersion or regular blender) add the first four ingredients up until the oil. Turn the processor on and allow the ingredients to mix. Then, VERY SLOWLY drizzle the cup of oil into the running processor. It will look to be a liquid consistency at first, but you'll notice that toward the end of the cup of oil it will have firmed up to be thick and creamy.

If desired, add a little more vinegar (I like mine slightly more tart) or even spices like curry or cayenne to create a flavored mayo.

Pin it on Pinterest!

September 4, 2012

Blueberry-Graham Greek Frozen Yogurt


What is that contraption dispensing delightful frozen treats into my dessert bowl? It's called Yonanas, and it was my carefully premeditated impulse buy of the weekend. This isn't a product review, but briefly: the Yonanas machine has a super-fast set of rotating blades inside that cranks creamy frozen yogurt like dessert from frozen bananas and other fruits. It's ice cream -- sans milk, fat, and added sugar. Sign me up.

I found out about it when I walked my dog past someone else's overflowing recycling bin two weeks ago and noticed the box popping out. It doesn't take much more than a picture of a dessert machine to stop me in my tracks. And I am sorry, unknown neighbor person, that I might have casually rummaged through your bin while looking over my shoulder to make sure nobody was around. I just needed a second look at the Yonanas box. And also I have no shame.


Part of me wishes I had never seen it, because then a) I'd be $50 richer, and b) I wouldn't have just eaten large bowls of (healthy, fruit-disguised-as) dessert two nights in a row. But I'm 99% glad I did see, it because this thing is awesome!

Problem: Matt hates bananas. Issue: This machine was born literally to process frozen bananas. After extensive research, I was glad to read that it happily accepts other fruits along with the bananas, and even other fruits on their own if you want something a bit more sorbet-like in texture. But I needed to know that I could accomplish that creamy, fro-yo texture and taste without bananas (Let's be honest, while I love feeding M, this was really about being able to justify to him that we actually needed this machine so I could keep it). 

As I swiped my credit card at Kitchen Kapers, the entire store's staff (okay it was just three people) were taking bets on whether Matt would end up falling in love with the machine even though he hates bananas.

I probably owe those people a follow up phone call. Because tonight we made some very truly delicious true frozen yogurt without the use of bananas. Knowing that I can use Yonanas to do this fast-tracked this machine from the "meh, maybe?" lane to the "frozen yogurt at the touch of a button!? let's keep it!" category.

I'm probably overly excited to keep trying different frozen yogurt, fruit, and ingredient combinations. Some I'm thinking of:
Apple pie: vanilla yogurt, dried apples, oats, and cinnamon
Peanut butter chocolate: frozen banana, peanut butter, cocoa powder
Peach cobbler: vanilla yogurt, frozen peaches, graham cracker

Allright, I'll stop, but I'll surely share with you more recipes as I make them! But move over Ben n' Jerry's Frozen Greek Yogurt -- we've got success with this homemade, totally healthy, pure ingredient Blueberry-Graham Frozen Greek Yogurt. That's dessert done right. 

*Note: I believe that you can use your food processor and/or blender to make this dessert, too. Some reviews online said that the Yonanas machine simply churns out a somewhat creamier and more cohesive product, but I am sure you'd have great results with what you've got.

Blueberry-Graham Greek Fro-Yo: serves two
Ingredients:
1 6oz. cup blueberry greek yogurt (or other berry flavor)
1 cup frozen blueberries
1 rectangle graham cracker, broken
a dash of cinnamon

Directions:
Stir the Greek yogurt to combine the berry flavor. On a non-stick baking sheet, dollop small rounded spoonfuls of the yogurt, then place in freezer until firm (about two hours). Next, using a Yonanas machine or blender, add (alternating, in this order if using Yonanas) frozen yogurt dollops, blueberries, graham cracker, cinnamon, bluberries, graham cracker, and ending with more frozen yogurt. Enjoy while cold.

Feel free to check out this link if you're interested in buying Yonanas.


September 2, 2012

Baked Quinoa & Broccoli "Mac n' Cheese"


I love it when an entire dish evolves into being because of a single ingredient. I guess you could call it "ingredient inspiration," when you've got one star ingredient and so you create the meal to spotlight and elevate it.

That's how this dish came about for me. I'd like to say that it was because I wanted a really healthy meal, but that's a lie, so I'm not even going to go into all the crazy health benefits of this bowl of gooey goodness -- you already know quinoa is a perfect protein, cheese is high in calcium and protien, too, and broccoli is basically super food of the universe.

To be honest, it all started with my favorite cheese, a sale, and a checkout girl.

Now I know that a lot of people call Whole Foods "Whole Paycheck" because it can be quite pricey to shop there, but I wander its aisles often enough to have noticed that there are certain Whole Foods products that are priced daily at a cost that is more economical than regular grocery brands (and is likely much better quality). But that's in in-depth discussion/love story for another day.

One example, though, is this cheese that keeps going on sale.  This particular Tilamook Farms natural white cheddar cheese is staring me in the face when I walk in the door. And its once again $2.99/lb. When I see this my eyes do that cartoon thing where they bug out. (I think there is a sound cue that goes something like baroooga!) I run to the stack of beautiful, creamy blocks of tightly wrapped cheese and begin to cradle them, deciding which weight I'll be coming home with.

It's a happy love story where I devour the cheese daily in any form I can. Like right now, as I write this, I keep pausing because I'm slicing off giant hunks and eating it atop crisp slices of Pink Lady apple. AMAZING COMBO!

But, back to another amazing combo. This dish. So I'm checking out and the check out girl goes:
 "Isn't it awesome when this cheese is on sale? It's soooo good. I use it in Quinoa Mac n' Cheese and it's, like, the best. I mean, what's not healthy about Quinoa mac n' cheese?"

A credit card swipe later and I'm running home, cheese in arm like a football, and heading straight for the kitchen. NEED-QUINOA-MAC-N'-CHEESE-NOW.


And so do you.

Baked Quinoa & Broccoli "Mac n' Cheese": serves 4
Ingredients:
1 Tablespoon Earth Balance butter
1/2 large Spanish onion, finely diced
2 cloves garlic, minced
3/4 cup quinoa, rinsed well and drained
1 1/2 cups low-sodium chicken stock (vegetable stock for vegetarians)
salt & pepper
1/4 teaspoon ground nutmeg
1 lb. frozen broccoli florets (cut into smaller pieces)
1 large egg
3/4 cup milk
2 Tablespoons grated Parmesan cheese
2 cups shredded cheddar cheese 
1 cup shredded cheese, for topping

Directions:
Heat a medium saucepan over medium-low heat. Add the butter and swirl to coat pan. Add the onions and saute until translucent and slightly golden. Add the garlic and stir, one minute, then add in the quinoa and cook for about five minutes, stirring occasionally.

Add in the chicken stock, salt & pepper, and nutmeg, stirring well.  Bring to a boil, then reduce the heat to low, cover tightly and simmer for 15-20 minutes, until most of the liquid has been absorbed. During the last 2-3 minutes of simmering, add in the frozen broccoli. Turn the heat up to return to temperature, then allow the broccoli to warm through.

While the quinoa is cooking, preheat the oven to 400ºF and lightly grease an 8" or 9" square baking dish.

When the quinoa is done, let it sit off the heat for about 5 minutes and in the meantime, whisk together the milk, egg, and Parmesan cheese. Add 1 tablespoon of warm quinoa mixture to the egg mixture to temper it, then quickly stir the liquid into the pan of quinoa. Add the 2 cups of cheese and pour it all into the baking dish.

Top with the remaining cheese and bake for 20 minutes, or until bubbly and golden brown on top.

Links

Related Posts Plugin for WordPress, Blogger...