September 21, 2011

Pumpkin Gingersnap Ice-Cream Cake

What I love most about this ice cream cake is that it's a celebratory marriage of seasons. Summer ends today, and fall begins tomorrow, so the timing is perfect. Here, summer's cool treat, ice cream, comes together with a couple of the spiced, warming favorites of fall: pumpkin and gingersnap.

Thin layers of cozy pumpkin bread and gingersnap cookies are enveloped by a brightly flavored lemon-gingersnap ice cream. This cake is simple, yet impressive. I do use specific brand ingredients in this recipe, but please feel free to use the technique of making this ice cream cake in order to make your own cake using brands and flavors of your choosing.

Pumpkin Gingersnap Ice-Cream Cake: makes one bread-loaf sized cake, with more pumpkin bread leftover if you desire to make a second cake. I use Trader Joe's brand pumpkin bread because it is the only boxed pumpkin bread I have found with a rich, molasses flavor and intense-enough spices to resemble homemade. To save calories and fat, swap the oil in the box recipe for apple sauce, in a 1:1 ratio.

Ingredients:
1 loaf Trader Joe's Pumpkin Bread, baked according to box directions and cooled completely
1/2 gallon container of Trader Joe's Lemon Gingersnap Ice Cream
1 box Anna's Cookies Ginger Thins or other gingersnap cookies (you will have cookies leftover)

Directions:
Place the ice cream in the refrigerator to soften, 30 minutes. Meanwhile, prepare to assemble your cake.

Using a serrated knife, gently and slowly cut the pumpkin bread in half (working from the side, not the top of the cake). Use a back and forth motion around the perimeter of the bread until you reach the middle, then carefully lift your layers apart. You will have two bread pieces: one is the bread's top half, the other is the bottom half. Use the same method of to cut each bread half into into approximately 1/2 inch thick layers. Set these layers aside.

Line your bread pan with enough plastic wrap to overhang on all sides. Place your bottom pumpkin bread layer into the bottom of the pan. Top with ice cream and gently smooth with a spatula or press with a meat mallet. Layer gingersnap cookies on top of the ice cream and press gently. Repeat method of spreading ice cream on top of the gingersnaps. Top with your next layer of pumpkin bread, and repeat the steps, ending with a layer of pumpkin bread once you reach the top of your pan. Cover completely with plastic wrap and place in the freezer.

Once it has frozen 2-6 hours, lift the cake out of the pan. You can store the cake completely wrapped in the freezer until you are ready to serve. When ready to serve, allow to sit in fridge for 30 minutes. This allows for better flavor. Remove cake from fridge, unwrap the plastic wrap, and slice 1-inch thick slices of cake. Serve with a cookie stuck in the top of each slice.

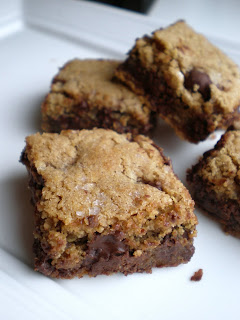
Sweet and Salty Chocolate Chunk Blondies

Excuse me, waiter, but there's salt on my dessert.


And underneath the salt there's this gently chewy blondie that's layered with ooey, gooey melted hunks of chocolate. But there's salt on top and that's a problem... or is it?

Not in the case of these decadent blondies. Throw out whatever Toll House chocolate chip recipe you've been wedded to over the years, and don't bother looking for another bar cookie again, either. These insanely scrumptious bars boast a ridiculous amount of semi-sweet chocolate in a light-as-air blondie batter. Then, every morsel is topped with a sprinkling of shining, crystalline sea salt.

Have you ever dipped your french fries in your milk shake or your potato chips in your fudge sauce? Then this is the dessert for you.


My only warning is this: don't think that you can cut them at 11:00 at night while they are still piping hot out of the oven and not eat almost half of the batch. When I arrived to bed with chocolate smeared into the corners of my mouth and on the side of my face ( I swear I thought I had cleaned up the evidence) M didn't even bother asking me where I'd been. That night I dreamed of chocolate chunks, buttery crumbs, and mouth-puckering salt. Now that is what sweet dreams are made of.

Sweet and Salty Chocolate Chunk Blondies: makes over 48 squares

Ingredients:
2 sticks salted butter, room temperature, wrappers saved
1/2 cup packed light brown sugar
1/2 cup packed dark brown sugar
1/2 cup granulated sugar
2 1/3 cup white flour
1 1/4 t. baking soda
1/8 t. salt
2 large eggs
2 t. pure vanilla extract
3 cups quality semi-sweet chocolate chips (don't skimp!)
1.5 T. coarse sea salt

Directions:

Preheat the oven to 350 degrees. Using your butter wrappers, grease a 9x13 jelly roll pan.

Using a standing mixer, beat the butter for two minutes until it is fluffy, then beat in the brown sugars and granulated sugars gradually. Scrape down the sides in between additions. Then, continue to beat butter and sugars together for 8-10 minutes until very fluffy and light.

Whisk the baking soda, flour, and 1/8 t. salt in a bowl. Add the eggs one at a time and stir each in completely with a wooden spoon. Now add your vanilla. Turn the mixer down to its lowest setting and gradually add the flour, egg, and vanilla mixture. Once it is fully incorporated with the butter, add all of the chocolate chips. The dough will become very densely packed with chocolate chips and it may be hard to mix, but allow them to continue to incorporate.

Once the chocolate chips are fully incorporated to the batter (don't overmix, though!) spread the batter out into the jelly roll pan. Use a spatula to evenly press the batter to the corners. Bake for 20-25 minutes or until the edges are barely browned and the center is no longer raw. Remove from oven immediately and allow to cool in the pan.

While blondies are still in pan, use a sharp plastic knife or regular knife to cut the blondies into 1" squares. The yield is a lot, but you will need all of them because they will get eaten fast! Try as you might, you will not be able to stop yourself from shoveling them in your mouth as you cut. However, any blondies that do not get eaten immediately can be stored in an airtight container for up to a week.

September 13, 2011

Slow Cooked Pulled Pork

It's dinner in minutes, but it cooks all day.


Slow cooked pulled pork is incredibly easy and intensely delicious. This is a must-have recipe. I was inclined to develop it after M requested pulled pork week after week. We usually get our pulled pork fix when we go out to a few of our favorite comfort food restaurants, and this request was one I knew was possible but wasn't ready to commit to.

Finally I looked up an initial recipe and discovered that pulled pork is made from Boston Butt. I didn't even know what a Boston Butt was. Sure enough my butcher had one huge hunk waiting for me when I visited the prime shop. He handed the giant, paper-wrapped package over to me with a smile and said, knowingly, "it's going to taste even better the next day."

Well, the pulled pork tasted amazing the day of and sure enough, even better a couple of days later when we got around to eating the leftovers. After hours of slow cooking in the crock-pot, the meat simply shredded itself into pieces with a gentle stir.


Every strand was juicy, tender, and finger-licking succulent. The house was filled all day with a deep, somewhat tangy aroma of smoky and sweet spices.

The first round of pork we took to our friend's house and served as little open-faced appetizers on sliced Tuscan bread. The second round we ate ourselves, at home, on big, soft potato rolls. Both were excellent. We vowed to make pulled pork again as as soon as possible. With a recipe this easy, there are simply no excuses.

Slow Cooked Pulled Pork
For the pork:
2 T. dark brown sugar
1 T. smoked paprika
1 T. chili powder
1 t. salt
2 t. ground cumin
1 t. ground black pepper
1/2 t. ground chili pepper
1 t. Dijon mustard
1 5lb. Boston Butt
1 large Spanish onion, thinly sliced
1/2 cup water
1/2 cup apple cider vinegar
1/3 cup ketchup

Sauce:
3/4 c. apple cider vinegar
1/2 c. ketchup
3 T. dark brown sugar
2 t. smoked paprika
1 t. chili powder

Directions:
Combine all sugar and spices for pork in a small bowl, then rub completely over the pork and allow to sit for about 30 minutes at room temperature. Place 1/2 of the onions in the bottom of the crock pot, then pour the water over the onions, then place the Boston Butt on top of the onions and cover with the remaining onions. Whisk together the
ketchup, apple cider vinegar, and mustard. Set on LOW and cook for 8-10 hours, and about halfway through cooking pour apple cider mixture over the pork and stir gently. Meat is done when it falls apart when touched. (Can also be cooked on high 5-7 hours).

To make the sauce, whisk all ingredients in a small saucepan and cook on medium-low heat until thickened. Serve pork on soft buns with 1 T. sauce each.

September 6, 2011

Soy Chorizo Sopes

It's a little weeknight trip to South America.


I was first exposed to sopes at my favorite Philadelphia Mexican restaurant, Tacqueria Veracrusana. This place is the real deal... I was obsessed immediately with pulled pork and pineapple tacos enveloped soft, fluffy just-made corn tortillas, the crispy, double-thick corn chips straight from the fryer, and their perfectly creamy guacamole.... It took me a few visits to venture out of my ordering routine and out into the territory of sopes.

Sopes are corn patties that are lightly fried and topped with the filling of your choice. The first bite was instant love. The cornmeal patties are slightly creamy in taste but firm in texture, which makes them satisfying and comforting at once. The gently fried cornmeal is the perfect light and delicate flavor vehicle for an infinite number of delicious toppings. But, I was nervous. I doubted I could re-create this at home. But I craved it so much I just had to try.

My discovery: they were easy. And healthful. In this case, I simply topped each patty with warmed soy chorizo, which took little effort beyond punching a few minutes into the microwave and stirring halfway. Feel free to get creative with toppings like beans, steak, pork, and chicken cooked in Mexican spices and a little broth for moisture. Garnished mine with lime, a little sour cream, and cheddar cheese, these sopes were a completely manageable weeknight dinner... and I saved myself a trip to the tacqueria. Enjoy!

Sopes: corn patties
Ingredients:
2 cups masa harina (corn flour)
4 T. flour
.5 t. baking powder
1/2 t. salt
1 1/4 cup warm water (add more if necessary)
vegetable oil for pan-frying
Toppings of choice, such as chorizo, soy chorizo, or other Mexican meats or vegetables

Directions:
Mix the dry ingredients together, then add the water slowly while mixing. Stop adding water when the mixture gets to be moist and well-incorporated, but still a firm dough texture. Either refrigerate covered in plastic or immediately begin to form small 2" size balls with floured hands. Gently press down each ball on an oiled surface until 1/4 inch thick rounds are formed. Heat a skillet to medium-low heat and add enough oil to well-coat the pan. Once oil is hot, gently add each sopes and cook about 4-minutes per side, until slightly crispy and golden brown on each side. Serve immediately with desired filling.

August 28, 2011

Catching Summer in a Mixed Fruit Pie


Catch summer before it's gone. Just a slice of this sweet and tangy mixed-fruit pie will have your mouth puckering into a smile, filled with thoughts of candlelit patios, dripping popsicles and wide-brimmed sun hats. All of the good things of these fleeting, wonderful months.

Be creative with the fruits you use, it's okay to put in what you have on hand. I used blueberries, strawberries and even a few diced mangoes and peaches. The result was bright, yet complex in the marrying of various textures and flavors. This oozey, gooey layer is complimented by the irresistible crunch of cinnamon brown sugar cobbler topping.

Just be ready with a pint of vanilla ice cream to top it off.... and maybe a camera to capture the smiles for a few months from now, when you'll need to escape into a daydream of summer.

Summer Fruit Pie
Ingredients:
1 frozen pie crust, thawed
5 cups of mixed berries and fruits, larger fruits diced to about 1/2" pieces
1/2 cup sugar
1/3 cup all-purpose flour
2 t. lemon zest

crumb topping: stir together 1/2 cup all-purpose flour, 1/2 cup packed brown sugar, 1 t. cinnamon, and 1 t. vanilla extract. Using a pastry blender or your fingers, cut in 3 T. butter until the mixture resembles coarse crumbs.

Directions:
Preheat oven to 375 degrees. Line a 9" pie plate with the pie crust and place on a cookie sheet to catch drips while baking. In a saucepan, combine the sugar, fl
our, and half of the fruits. Simmer over low heat for about 5 minutes or until the fruit filling has slightly thickened. Stir in the rest of the fruit and the lemon peel. Pour filling into the pie crust. Evenly sprinkle the crumb topping over the pie to about 1/2 inch from each ed
ge. Cover the edge of the pie crusts with foil to prevent browning, and bake for 25 minutes. Remove foil and bake for 25-30 more minutes or until filling is bubbly and pastry golden. Cool on a wire rack, and serve while warm.


August 16, 2011

Mini Peanut-Crunch Ice Cream Sandwiches

I really went MIA there for a few weeks. Sorry. You see, we decided to move, then had to find a new house, then we actually had to move. And that means weeks of packing and then unpacking again. Needless to say, I am exhausted, and have just begun to use my new kitchen. Hurrah! How I did miss the stove.

These are some goodies that don't require the stove. On the contrary, they require only the freezer.

Start with a pint of ice cream. Not frozen yogurt, but ice cream, the good stuff.
I used chocolate gelato. You want it to be firm enough to hold its own. Got it? Good.

Now finely chop a handful of roasted peanuts. Put them in a small dish.

Take a box of vanilla wafers, a spoon, and get to work. Spoon a heaping tablespoon of ice cream and spread it high and evenly on one vanilla wafer. Top with a second cookie and gently press down to make a sandwich.

Roll the sides of the sandwich in the peanuts. Peanuts should be sticking to the ice cream. Perfect! Now place the cookie gently in a plastic tupperware and into the freezer, keeping the tupperware open for easy access as you add cookies.

Repeat until one of your ingredients are gone. Now cover the cookies and freeze overnight. The next day they will be firm, yet gently yielding when eaten, with deliciously nutty crunches in every bite. The best part is that the vanilla wafers get even better with time, as they become softer.

Enjoy these frozen few-bite treats as often as you like! They're a perfectly portioned snack or dessert, waiting and ready for those warm nights when the stove is taking a rest.

July 18, 2011

Crispy Falafel with Tangy Yogurt Dressing

I had never made falafel before this, and in fact, I had only eaten falafel once. That was just a tiny, hesitant taste taken off a friend's place. To be honest, the idea of falafel was strange to me. What were these mystery nuggets that claimed to be made of chickpea? As much as I expected not to, I liked what I tried.


Hot summer nights call for dinners that are light and crisp, but hearty and interesting, as this falafel-salad is.

It's okay to lightly fry the falafel in oil. After all, these spicy, fragrant, and crispy nuggets are nesting atop a bed of healthy greens. The falafel's dominant flavors of smoky cumin and earthy turmeric instantly brighten with the zing of lemony yogurt sauce. Here, I drizzled the whole salad with generous dollops of the cool and creamy dressing, which is healthy and high in protein due to its yogurt base and takes barely a minute to whip together.

Admittedly, the only reason I ventured to try this recipe was that I had a bag of chickpea flour I wanted to get rid of. I am so glad I tried these falafel, though. Eating this salad was fun, and delicious, too. I know I'll be making them again, so it looks like I'll be buying more chickpea flour to replenish that supply I had wanted so badly to finish!


Crispy Falafel Patties: makes about eight 3-4 inch patties, or enough for 2-3 dinner salads.

1.5 cups chickpea flour plus extra for dusting
1 T. sea salt
2 t. cumin
1.5 t. turmeric
1 T. crushed garlic
1/4 cup hot water
1 t. baking soda
1 T. chili pepper, ground
1 t. mustard seed (a dollop of regular mustard will suffice)
1 t. garam masala
1 t. fresh ginger
2 T. finely chopped white or yellow onion
1/2 cup frozen spinach, defrosted and drained well

Vegetable oil for frying
Chopped lettuce and diced plum tomatoes for salad

Mix all of the ingredients except for the garlic, ginger, onions, and spinach in a bowl. Add the hot water and stir. Mix in the garlic, ginger, onions, and spinach and stir. Place in the fridge to cool until the mixture is slightly firm and easier to work with. Preheat a large skillet to medium heat with about 1 inch of oil. Meanwhile, dust a work surface with extra chickpea flour and scoop out a few tablespoons of mix at a time to form patties that are about 3/4 inch thick and 3 inches wide. Gently lower the patties into the oil and lightly fry until golden brown, about 3 minutes per side. Meanwhile, mix the yogurt dressing, as follows. To assemble salad, place diced tomatoes atop lettuce, then top with 3-4 falafel patties and drizzle generously with dresssing.

Creamy yogurt dressing: 6 oz. container plain non-fat yogurt, zest and juice of 1/2 a lemon, 1 t. dried basil or dill (or fresh if you have it), salt and freshly ground pepper to taste. Whisk together until well blended.

Chef's Note: Next time I may try a hybrid of fresh chickpeas coarsely chopped in the food processor, and chickpea flour. This combination may lend itself to a somewhat meatier texture.

Links

Related Posts Plugin for WordPress, Blogger...