July 27, 2010

Leftovers with a New Life: Cheesy Rice Cakes

The plain, white rice 
practically jumped 
out of the Chinese food carton 
and into the pan, 
eager for a new identity.


The truth is, it had been two days since this otherwise bland accompaniment to takeout had been carelessly tossed on the top shelf in the fridge, its more flavorful counterparts having been already consumed. Odds were that it was doomed for the fate of "forgotten, then garbage can".

But why throw out perfectly edible rice? Simple Chinese takeout could become tonight's main Italian event. And it did: with the addition of a couple eggs, a blend of cheese, and aromatic herbs, a new spin on Arancini (those little Italian nuggets of cheesy, ricey goodness) was born within minutes. These cakes, which M and I crafted into entree-sized patties and dipped into tomato sauce, would also be delicious as the side to a tender cut of meat, or served up bite sized for a quick and user-friendly appetizer. Regardless of how these cakes are consumed, it's pretty sweet when last night's leftovers get a second chance as a savory and healthy new item.


Just like a fickle teenager (can we tell I've been in school-counseling class too long?), plain white rice reinvents itself in an instant: with new layers of complexity it becomes worlds more interesting than it was only moments before... and maybe even packs a little attitude, too. 

Italian Rice Patties: (makes 6 entree-sized patties)
Ingredients: 
1 1/4 cup cooked white rice
2 large eggs, beaten
1/2 cup Italian cheese blend (Asiago, Mozzarella, Provolone)
2 T. cream cheese, softened, or Greek yogurt
2 T. Italian seasoning
1 t. salt & pepper each
2 T. olive oil

Directions:  Combine all of the above ingredients, except for olive oil, and mix very well. Cover and place in the refrigerator for two hours to allow the ingredients to thicken and settle. In a large pan or griddle, heat the olive oil over medium heat. When the pan is hot, scoop the rice mixture (using an ice cream scoop or spoon) into a ball and place down in the pan. Press until flat with the back side of a spatula. Allow to cook until sizzling and browned on one side, then flip. Keep patties warm in tin foil in the oven while cooking batches, then serve with hot tomato sauce. 

July 23, 2010

Spicy Thai Basil Noodles (Pad Kee Mao)

I was lying on my couch on Monday night, when I thought to myself, "all I really want is spicy Thai basil noodles." Then wanting became needing, and needing became rampant, uncontrolled craving.

Two days later, obsession yet to be satisfied, this emerged from my stove-top:


I'll fill you in on the two days in between. First of all, there were other dinners that had to be made and eaten. Second of all, when Monday night's craving hit I realized I needed rice noodles. So I texted my friend and co-worker, Dot, who lives in Philadelphia's bustling Chinatown area, "do you know where I can get some rice noodles?" Immediate reply, "course, my mom will go get some for you tomorrow."

On Wednesday, the noodles were exchanged at work (thank you thank you!!), and at night I scooted out to the market for some oyster sauce and mirin, two ingredients I needed but didn't yet have. 

In my mind, I was craving the Holy Basil Noodles from Klong on St. Mark's Pl. in New York City. Wide, thick, spicy, saucy noodles stir fried with flavorful, dark duck meat. This would not be Klong's noodles, and there would be no duck to be had, but I could try to approximate the flavor I so craved. What I discovered is that every Pad Kee Mao recipe is different, with its own ratio and list of ingredients. 


My own combination, loosely based on a few different recipes I gathered, was spicy, saucy, and definitely fulfilled my Thai craving. This dish brings the heat -- every bite is packed with fiery chilies, then chased with a cool kick of basil -- which I love. Overall, this dish was loaded with flavor and actually quite simple to make. 

Now that I know that every Pad Kee Mao recipe is unique, I may just need to book a trip to New York, head straight to Klong, and see if I can get my hands on their exact  recipe. In the meantime, my own stove is a tad closer than NYC, so I'm glad to know I can make this anytime the craving does hit!

Pad Kee Mao: Spicy Thai Basil Noodles
Ingredients:
Sauce:
3 tablespoons oyster sauce
2 tablespoons brown sugar
2 tablespoons mirin
2 tablespoons rice vinegar
4 tablespoons Dark Soy & Tomato Sauce
1 tablespoon hot red pepper flakes
Juice of half a lime 
Noodles:
1/2 lb. drained and pressed firm or extra firm tofu
7 ounces rice noodles
3 tablespoons canola oil
2 clove garlic, minced
2 de Arbol chiles, seeded and thinly sliced
1 small onion, sliced
Broccoli, shredded carrots, and thinly sliced bell peppers
1/8 cup roasted peanuts, crushed
1/2 to 1 ounce fresh basil leaves, coarsely chopped
Half a lime, cut into wedges, for serving.
 
Directions:
For sauce: In a small bowl, combine oyster sauce, sugar, mirin, rice vinegar, soy, chiles and lime juice. Mix well and set aside.
Soak noodles in warm water for 30 minutes. Meanwhile, pan fry the cubed tofu until lightly browned on each side. Place a large pan or wok over high heat. When pan is hot, add oil. Add garlic, chiles  and sliced onion, and vegetables and sauté to let flavors infuse oil, about 1 minute. Add peanuts and tofu and stir-fry 2 to 3 minutes.
Add basil and drained noodles to the pan. Add sauce, and toss until mixed and well-heated, 1 to 2 minutes. Serve hot, with lime wedges for squeezing over noodles.

July 22, 2010

Pizza Night is Always a Good Night!

The crust was perfect! A light and slightly fluffy outer edge, yet a perfectly toasty brown bottom that gently yielded to each bite.


It's not easy to find the perfect chemistry of dough thickness and baking time to yield an all all-around great pizza crust. I'll be the first to admit that my crusts come out different every time. Sometimes I make square pizzas, and sometimes a rectangle. Sometimes the crust is paper thin because I've stretched it big, and sometimes it's doughier and thick. It depends on my mood, but having no method to the crust madness does not make it easy as all consistency goes into the wind. Regardless, it is always delicious, which is really the main goal.

What you never want, though, is a soggy crust. To avoid this, pre-baking is the key. Generously flour the work surface, stretch out the dough by letting gravity do its work as you pass it between your floured fingers, then lay it out on your floured dough pan (all the flour is to avoid sticking). Bake the crust on its own until it shows the first signs of becoming firm and lightly browned. Remove it from the oven: now it's a toasty-on-the-outside, fluffy-on-the-inside palate that can hold it's own against the sauce, cheese, and toppings. Yum. Time to lose the delivery guy's number!

Pizza with Fresh Mozzarella, Peppers, and Onions:
Ingredients:
1 package store bought pizza dough (or homemade, it you have the time and forethought)
Flour
1 cup crushed tomatoes
1/2 lb fresh mozzarella, sliced into 1/4 inch rounds
Yellow, Red, and Green Bell Peppers, sliced
1/2 Spanish Onion, thinly sliced
Cooking Spray

Directions:
Prepare the crust as instructed above in a 500 degree oven. Evenly distribute the sauce on the pre-baked crust, leaving 1/2 to 1 inch around the outside for the crust. Top evenly with the mozzarella, then top with peppers and onions. Lightly spray the entire pizza with cooking spray. Return the pizza to the oven for about 8 minutes, checking often. Remove when the cheese is lightly browned and bubbling. Let stand for a few minutes, then slice and serve.


(Please excuse the strangely colored photos... it was dark and use of the flash was necessary!)

July 21, 2010

Crispy Tofu.... with Spicy Thai Vegetables

Okay, it's time to be totally honest about last night's dinner. There were parts that I absolutely loved, and there were parts that were forgettable. As in, the recipe card went straight into the garbage afterward.
So, for the sake of focusing on the good, let's separate the two. 

May I present to you my favorite part of last night's dinner: Crispy Tofu


What a fantastic surprise! Tofu that is crunchy, crispy, and slightly spicy. Each little nugget is entirely good enough to eat on it's own. I would happily serve these on a platter, poked with little toothpicks at a party and accompanied by a delicious plum or sweet and sour sauce for dipping.

What we have is cubed firm tofu tossed in a coating of yellow cornmeal, sesame seeds, and cayenne pepper, then gently pan-fried. A tofu treat, sans fat, oil, and a frying pan. In my tofu dreams (in other words, next time I make these) I will substitute the sesame seeds for sweet coconut flakes and have coconut encrusted crunchy tofu. Yummmmmm. 

Now, may I present to you the forgettable element of dinner: Spicy thai vegetables served over rice


I know that I am being far too harsh on these poor vegetables. It isn't their fault that they were included in a recipe not worthy of keeping, and to be fair they were actually somewhat delicious. But their crispy tofu counterpart simply deserved better. I ended up eating the tofu first, then mixing the veggies and rice together afterward. 


Needless to say, either element of this dinner is worth making... on its own. So I'll separate out the recipes below and let you take your pick. Happy stir frying!
  
Crispy Tofu: (serves 2)
Ingredients:
1/2 lb. firm or extra firm organic tofu
1/8 cup yellow cornmeal
2 T. cayenne pepper
3 T. sesame seeds
oil for pan frying

Directions: 
Drain and press the tofu to remove the water. Cut the tofu into 1" cubes. In a separate bowl combine the next three ingredients, then toss the cubed tofu in the bowl to coat thoroughly. Heat 1 T. oil in a large skillet over medium heat. When the pan is hot, place the tofu down and allow to brown on each side for a few minutes, turning over gently on each side. Serve with dipping sauce or on top of noodles.

Spicy Thai Vegetables:

Ingredients: 
1 tablespoon oil
2 tablespoons minced peeled fresh ginger
2 garlic cloves, minced
Frozen stir fry vegetable blend, defrosted
3 tablespoons sesame oil
2 tablespoons soy sauce
2 tablespoons balsamic vinegar
1 1/2 tablespoons sugar
1 tablespoon (or more) hot chili oil
1 1/2 teaspoons salt
1 cup brown basmati rice, cooked
1/2 cup coarsely chopped roasted peanuts
1/4 cup thinly sliced basil leaves

Heat oil in small skillet over medium heat. Add ginger and garlic; sauté 1 minute then remove. Add the stir fry vegetables, then the next six ingredients. Stir fry until heated through and the sauce thickens. Stir in the basil, season with salt and pepper, then serve over rice and top with the peanuts. 

July 20, 2010

Gnocchi with Sausage, Kale and Walnuts

Warm, comforting and entirely satisfying. 


Gnocchi with sausage and kale is an easy and simple weeknight recipe that involves only a few ingredients and can be modified based on what you have on hand. Broccolini or spinach would be just as good as a substitute for the kale, and you can use your favorite sausage or even pancetta or bacon for the meat. I played around with the cheeses: although I had a bit of Monte Veronese and Pecorino Romano tossed in with the rest of the ingredients, I also topped it with some fresh feta cheese at the end.

This is one of the recipes where the focus is on the veggies and grains, with the meat and cheese as a compliment to add flavor and dimension without being the main event. This makes for a healthy and nutritious dinner that is entirely savory, hearty, and full of flavor. Which left me room for a little something sweet at the end: 


Lemon cream pie ice cream topped with crushed sugar and cinnamon graham crackers.

Like we always learned, you can't have dessert unless you eat your whole dinner. This one-pot gnocchi is so good that you'll eat your entire plate and then seconds...so don't get caught without something sweet on hand for afterward!

Gnocchi with Sausage, Kale & Walnuts: (serves 2)
Ingredients:
1/4 cup walnut halves
1 T. olive oil
4 cloves garlic, sliced
1/2 Spanish onion, thinly sliced
1/2 lb. spicy or sweet Turkey sausage
1/3 lb. fresh kale, washed, stems removed, chopped
1 16oz. package of Basil Gnocchi (any variety will do)
salt & pepper
1/8 cup of Pecorino Romano cheese
Additional cheese of choice for garnish and topping -- any semi-soft Italian cheese or Feta will do

Directions:
In a large pot, toast the walnuts over medium heat. Remove onto a plate, then heat the olive oil. Add the onions, garlic and sausage and brown. Remove from the heat, add the kale and a little bit of water. Cover and cook the kale until tender, adding water as needed to retain moisture. Meanwhile, slice the sausage into rounds. 

Cook the gnocchi according to the directions: boil salted water and when the gnocchi rises to the top, remove them immediately with a slotted spoon directly into the pot with the kale. Reserve the starchy pasta water. Add the sausage, walnuts, onions, and garlic back in to the pot. Pour in enough pasta water to lightly moisten all ingredients, then stir in the cheese and season with salt and pepper. Add more pasta water as needed. Top with some fresh cheese at the end and enjoy!

July 19, 2010

Braised Lamb Shanks Provencal

I love lamb.


Last night, M and I sat around the table playing a game of designing our own restaurant menus. If we were to choose five appetizers, five entrees, and three desserts to be on the menu at a restaurant bearing our name, what would they be? This lamb shank was the first entree on both of our menus. 

These lamb shanks feel completely indulgent. Yet they are entirely simple and only call for a few basic ingredients. In fact, I had things to do with my Sunday, like go for a long bike ride and paint some furniture, so the shanks slow braised in the crock pot all day long. No attention required. We came and went as we pleased, and later sat down to a dinner that felt like it had been served up at a great restaurant on a special occasion, and tasted just as good... Even before the first bite, the aroma is so  incredibly deep and rich that it gives the sensation of eating the whole meal without having yet lifted a fork. The shank is so tender and moist that it falls right off the bone with a single touch and into the rich gravy of beef stock and onions.

The dish is pure bliss, but for now, the upscale restaurant serving lamb shank is my own Philadelphia kitchen and modest little table by the window. But M and I can sit there as long as we like, looking out onto the park, savoring mouthfuls of tender meat and imagining a menu full of things that are almost as delicious as what we're eating. 

Slow Braised Lamb Shanks: serves 2
2 lamb shanks (approx. 1 lb each, from the butcher)
3 cloves garlic, sliced
1 T. olive oil
2 T. flour
1 Spanish onion, sliced
Herb de Provence (mixture of thyme, tarragon, rosemary, etc. Use whatever herbs you see fit)
salt & pepper
1 cup beef stock
1 T. red wine

Directions:
Set oil over medium-high heat. Meanwhile, cut small slits into the shank and stuff with garlic slices. Dust each shank with flour. When oil is hot, lower each shank into the pot and allow to brown for five minutes on each side. Remove the shanks and put the onions to saute in the same pan. Rub the shanks with the herbs, salt, and pepper.

In a slow cooker (or large pot, if you are willing to stay home to man the stove), place the red wine. Then, put the onions in the slow cooker and deglaze the pan with the beef stock, and pour into the slow cooker or pot. Lower in the lamb shanks and cover. Allow to cook on low for 8-10 hours in the slow cooker, or for 2-3 hours in a pot over low heat. Serve covered with the onions and gravy, with potatoes and a vegetable on the side.

July 16, 2010

Apple Peanut Butter Crunch Snack Attack

This is a silly post, but really sometimes you just need a snack. I love snacking and I need a snack very often.  Thus, this snack is important. It needs to satisfy all of my cravings: salty, sweet, crunchy smooth. I like it to have protein, carbs, and a fruit or veggie in there would be nice. Some fat is good, too.

May I present the apple peanut butter crunch snack:


Try writing the word "snack" over and over like I just did. It begins to look more and more strange until finally the word barely makes any sense anymore. In fact, it makes no sense right about now.

Anyway, this snack (argh!) is one that satisfies all of my cravings so that I don't keep on raiding my desk drawer until there is nothing left. It's a fun and tasty treat, though the crunching may attract hungry colleagues. Happy snacking!

Apple & Peanut Butter Crunch:
1 Gala or Fuji Apple
3 T. smooth peanut butter
1/2 cup Kashi GoLean Crunch or your fave granola

Slice the apple and layer on the peanut butter. Then, dip the slices in the Kashi or granola. Snack away.

July 15, 2010

Delicious Creations: Meatless Chorizo Burgers with Sweet Potato Fries

This burger is so tasty! We gobbled ours up in a matter of minutes. 


M said, "these dinners always go too fast." He was right. Whenever it is "meatless burger" night, whether it's bean burgers or this new chorizo burger, we tend not to come up for air. We are quickly left with empty plates, as if dinner never happened. The evidence, though, is in our big smiles. There were many smiles last night.

My love for soy chorizo is no secret. Yet I longed to make it more versatile, to reach past the expected creations of enchiladas or chili. Why not a soy chorizo burger? As long as I could make the ingredients stick together, shaped into burger form, it could just work. And it did!


The soy chorizo is so flavorful on its own, the burger patty barely needs additional spices. Browned under the broiler, the patty becomes toasty on the outside, yet stays soft, meaty, and perfectly moist on the inside.

These burgers were made over-the-top delicious with the right toppings. First, the thick, melted Manchego cheese: its cool, smooth flavor was the perfect compliment to the spicy burger. Then, the creamy salsa sauce smothered on top was the ultimate condiment. With all of these incredible flavors sandwiched between a big, soft bun, nothing else was needed. 

Our silence said it all as we devoured every last crumb.

Soy Chorizo Burgers: makes 2 burgers
Ingredients:
1/2 small Spanish onion
1 clove garlic
1 egg
1 T. Worcestershire Sauce
1/2 cup whole wheat breadcrumbs
1/2 casing of soy chorizo
1 t. chili powder
1 t. Cayenne pepper
2 oz. sliced Manchego cheese
2 soft buns
Salsa spread, recipe below

Directions:
In food processor, chop the onion and garlic. Add the egg and pulse until blended. Add the breadcrumbs and pulse together with the Worcestershire sauce and the spices. Transfer to a large  bowl and stir in the soy chorizo. Shape into two patties and cook under the broiler until lightly browned, or in a pan. Flip over to the other side, then in the last two minutes top with Manchego cheese and toast the buns if desired.

If you don't have a food processor, you can simply chop the onions and garlic and combine all other ingredients.

Top with generous dollops of the salsa spread, and serve with Sweet Potato Fries.

Salsa Spread:
Stir together 2 T. light or regular mayonnaise with 4 T. salsa. Add salt, pepper, and any desired spices.

Spicy Sweet Potato Fries


Spicy, salty, and slightly sweet, these baked sweet potato fries are totally healthy for you, but taste sinfully delicious. Plus, they are easy to make. All you need are sweet potatoes and a few spices. They taste like they took a plunge in the deep-fryer, but I promise, there will be no deep-fryer in sight.

Cooking the fries under the broiler is the key to fries that are lightly crispy on the outside just like regular fries. We will have no soggy sweet potato fries here! So get out your peeler, knife, and a baking sheet... you'll be looking for every excuse to make these as often as possible.

Sweet Potato Fries: makes two side servings 
Ingredients:
2 medium to large sweet potatoes, preferably elongated in shape
cooking spray
1 T. salt
1 T. cayenne pepper
2 t. chili powder
2 t. cinnamon

Directions:
Peel the sweet potatoes, then cut down the length of the potatoes to produce 1/2 inch slices. Place the uncooked fries on a baking sheet. Spray with cooking spray, then evenly sprinkle with salt, cayenne, chili powder, and cinnamon. Turn and toss them gently on the sheet to evenly distribute the spices.
Cook under the broiler set on Low, turning the fries every few minutes to evenly brown on each side.

July 14, 2010

Spinach Semolina Gratin

It tastes like Italy in a dish. I promise.


I had a bag of semolina flour on hand and wondered what else to do with it other than make fresh pasta.


I found the most delicious answer. 

Warm and bubbly, thick and richly flavored, every spoonful of this spinach gratin is a complete pleasure. As it bakes, the mixture of semolina flour rises in the dish, puffing up and browning slightly at the edges, all the while completely enveloping the cheese, spinach, and tomatoes.


Here is a secret: those browned edges and the lovely toasty base that forms at the bottom of the baking dish are a serious treat. I may have scraped them all out of the pan and eaten them myself. I simply could not help it.

I had some lovely orange and yellow tomatoes which I sliced thinly and placed on top. They worked wonderfully and added color and flavor. Although the filling calls for spinach,  it is fair to say that this gratin is so user-friendly that it would be a delicious vehicle for any ingredients you may have on hand. Some that would likely work well are kale, broccoli raab, and diced Yukon Gold or sweet potatoes. I may even venture to say that meat has a place in this gratin if you wanted to include some browned sweet sausage or pancetta. It's a wonderful recipe for creativity, and you can experiment with what to include, even changing the cheeses you use. Really, though, it is fabulous as a vegetarian dish that is filling and satisfying on its own.

On a final note, this gratin is very simple to make, inexpensive, and would be perfect to serve to a large group at a dinner or holiday. As I discovered, the leftovers of are delicious for breakfast and lunch: testament to its truly versatile combination of flavors. On a final note, although I made this as a main course, it would certainly serve well as a side for a super-cozy comfort meal...perhaps paired with a nice lamb shank (...yum. That may be for next time!)

Semolina and Spinach Gratin: serves 6
Ingredients:
1 Spanish Onion, diced
2 cups milk (preferably 2%)
2 cups water
2 tablespoons Earth Balance or regular butter
2 teaspoons salt
1 cup semolina flour
1 (10-ounce) package frozen chopped spinach, thawed and squeezed dry
1/2 cup grated Monte Veronese cheese, or other semi-soft Italian cheese
3 large eggs (whisk in 1 at a time)
1 teaspoon ground nutmeg
1 teaspoon garlic powder
Salt and pepper

1/3 cup grated Parmesan or Monte Veronese cheese
Thinly sliced tomatoes

Directions:
Preheat oven to 400°F.
Butter 11x7x2-inch glass or ceramic baking dish.
In large saucepan, saute onions in 1 T butter until golden brown. Add and bring to a boil milk, water, butter, and salt. Reduce heat to medium. Gradually whisk in semolina flour, then whisk until mixture is thick and smooth, from 1-5 minutes. Whisk in spinach, 1/2 cup cheese, eggs, nutmeg, salt, and pepper. Pour mixture into prepared baking dish; smooth top. Line the top with the sliced tomatoes and sprinkle with 1/3 cup grated cheese.
Bake gratin until puffed and golden, about 40 minutes. Cool 10 minutes before serving.
adapted from epicurious.com

July 13, 2010

How to Make a Fun Cake Base

I feel sad for my springform pans. Inevitably, they end up being a base for lots of slicing of the cake that is assembled on top of them, and end up with many a silver scar to show for it. I decided it was time to stop abusing my springform pan bases and start getting creative. I don't own a cake stand, but even if I did, assembling a cake on the cake stand poses a problem of exposing the cake to air (unless it has its own cover). So I home-made a little circular base that I could assemble, decorate, move my cake around on, as well as tuck inside my cake caddy:


Since my cake was an 8" round, I made the base a 9" round to give myself room for decorating, slicing, and also to let the pretty print show.

Here's what you need:
A piece of cardboard
A round pan or baking dish
A pencil or pen
Scissors
Double sided tape or glue dots
Regular tape
Decorative scrapbook paper
Wax Paper

Trace the baking pan on the cardboard. Cut out the circle. Trace the same circle on your scrapbook paper. Cut it out. Place double sided tape or glue dots close to the edges and on the inside of the cardboard circle. Then, carefully line up your scrapbook circle and press firmly on top. Next, rip off a big sheet of wax paper and place it on top of your circle. Turn the circle over and tape down the wax paper on the opposite side of the cardboard like this: (can you tell it was a beer box? This is not an ad for Sam Adams)


It may not look pretty on the opposite side, but just firmly tape the wax paper down and smooth it so that the edges are rounded and neat. Then, turn it back over and put your cake on it, like I did with this one. You can get creative and use photos, articles, or any other interesting print! Happy tracing and baking!

Potato Chickpea Masala

Finally, my first and only attempt at making Indian food from scratch.


I did it! And I will do it again and again because it was easy and delicious. Farewell to the days of vaccum packed baggies of Indian fare. Goodbye to the ever-bland jars of Korma sauce I would casually toss into a pot with some chickpeas... And I am sorry, Indian food, that it even took me this long to discover you in your freshest and most flavorful state. Really, I am.

Last night as the rain pelted down on our big windows and lightening flashed through the dark sky, I peeled potatoes, chopped onions, rinsed chickpeas. "Is that coconut?" M wondered out loud as the smell of toasted coconut flakes rose from the stove and filled the apartment. Pureed garlic and jalapeno peppers simmered in a thick sauce of curry powder, garam masala, cumin, turmeric...

Twenty minutes later, M and I sat down to plates heaping with Potato Chickpea Masala to be scooped up with huge, fluffy curried naan bread. The spicy, aromatic sauce had a perfectly thick consistency to coat the heaps of tender potatoes and meaty chickpeas. I was in Indian food heaven. Although it was almost embarrassing how easy the meal was to prepare, I still felt a twinge of earned pride at having crossed a personal culinary boundary.... Even if the steps are small, all about taking them in the first place. Now, if you're looking for some jars of masala sauce, I think that I have some to give away...

Potato Chickpea Masala:
Ingredients:
1 1/2 pounds Yukon Gold potatoes
1/3 cup dried grated unsweetened coconut
2 teaspoons cumin
1 (3-inch) fresh jalapeño, coarsely chopped, including seeds
1 T. ginger
3 garlic cloves, smashed
1 tablespoon curry powder
2 t. garam masala
1/2 teaspoon cinnamon
1/2 teaspoon turmeric
1/3 cup vegetable oil
1 3/4 cups water, divided
1 large onion, chopped (about 3 cups)
1 (15-ounces) can chickpeas, rinsed and drained
1/2 cup frozen peas (do not thaw)

Directions:
Peel potatoes and cut into 1-inch pieces.
Toast coconut in a 12-inch heavy skillet over medium heat, stirring occasionally, until golden, about 3 minutes. Transfer to a small bowl and wipe out skillet.
Purée jalapeño, ginger, and garlic in a blender with curry powder, garam masala, cinnamon, turmeric, oil, 1/4 cup water, and 1 teaspoon salt until smooth. Transfer purée to skillet and cook over medium-high heat, stirring, until thickened slightly, about 1 minute. Add onion and cook, stirring occasionally, until it begins to soften, about 8 minutes.
Drain potatoes, then add to onion mixture with cumin seeds, chickpeas, and remaining water and cook over medium heat, stirring occasionally, until potatoes are barely tender, about 20 minutes.
Add peas and cook, covered, until just tender, about 3 minutes. Remove from heat and stir in toasted coconut.
Serve with rice or naan.
recipe adapted from epicurious.com

July 12, 2010

It's a Pear & Carrot Cake...

Love is in the air.


I baked a pear & carrot cake for my friends Mindy & Mark's engagement party this weekend. I guess that we can call it a Pearot Cake, although the real story behind this cake arose from a joke about a "Parrot Cake." You see, Mindy had baked a pear cake with cream cheese frosting for Mark's birthday (along with the chocolate stout cake, for good measure), but everyone became confused when they learned mid-bite that they were not eating carrot cake. Mindy spent the evening explaining that, no, it was in fact a pear cake, and not carrot. It then became dubbed the "parrot cake" and lots of corny jokes about tropical birds ensued.

Fast forward to M & M's engagement party. Guests were asked to bring a dish that reminded them of the celebrated couple. Thus came my attempt to make an actual pear & carrot cake, a true "parrot" cake. There are no recipes for pear & carrot cake, so I adapted the original pear cake recipe, made a few changes, and viola:


This cake is sweet, moist, and completely scrumptious. Hints of cardamom and cinnamon in the batter are completely addictive. Crunchy toasted walnuts add delicious texture and depth to the smooth pear and carrot cake layers. 


Slather on the honey, cinnamon, and lemon cream cheese frosting. It is a balancing act of flavors made in heaven. 


The little heart shaped layer went right on top! 


Then it was decorated with "something blue." 

I think I ate four slices of this cake before the night was through. There really was no other way around it. It is the kind of cake where you can't help but go back for seconds... or fourths. It's both extremely rich and brightly flavorful. In a strange way, the cake is almost juicy. The cream cheese frosting is unique, with undertones of honey and lemon that make it both sweet and citrusy. 

This Pearot Cake is a party on a cake stand. It was fun to make and even more fun to eat. Now that's reason to celebrate!

Pear & Carrot Cake with Honey Lemon Cream Cheese Frosting:
Cake:
2 cups all purpose flour
1 cup granulated sugar
1/2 cup brown sugar
2 teaspoons baking soda
1 teaspoon salt
2 teaspoons fresh ground cardamom
2 teaspoons ground cinnamon
3/4 teaspoon ground nutmeg
3/4 cup vegetable oil
2 large eggs
1/3 cup whole milk
1 1/2 teaspoons vanilla extract
1.5 cups peeled Bosc pears (about two large). Food process 1 cup, chop 1/2 cup
1.5 cups peeled carrots, finely chopped in the food processor
1/2 cup walnuts, toasted, chopped

Frosting
2 8-ounce packages cream cheese (1/3 less fat, optional) room temperature
1/2 cup (1 stick) unsalted butter, room temperature
1 cup plus 3 T powdered sugar
2 teaspoons vanilla extract
2 teaspoons grated lemon peel
2 T. fresh lemon juice
1/8 to 1/4 cup honey (start with 1/8 cup, adjust to desired flavor & consistency)
2 t. cinnamon

Directions:
For cake:
Preheat oven to 325°F. Butter and flour two 8-inch-diameter cake pans with 1 1/2-inch-high sides. Whisk flour, sugar, baking soda, salt and spices in large bowl. Make well in center of flour mixture. Add oil, eggs, milk and vanilla; whisk just until evenly moistened. Fold in pears, carrots, and nuts; divide between pans.
Bake cakes until tester inserted into center comes out clean, about 45 minutes. Cool cakes in pans on racks.
For frosting:
Beat cream cheese, butter, powdered sugar, vanilla, cinnamon, lemon juice and lemon peel in large bowl until fluffy. Add honey and beat until smooth. If frosting is very soft, chill until firm enough to spread.
Cut around cakes; turn out of pans. Place 1 cake layer, flat side up, on platter. Spread with 1 cup frosting. Top with second layer, flat side down. Spread remaining frosting over top and sides of cake.

For directions on how to home-make the cake base, click here.
adapted from epicurious.com pear cake recipe.

July 9, 2010

Chocolate Stout Cake: A Long Overdue Post

I did not make this stout cake. My friend Mindy made this stout cake, and for all I am concerned she can continue making this stout cake. It is in-cred-i-ble. 


Not to mention that this cake weighs as much as a ten-year-old boy. 

I first tasted Mindy's stout cake in cupcake form, where she piped the chocolate ganache straight into the middle of each cupcake, then slathered it thickly on top of each. I almost died. I begged her for the recipe. I almost proposed marriage. 

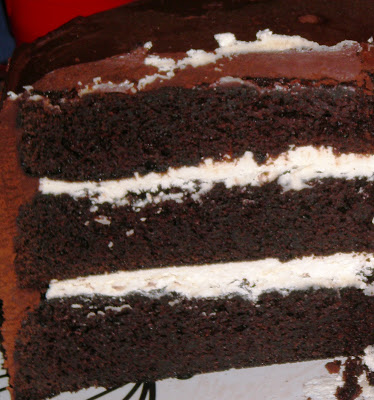
A couple of weeks later, she baked it again, this time in cake form for her boyfriend Mark's birthday party. Mark had requested vanilla creme layers on the inside of the cake in order to break up the chocolate, which is what you see here:


A great idea. An even better idea was that Mark proposed to Mindy last week (could it have to do with her baking skills?), so I thought it was high time to post the recipe here as an ode to one of my favorite couples. Good thing I did not propose marriage over those cupcakes, since clearly that was what Mark had in mind.

This is one seriously thick, heavy, decadent chocolate cake. It is for serious chocolate people. I am a pro cake-eater, and I can only consume about a 1/2 inch slice at a time. It is just that rich! The entire situation is kind of frustrating, since your eyes want to eat the entire thing in one sitting, but your stomach is saying, "dear god, it is so good, but please I need a break!" 

The cake itself is both dense and moist and could be easily enjoyed on its own. But then, it is layered with a thick ganache has the flavor and texture of rich chocolate truffles. I promise that you will enter heaven immediately upon the first mouth full... I hope to see you there soon.

Chocolate Stout Cake: 
Cake
2 cups stout (such as Guinness)
2 cups (4 sticks) unsalted butter
1 1/2 cups unsweetened cocoa powder (preferably Dutch-process)
 4 cups all purpose flour
4 cups sugar
1 tablespoon baking soda
1 1/2 teaspoons salt
4 large eggs
1 1/3 cups sour cream
Icing:
2 cups whipping cream
1 pound bittersweet (not unsweetened) or semisweet chocolate, chopped

Directions:
For cake:
Preheat oven to 350°F. Butter three 8-inch round cake pans with 2-inch-high sides. Line with parchment paper. Butter paper. Bring 2 cups stout and 2 cups butter to simmer in heavy large saucepan over medium heat. Add cocoa powder and whisk until mixture is smooth. Cool slightly.
Whisk flour, sugar, baking soda, and 1 1/2 teaspoons salt in large bowl to blend. Using electric mixer, beat eggs and sour cream in another large bowl to blend. Add stout-chocolate mixture to egg mixture and beat just to combine. Add flour mixture and beat briefly on slow speed. Using rubber spatula, fold batter until completely combined. Divide batter equally among prepared pans. Bake cakes until tester inserted into center of cakes comes out clean, about 35 minutes. Transfer cakes to rack; cool 10 minutes. Turn cakes out onto rack and cool completely.
For icing:
Bring cream to simmer in heavy medium saucepan. Remove from heat. Add chopped chocolate and whisk until melted and smooth. Refrigerate until icing is spreadable, stirring frequently, about 2 hours.
Place 1 cake layer on plate. Spread 2/3 cup icing over. Top with second cake layer. Spread 2/3 cup icing over. Top with third cake layer. Spread remaining icing over top and sides of cake.
recipe from www.epicurious.com

July 7, 2010

Israeli Couscous with Roasted Butternut Squash, Pine Nuts & Raisins

A hearty vegetarian dish with big flavor. 


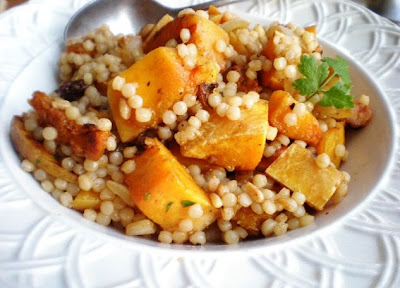
It's ready in less than 20 minutes and is both pretty to look at and delicious to eat. Savory roasted butternut squash, toasted pine nuts, and browned onions are combined with sweet bursts of juicy raisins, chopped figs, and aromatic cinnamon and cardamom. 


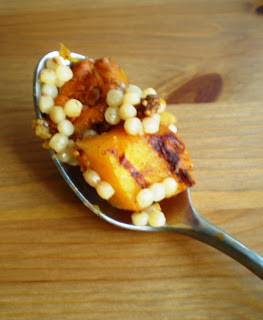
It was 104 degrees here last night, and I was determined not to light the oven to roast my butternut squash. So I placed each hunk of squash down in the stove top grill pan and let it work its magic.


I tossed all of the above ingredients together with boiled Israeli couscous. A big bowl of this is all you need for dinner. Its bright colors and deep flavors engage all of the senses.


A treat to eat, yet fast and inexpensive. It would also be a fabulous side to a grilled lamb chop, or even served cold or at room temperature as a salad.

Israeli Couscous with Butternut Squash:
Ingredients:
3/4 pound butternut squash, cut into 1/2-inch dice. In this case, I had already peeled and seeded it, which saved time. You can also use a bag of defrosted, pre-cut frozen butternut squash.
1 T. salt
3 tablespoons olive oil
1 large onion, chopped
1 cup Israeli couscous or acini di pepe (tiny peppercorn-shaped pasta), about 1 pound, cooking water reserved
1 (3-inch) cinnamon stick (optional)
1/8 cup chopped fresh flat-leaf parsley
1/2 cup pine nuts, toasted
1/2 cup raisins (golden or regular)
1 T. ground cinnamon
1 t. freshly ground cardamom
2 T. fresh squeezed lemon
salt & pepper to taste

Directions:
Toss squash with 1 tablespoon oil and salt to taste and spread in 1 layer on a grill pan over medium heat. Cook for 15 minutes or until squash is just tender, turning every 5 minutes. Transfer to a large bowl. 
Toast the pine nuts in a dry pan over medium heat. Add to the large bowl. 
Cook onion in 1 tablespoon oil in a 10-inch heavy skillet over moderately high heat, stirring occasionally, until just beginning to turn golden. Add the raisins to the pan and stir to warm through. Add to the bowl with the squash and pine nuts.
Cook couscous with cinnamon stick in a large pot of boiling salted water 10 minutes, or until just tender, and scoop out of the water with a fine meshed colander (do not rinse). Add couscous to vegetables and toss with 2 tablespoon oil to coat. Add the lemon juice, parsley, nuts, raisins, ground cinnamon, cardamom, and salt and pepper to taste. Toss to mix well.

July 6, 2010

Gemelli with Pesto & Cherry Tomatoes

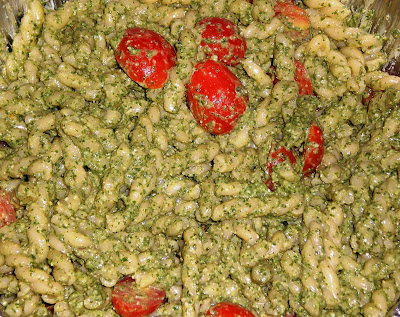
A wonderful, bright and fresh tasting pasta salad for a summer's day! Though I know I made pesto last week and posted it, I ended up making some more when I was out in the Chicago area for the 4th of July and tossed it with some cute gemelli pasta and sliced cherry tomatoes.  Then, we brought it to a potluck.

basil

toasted pine nuts

Essential for the pesto! Plus lots of fresh squeezed lemon and good olive oil. Parmesan cheese and salt. 

I chose gemelli because they are just so adorable and fun to eat. I swear their lovely little twisted shape even makes them taste better.... 


Gemelli with Pesto & Cherry Tomatoes:
Ingredients:
1 recipe Basil Pesto
2 lbs. cherry tomatoes or variety heirloom tomatoes
2 lbs. Barilla Gemelli
salt

Directions:
Add the pasta to a large pot of boiling, generously salted water. Cook uncovered until al-dente. Meanwhile, slice each cherry tomato in half. Once the pasta is done, drain and rinse immediately with cold water. In a large bowl, toss the pasta well with the cherry tomatoes and pesto. Salt to taste.

July 5, 2010

Oatmeal: Breakfast of Champs

I really really love oatmeal. In all forms, with all sorts of things added into it. This posting spot is my ode-to-oatmeal. Whenever I make a new sort of oatmeal, I'll post it here. Since making oatmeal is not exactly a groundbreaking culinary endeavor, I'll just share the add-ins in case they provide some yummy inspiration . Oatmeal is a great vehicle for add-ins, and anyone who has ever gone out for an ice cream sundae with me knows that I am a total sucker for add-ins, mix-ins, whatever you want to call them... I say the more the merrier, go wild, do what you like.  In this case, oatmeal is the start to a new day... what a great excuse to get powered up with some seriously yummy ingredients!

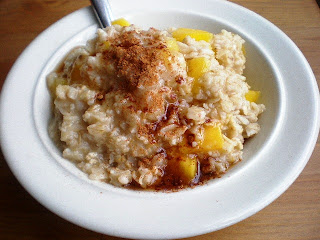
Mango Maple Oatmeal:


1/2 cup whole rolled oats, 1/2 t. salt, 1/2 cup chopped frozen mango, 1 T. cinnamon, 2 T. maple syrup.
Bring the oats and salt to a boil. Reduce to a simmer. After 2 minutes, add the frozen mango. Cook another 2 minutes. Pour into a bowl and top with cinnamon and maple syrup. 

Banana Flax Oatmeal:


If I don't fuel my day from the very start, I lose steam quickly. To avoid this, and to have about twenty minutes of bliss every morning as I enjoy every single bite of my breakfast, I make banana oatmeal.

To make it quickly, I use one-minute oats. One-minute oats are not instant oats, which leave me feeling sad and empty, nor are they whole rolled oats, which take a bit too long to cook in a time-crunch and in the microwave at work. I find that one-minute oats have a great, cohesive consistency, sticking together nicely while still resembling well-enough the oats they came from. By adding an over-ripe banana, which becomes even sweeter when hot, and a big dash of cinnamon, it feels like a dessert! The banana's potassium is a wonderful source of fuel. Cinnamon fights dips in blood sugar. Flax seed combats cancer-causing agents...

Banana Oatmeal:
1/2 cup one-minute oats
1 large, over-ripe sliced banana
1 cup hot water
2 T flax seeds, ground or whole
1 T cinnamon (less if you don't like as much as I do)

Microwave in a large bowl on high for two minutes, stirring at one minute and taking care that it does not bubble over.

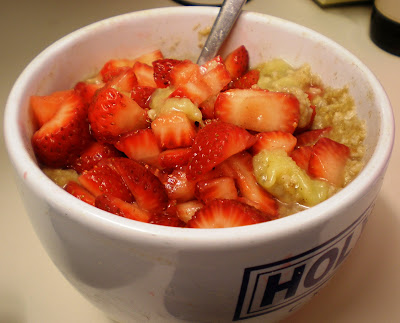
And Strawberry Banana Oatmeal:


Add 1/2 a cup of quick cooking oats and hot water, plus a ripe, sliced banana. Microwave on high for 1 minute, then add sliced strawberries that are tossed in 1 T of granulated sugar. Microwave on high for another 30 seconds - 1 minute, watching closely as it will bubble over. Add cinnamon and enjoy!

And Raisin Walnut Cinnamon Oatmeal:


Add 1/8 cup of chopped walnuts and 1/8 cup of Organic Raisins to your dry oatmeal. Add water and microwave on high for 1.5 minutes. Stir in 1 T cinnamon and 1 T ground flax seed.

Peanut Butter & Raisin Oatmeal:


Tastes like a peanut butter raisin oatmeal cookie!


1/2 cup dry oatmeal, 1 cup water, 1/4 cup raisins, 2 T creamy peanut butter, 1 T cinnamon.
Microwave on high for 2 minutes, stir well!

Links

Related Posts Plugin for WordPress, Blogger...