Showing posts with label Dinner. Show all posts

March 6, 2014

"Greek with Greens" Pasta


Our favorite local restaurant, Dmitris, is a special place for M and me. It's been a long favorite, with authentic and amazingly prepared Greek small plates. It's located on Fitler Square park, where M proposed to me, and we always smile when we remember all the days while M was a first year medical student. We'd walk by and stop to read the menu, always dreaming of being able to afford a night out at such a cozy, intimate spot. 

Years have passed with Dmitris as our special place. We've had anniversaries, dinners with both our parents, countless dates, and milestone celebrations at almost every table there. On March 9th, our Dmitris will be closing. They lost the lease, and for M and me, it's the end of an era. We're silently thankful for our upcoming move to NYC to lessen the ongoing grief over this loss!

Among our favorite dishes there includes what they call "Greek with Greens." It's a bright and perfect salad loaded with hunks of briney feta, zesty kalamatas, and crisp greens. This pasta dish is my homage to those flavors, which we crave regularly.


These cold nights call for a piping hot, comforting pasta bowl with all those fabulous Greek flavors we love. This rigatoni is simmered in a lightly creamy sauce and tossed with bright spinach, hot pepper flakes, feta, and chopped kalamatas olives... Oh, and don't forget the juicy slices of sweet basil turkey sausage!

Although we'll have to fiercely protect our wonderful memories of long chats and laughter over fried smelts, hummus and grilled pita, lamb, and of course, Greek with Greens, it is some small consolation to channel those memories over my own stove and serve them at my home table.


Greek with Greens Pasta: serves 2
Ingredients:
2 cups rigatoni *reserve pasta water
1/2 bag frozen spinach
2 sweet basil pesto turkey sausages, sliced (Trader Joe's)
1/4 onion, halved and sliced
1/4 cup olive oil 
1/4 cup light whipped cream cheese 
1 T. red pepper flakes
1/2 t. garlic powder
1/2 t. cumin
1/4 cup kalamata olives, lightly chopped
4 oz. feta cheese, crumbled
Salt to taste 

Directions:
Boil pasta according to directions, adding the frozen spinach once pasta turns al dente, and turning off heat. Once spinach is thawed in the pasta water, drain and reserve the water.

Meanwhile, heat a sauté pan over medium heat. Add a couple T. of your oil to coat, then add sausages and onions to brown. Turn heat to medium low and add the olive oil and cream cheese. Stir to blend as it heats, then stir in the pepper, garlic, and cumin. Pour your drained rigatoni and spinach into the saucepan and stir to combine. Add some of the pasta water and bring to a simmer until sauce thickens further. Stir well and salt to taste. 

Divide into two pasta bowls, squeeze with lemon if desired, and top with feta crumbles.
 

November 23, 2013

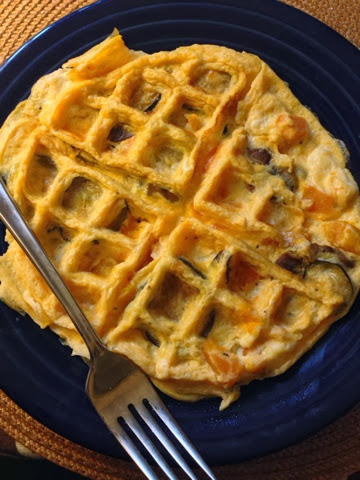
Waffle-Maker Fritatta


I tried it! Using my waffle maker for eggs that were deliciously fluffy, veggie and cheese laden, and piping hot.

This was not my idea -- I saw it this past Wednesday morning on a segment of the Today Show. I am so glad I saw it because I was about to toss my waffle maker for lack of versatility. It seemed to take up too much space while lacking versatility. I'm kind of just over one-purpose gadgets (except for you, coffee maker).

Now I know my waffle maker is a secret multi-purpose gadget! I'm so excited, and so is the waffle maker since he won't end up on the curb in this week's trash pick up.


Ingredients:
2 large eggs, beaten together with 1 T. water and a pinch of salt
1/2 cup of cooked veggies of choice (or well diced raw veggies)
2 big tablespoons crumbled feta cheese
Non-stick spray 

Directions: preheat waffle maker (I used setting 4) then spray the top and bottom with non stick coating. Meanwhile, whisk together the eggs, veggies, and cheese. Pour evenly over the waffle pan and move the veggies around if they all landed in one spot. Close the top gently and don't turn it over, just let it cook an both sides. After 3-4 minutes you've got a wonderful, quick Fritatta to enjoy.

November 2, 2013

Freezer Cleanout Challenge: Slow Cooker White Bean Chicken Chili


A couple of weeks ago I opened the freezer and almost broke my toe. Sadly, this freezer attack (this time, the perpetrator was a sliding slab of rock hard bacon) was subconsciously expected. I jumped back quickly and the bacon slab slammed to the ground, slid a few inches, and stopped. Then began an avalanche of every other frozen, odd shaped, stuffed-into-any-available-crevice food item.

This avalanche was the equivalent of a sit-down intervention, just a bit more active (and frantic).

I knew my tendency to freeze everything was catching up with me in a big way. Not only was there no  more room, but the whole freezer screamed "open me and risk a trip to the E.R.!"

Oh, and there was also the whole part about not having any idea what's in there anymore or how long it's been in there.

Please tell me you know what I'm talking about.

Please.

Freezer addicts, you know who you are. We're the breed that hates to waste food and just knows we'll have some better use for the rest of that bacon slab at a later date... that may just never come because now the bacon is hidden behind half a steak, some broccoli spears, and that chipotle-cilantro butter you made for steaks last Thursday.

As I shoved the freezer door closed, crinkling bags and shifting containers still precariously moving inside, I made a vow: for the next month (at least) I'd cook dinner only with items out of the freezer -- no adding!

Thus this chicken chili was born. It uses some frozen boneless skinless chicken thighs, some of the bacon that attacked me, and a few fridge and pantry items. I was proud of myself for making a dent in the freezer.... It was a step forward, post-intervention.


If we're going for honesty here, a few days later I took a step back as I packaged up leftover chili into little containers and... yes... froze them.

Hey, awareness is the first step toward change, right?

My freezer challenge isn't over. Future posts are TBD as I make my way through the cavern of cold! Hopefully someday soon I won't open that little door with fear for my life, but confidence about what's inside. Stay tuned!


Slow Cooker White Bean Chicken Chili: makes 6-8 generous servings
Ingredients:
1 bag dried white beans (cannelini), rinsed
about 6 cups water
2 strips thick cut bacon, diced
4 boneless, skinless chicken thighs
salt + pepper
olive oil for the pan
1 large red onion, diced
2 carrots, peeled and diced
1 T. dried oregano
1 T. chili powder
1 T. cumin
1 t. dried basil
1 t. garlic powder
1/2 t. cayenne pepper
1/2 t. paprika
2 large Idaho potatoes, diced into 1/2" pieces
2 cups chicken stock
3 bay leaves
salt + pepper to taste
hot sauce and shredded cheddar, optional

Directions:
In a large slow cooker, add the dried beans and 6 cups water (enough to cover the beans by a couple inches), and turn the cooker onto low and cover. Preheat a large pan or dutch oven to medium heat and spray with cooking spray. Once hot, add the bacon and cook until just crisp. Set aside. Add the chicken thighs to the bacon grease and sprinkle with salt and pepper. Brown the chicken on both sides a few minutes, then add this and the bacon to the slow cooker.

Add olive oil to the pan and again allow to heat through. Then add the onion and carrots and stir. Make a clearing in the middle of the pan/pot and add a little more oil. Then add all of the spices to the oil clearing and allow to heat, about 1 minute, before stirring in with the carrots and onions. Once the vegetables are slightly golden, add these to the slow cooker along with the diced potatoes. Return the pot to the stove and use the chicken stock to de-glaze the pan, scraping up all the flavorful bits before pouring this into the slow cooker and adding the bay leaves.

Slow cook on low 6-7 hours, or high 3-4 hours. Remove the bay leaves, salf + pepper to taste, and top with hot sauce and shredded cheese.

September 6, 2013

Cheesiest Cottage Cheese Baked Rigatoni


Oh, hi there. Have you noticed the weather cooling down?
 
Each day this week a breezy, cool evening sinks into a downright chilly night, which blooms into a crisp, sunny morning.
 
I have to put my sweater on to walk the dog. It's delicious.


I get excited in my bones for the change of the seasons. I'm sure you do, too.
And I get all giddy at the thought of piping-hot comfort food dinners. Like this one.
 
Don't call it low-fat, that's a term that makes me say, "boo, no flavor." It's got the hiss of that word "insipid." Call it lusciously sensible. There's no sacrifices here, and due to pureeing the cottage cheese into a ricotta-like texture, you don't even have to mention that you used the cheese that comes with a bland, bad rap and usually gets a boost from an odd pairing with pineapple.
 
Nope, let's just not mention it. Except for putting it smack in the recipe's title.


Your ooey, gooey secret's safe with me.

Cheesiest Cottage Cheese Baked Rigatoniserves 6-8

First, prepare the sauce. Of course, you can always use a quality jarred:
Sauce: In a medium saucepan, heat 2 T. olive oil over medium heat. Add 1/2 a largely diced red onion. Saute until slightly golden, 5-6 minutes, then add 6 cloves minced garlic and stir. Push onions and garlic to the sides to make a clearing in the middle of the pan, and add a heaping tablespoon of tomato paste. Caramelize the paste a minute, then add 1 t. dried basil, 1/2 t. dried oregano, 2 t. kosher salt, and 1 t. dried red pepper flakes. Stir, then add 1/4 cup red wine, 2 t. white sugar, and 1 28-oz. can Tuttorosso crushed tomatoes w/basil. Simmer 1 hour on low, stirring occasionally. Add up to 1/4 cup pasta water after cooking to thin it out a little bit, and season with salt + pepper to taste.

Then, boil 1 lb. rigatoni to very al-dente, about 4 minutes less than the suggested time on the bag. Drain. Meanwhile, prepare the cottage cheese "ricotta":

Cottage Cheese Ricotta: Food process together 1 16-oz container lowfat cottage cheese, 2 large eggs, a pinch nutmeg, generous pinches of dried basil, salt, pepper, and 3 T. grated parmesan cheese.

Shred: 1/2 lb mozarella cheese and 1/2 lb fontina cheese
Have some torn fresh basil on hand, too!

Once you've got all of the above on hand, coat an 8X8 inch baking dish with oil. Add a few scoops of red sauce to bottom of dish and spread. Add 1/3 of the pasta, 1/3 white sauce, and 1/3 shredded cheese. Repeat this, ending with a last layer of white sauce topped with shredded cheese and fresh basil. Spray top generously with cooking spray and bake 375 degrees covered with non-stick coated tin foil, then uncovered for 10-15 minutes or until bubbly and browned. Enjoy!

August 12, 2013

Pearl Couscous with Mint, Basil, and Gigantes


This recipe is for everyone with an abundance of summer herbs. Please, please don't let your beautiful basil or mint overheat in the sun or go to seed -- chop those beauties and toss them into this light, fragrant pasta.

The whole dish is ready in minutes, with the couscous taking less than ten as it simmers away in broth. Chop the herbs while the pasta plumps, then stir in veggies and beans, salt to taste, and sprinkle with some feta cheese if it's on hand.

Since I used frozen corn and peas, this dish is largely a pantry and herb garden creation. Perfect for busy weeknights when flavor can't be sacrificed for time and relaxation.


Ingredients: (serves 2)
1 T. olive oil
1/2 large Spanish onion, largely diced
2 cups chicken broth (vegetable broth for vegetarian)
3/4 cup pearl couscous
red wine dressing (recipe follows)
1 cup frozen corn
1 cup frozen peas
1 can gigante beans, rinsed and drained
1/3 cup basil, chopped
1/3 cup mint, chopped
salt and pepper to taste

red wine vinegar dressing: 1/4 cup red wine vinegar, 2 T. fresh lemon juice, 1 T. honey, 1/4 t. freshly ground black pepper, 1/2 t. salt, 1/2 cup olive oil whisked together)

Directions:
Bring a large saucepan to heat over medium low, then add the olive oil to coat. Add the chopped onions and cover, stirring a couple of times, until turning just golden. Pour in the chicken broth and couscous and cover, turning up the heat to bring to a boil. Reduce to a simmer and stir occasionally. When the couscous is tender but still firm to the bite add the red wine dressing and stir. Add in the frozen corn, peas, and beans and heat through. Stir in the basil and mint and salt and pepper to taste. Add feta cheese on top if desired and serve warm or room temperature.


July 13, 2013

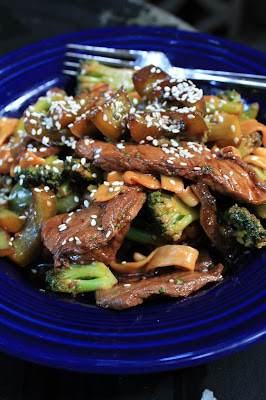
Chinese Takeout Takeover: Beef & Broccoli


After returning from a week vacation in Maine that was filled with binges on bags of Cape Cod potato chips, late night ice-cream sandwiches, giant lobster rolls dripping in butter, "taste testing" beer variety packs, and multiple rounds of BBQs, I returned determined to get back to healthy. Don't get me wrong, my vacation indulgences were exactly what I wanted, but the swollen feeling I noticed coming over me at about day 5 was not exactly what I wanted.

Wait, what? I can't eat a diet solely of fat, sugar, and carbs?

If only....

I threw back the last bag of chips on the return drive home, bought myself a McDonald's ice cream cone outside of Philly, and vowed to get back to healthy for the week ahead. Bye bye vacation, hello balanced diet.

I'm surprised I wasn't shaky from the withdrawal, but I started off my week focusing on protein and produce without sacrificing flavor or fun. That's how we fell in love with this beef and broccoli dinner we ate three times this week.

Thinly sliced soy-sauce marinated beef, tossed with loads of broccoli and peppers and combined with light and scrumptious tofu noodles was a trick to our tastebuds. It was a takeout takeover.


Ok, so we might have had a beer with it, and a bit of chocolate for dessert afterward, but with dinner this good it simply felt like we were still on vacation.

And that's exactly how every day should be.

Chinese Beef & Broccoli: serves 4
canola oil for the pan
1.5 lb Thinly sliced steak, marinated 30 min. in 2 T. soy sauce
1 green pepper, cut into 1" dice
1 lb. frozen broccoli, thawed
1 t. grated ginger
1 bag of tofu "linguini"*
sesame seeds for sprinkling, optional
Sauce:
1 cup broth
6 T. oyster sauce
6 T. red wine vinegar
1/2 t. garlic powder
2 t. sesame chili oil
2 T. soy sauce
2 T. cornstarch

Heat a large skillet over medium-high heat. Once hot, add enough oil to coat, and sear the beef strips in batches quickly, giving each piece enough room to sit and brown before turning over with tongs (this ensures the meat does not steam, but instead browns). Add oil between each batch. Remove beef strips immediately after they are browned on each side, as they will finish cooking through once added back into the stir fry. Cover and keep warm.

Add more oil to the pan and then sear the peppers. Meanwhile, whisk together the sauce ingredients. Clear a hole in the center of the pan then add more oil and the grated ginger. Bloom in the oil 30 seconds, then stir. Add the sauce, bring to a boil, reduce 5 minutes until thickened. Add the tofu noodles and the broccoli and heat through, then stir the meat back in.

Serve topped with sesame seeds.

* Tofu pasta is sold in the refrigerated section of Whole Foods stores.

June 4, 2013

Fried Brown Rice with Tofu


That tofu in the fridge was creeping toward its "use by date." It was in stiff competition with the remaining BBQ leftovers from Memorial Day -- packages of hot dogs, hamburgers, buns, all begging to be cooked and eaten -- along with leftover pizza and pastas from a night out to dinner where Matt and I managed to grossly over-order, as if we might never eat again.

There simply weren't enough dinner-times in the week to give all those items a rightful spot in the repertoire! Sorry burgers and dogs, you're getting re-located to the freezer for use another day. Pizza, you'll get taken for lunch until you're done. As for dinner, it's tofu's time to shine.

It has been a while since we had Chinese food so I decided on fried rice. It's a one dish meal that seemed simple to make while satisfying major cravings for takeout. Add in tons of healthy veggies and protein packed tofu, and it was a dinner winner.

I think you'll really enjoy  my version, which uses the more toothsome and nutty brown rice instead of traditional white. Brown rice also has more nutrients, so it's a better bang for your meal buck. The coating on this fried rice is a bit more robust, too, with the use of dark soy sauce.

Needless to say, I made heaps of it with the intention of creating (yet more) leftovers.... and we ended up with barely any! That empty fry pan speaks volumes!


Fried Brown Rice with Tofu: serves 4-6
Ingredients:
3 cups uncooked brown rice, rinsed thoroughly
vegetable oil (keep the bottle handy)
1 package extra-firm tofu, rinsed and patted dry
2 tablespoons regular reduced-sodium soy sauce
3 eggs + 1 tablespoon water, lightly beaten
1 teaspoon Sriracha, divided
1 white onion, cut into large dice
8 garlic cloves, minced
1 bag of frozen mixed Chinese vegetables
2 cups frozen peas
1/4 cup dark soy sauce
1/4 cup Mirin
2 tablespoons hoisin
1 tablespoon (plus more to taste) sesame oil
salt to taste

Directions:
Cook the brown rice according to the package directions. I used a rice cooker, but a pot works just as well. Once the rice is just-cooked and chewy in texture, spread out on a baking sheet to cool and dry out slightly.

While the rice is cooking, prepare your tofu by cutting it into 16 equal cubes and pressing to dry. In a small bowl, mix the low-sodium soy sauce and 1 teaspoon of Sriracha. Toss the tofu in this mixture and set aside to absorb.

While your rice is cooling, in a very large skillet or a wok, heat 2 tablespoons oil over medium-low heat. Add the eggs and cook as a flat omelet for 2 minutes, then break up into pieces. Remove from skillet into a medium sized bowl and set aside.

Heat the skillet to medium-high again. Add about 1/4 cup oil, or enough to generously coat the pan. Add the tofu and allow to cook until browning and crisping on the sides, stirring only every few minutes. Add the onions halfway through and allow to cook until golden and soft. Add the garlic and stir one minute. Remove tofu and onions to the bowl with the eggs.

Heat another 1/4 cup oil in the skillet and now add the rice, frozen vegetables, peas. Stir often, allowing the rice to crisp and the vegetables to heat through. Whisk together the dark soy sauce, Mirin, hoisin, sesame oil, and remaining Sriracha. Pour over the rice and stir to coat, salting to taste, as well.

Add the tofu, onions, and eggs back in and stir to combine well and heat through before serving.

March 25, 2013

Warm Harvest Fruit & Nut Wild-Rice Salad


This wild-rice salad is warm, hearty, and full of protein and nutrition. It's a one-bowl, one pan meal that's ready in mere minutes. I love healthy but sumptuous dishes like this, where you can serve yourself a giant, heaping bowl and scoop up every last bite without regret. It's food at its best, doing what it should do -- fill you and energize you.

I adore this dish because it's a great mixture of flavors and textures. It's got sweet and chewy dried cranberries, the earthy crunch from toasted pecans, hunks of soft and juicy chicken, crisp asparagus, and nutty, wonderfully toothsome wild rice. Plus the zing of chopped mint on top, balanced with the creaminess of feta cheese, is far far better than finding the prize in box of cereal for dinner.


Use your favorite vinaigrette dressing or make your own. Play with goat cheese versus feta, maybe toss in some chopped dried apricots with the cranberries, or use slivered almonds for your crunch factor. Omit the chicken for a great vegetarian dish. 

Like I always say, the kitchen is for playing and personalizing... Don't take it too seriously. After a long day at work, it's time to find delight in dinnertime.


Warm Harvest Fruit & Nut Wild-Rice Salad: serves two generously
Ingredients:
1 T. olive oil
1 boneless skinless chicken breast, cubed (optional)
1 cup wild rice
4 cups water
1/4 cup dried cranberries
12 spears frozen asparagus, defrosted and cut into 1" pieces
1/2 cup chopped red onion
1/2 t. Chinese 5 Spice
2 T. creamy vinaigrette dressing of choice
salt & pepper to taste

1/3 cup crumbled feta or goat cheese
1/4 cup toasted pecan pieces

1 t. chopped mint leaves

Directions:
In a medium saucepan over medium heat, preheat olive oil. Add the chicken breast and cook 4-5 minutes or until just cooked through. Remove from heat and set aside. Add the wild rice and stir 1 minute to toast, then pour in the water and bring to a boil. Reduce to a simmer and cover to cook as directed, about 40 minutes. 20 minutes in, add the dried cranberries. When the rice is barely done cooking, add the asparagus, onion, diced chicken and stir to heat through. Add the five spice and dressing, then salt and pepper to taste. Stir in the cheese, then divide into two bowls. Top with pecans and mint leaves and serve warm.

March 3, 2013

Split Pea Soup with Whole-Wheat Parmesan Croutons... a nod to Easters of my past


For all of my 27 years, and likely longer, my family has hosted our Easter holiday meal. It's a favorite season for me, and a day I look forward to year after year. I can almost smell the day in early Spring, slightly damp and cool; aunts, uncles, grandmas, cousins, gathering around trays of antipasto and clamoring loudly over glasses of wine as the ham bakes in the oven. If we're really lucky we'll get an unexpected bout of warmth and sunshine, enough for all the cousins play kickball or SPUD in the cul-de-sac for hours after dinner,  our bellies over-full as we distract ourselves until dessert. 

The Easter meal is always fantastic. Holidays are the best excuse to over-eat, of course. But there's another dish my father always had ready on the back burner... our post-Easter supper which used the best parts of the ham leftovers: Split pea soup. 

This soup is tied to my Easters past, when I still lived at home to enjoy it the nights after our guests had gone. My father had the bag of dried split peas already on the counter long before Easter, as a reminder to himself about the soup. Later, it simmered away on the stove with the ham hock for a boost of flavor. His pea soup was simple, salty. I loved it. Hunks of deep pink, almost red, chunks of our leftover ham were like prizes worthy of celebration, waiting in every bite... There were bits of sweet carrots that, admittedly, bothered me as a picky child but today feel like a craving in my memory. We'd eat it with big crusty bagels slathered in butter.

Could I create a soup like dad's and make it my own? 

Yes. Enter crisp bacon (another best of the pig, if I can't have a whole leftover spiral-cut!), hearty stock, pureed carrots, leeks, onions, and to top it off, crunchy fresh-made whole wheat Parmesan croutons. Be careful with this utterly addicting bread addition. I couldn't help but adorn each spoonful with a crispy crouton. My love for this soup was getting out of control. 

My own version of this pea soup has a texture as velvety as butter, thanks to the immersion blender, so there were no carrot hunks in sight. It is thick, savory, and truly lovely; just as Easter, just as the spring, and just as a memory of a wonderful dad with a trusty recipe.

I hope I did dad proud. 


Post-Easter Pea Soup: serves 4 generously
2-3 strips thick-cut Applewood Smoked Bacon
1 T. butter
1/2 cup diced onion
1/2 cup diced carrots
1/2 cup diced leeks
1 T. salt
32 oz. chicken stock
1 bag (about 2.5 cups) split peas, rinsed
additional water as needed
1/2 t. freshly ground pepper
1/4 t. ground nutmeg

*top with whole-wheat Parmesan croutons

Place a large stockpot or dutch oven over medium heat. Melt the butter, then cook the bacon until crisp and brown. Remove and set aside on a cutting board, reserving the fat in the pot. Add onion, carrots, leeks and salt, and saute until soft and fragrant, covered and stirring occasionally, about 8 minutes.

Pour in the stock and scrape the bottom of the pot for any flavorful brown bits. Add the peas and bring to a boil. Reduce the heat to a simmer and cook until the peas are soft to the bite, about 25-30 minutes, adding extra water to thin if necessary. Meanwhile, dice the cooked bacon into small hunks.

Add pepper and nutmeg to the soup, then puree with an immersion blender until completely smooth. Stir in the bacon. Season with salt and extra pepper to taste. Serve topped with whole wheat croutons.

February 21, 2013

Warm and Creamy Quinoa Salad with Chickpeas and Mint over Chopped Spinach


This creamy quinoa is the best of sweet and salty. Cardamom, mint, and dates add the sweet notes, while feta cheese, chickpeas, toasted nuts, and onions give it a savory balance. I loved serving this hot, velvety quinoa over finely diced spinach leaves... Giving it all a stir in my bowl brought the flavors together and gently wilted the spinach to the perfect consistency. 

Best yet, dinner was on the table in about 25 minutes. I'm looking forward to keeping this as a weeknight staple, swapping out the dates for dried cranberries, raisins, or currants, and interchanging different nuts, beans, and cheeses. Enjoy a big warm bowl as a respite from the work week and the winter cold!


Ingredients: serves 2
1/4 cup pine nuts or cashews
1 T. butter
3 cloves garlic, pressed
1/4 heaping teaspoon ground cardamom
2/3 cup quinoa, rinsed and drained
1 cup chicken stock (vegetable for vegetarians)
1 cup water (+  more as needed)
6 pitted dates, chopped
2 T. cream cheese
1/4 to 1/2 cup feta cheese (or goat cheese)
1/2 cup chickpeas
1/2 cup diced red onion
1/8 cup chopped fresh mint
salt + pepper to taste

2 T. olive oil
2 lemon wedges or 2 t. fresh lemon juice
4 cups finely chopped curly leaf spinach

Directions: Heat a small saucepan over medium heat and toast the nuts until just golden and fragrant. Set aside. Turn heat down to medium low and melt the butter, then stir in the garlic and cardamom for one minute. Add the quinoa, chicken stock, and water. Cover and turn to a boil, then add the dates and reduce to a simmer for 15 minutes or until the quinoa has softened and a white germ is visible around the outsides.

Meanwhile, divide two cups each spinach in two bowls. Drizzle with 1 T. olive oil each and 1 lemon wedge or t. of lemon juice each.

Then, into the quinoa stir the the cream cheese, feta cheese, then the nuts, chickpeas, red onion, and mint. Allow to warm through thoroughly. Season to taste with salt and pepper and serve atop the spinach in the bowls.

February 2, 2013

Pasta with Spicy White Clam Sauce


I'm going to apologize in advance for the rather gnarly-colored photo of this dish. I was in a rush to eat it (hungry, dinnertime, delicious, etc.) so I carelessly snapped a picture under the harsh lighting of my kitchen counter.

But it was oh-so-hot and tasty so I am sorry, friends, but the poor picture was worth the rush. I do hope that you make it despite lack of photo appeal. It was incredibly wonderful and amazingly easy. I'm very, very glad that I finally cooked this dish even though the canned clams had been sitting in my pantry for about two years now (don't worry, expiration date was like, 2019 or something!).

While growing up I'd get very excited when my mom would crank open a couple cans of white clam sauce to pour over linguine. There was something very luxurious about the buttery, white-wine-tinged, chewy clam laden sauce that I absolutely adored. I'd beg her for it. And then, just like that, I grew up and never had white clam sauce again. It also may have had something to do with the fact that my husband really does not enjoy dinners with fish in it. I felt unable to recreate my childhood classic out of fear that he'd starve at dinnertime.

Last week, I decided to risk his starvation. It had been far too long! Rather than open a can of sauce I cross-referenced a bunch of different homemade clam sauce recipes. It was too easy to be true, and all the ingredients were right there in my fridge and pantry. It's likely they're also in  yours. Simple canned clams steal the show here, but they are made truly divine with the backdrop of a velvety, savory white sauce.

Oh, and just in time for Valentine's Day, I should probably mention that clams fall under the "food aphrodisiac" category!

Pasta with Spicy White Clam Sauce: serves 4
12 oz. pasta of your choice
1/4 cup olive oil
1/2 large white onion, cut into 1" dice
3 large cloves garlic, minced
1 t. crushed red pepper (or more to suit taste)
1/4 cup dry white wine
1/8 cup cream or milk
1 t. Worcestershire sauce
1/4 cup freshly squeezed lemon juice
3 6-oz. cans chopped clams, drained with juice reserved
1 cup grated Parmesan cheese
1/2 cup freshly sliced basil
1 t. salt
1/2 t. freshly ground black pepper

Cook pasta in a large pot of boiling salted water until slightly more firm than al-dente (take about 2 minutes off the box-preparation time listed). Reserve pasta water.

Meanwhile, heat a large heavy skillet over medium heat. Add olive oil and saute' onions, covered, until golden and soft, 8-10 minutes. Push onions to one side of the pan and add the garlic and crushed red pepper. Allow both to bloom in the hot oil, 1 minute, then stir. Add white wine, cream, Worcestershire sauce, and lemon juice. Stir and bring to a rapid simmer. Add the pasta, then the reserved clam juice, and continue to simmer the sauce down a couple of minutes. Add pasta water to boost the sauce if necessary. Add the clams, Parmesan cheese, basil, salt, and black pepper. Stir, and adjust seasonings to taste. Serve immediately.


January 19, 2013

Pumped-Up Vegetarian Chili


Some vegetarian chilis are watered down, rather non-cohesive, and lack that savory heft of meat chili. 
This vegetarian chili is everything but.

I was on the search for a veggie chili that could stand up to its meaty counterparts, and I found it. It's loaded with nutritious ingredients that deliver on both flavor and texture, like lentils, soy chorizo, and creamy beans. By the way, I absolutely love lentils and had never thought to put them in a chili until now. It adds an earthy, chewy depth I'm officially hooked on. 

On a side note, one trick I use to make my chilis delightfully thick is to stir in refried beans. I didn't use that method here, but I still wanted to pass it along in case you want a foolproof short cut in time for Super Bowl Sunday.... It works every time, whether in beef, turkey, or veggie chilis. 

Enjoy getting creative with this chili -- use the basic method but feel free to adjust the spice level, toppings,  and even bean types, to what you enjoy the most. After all, the fun of cooking is in the flexibility, and the joy of eating is in the comfort of having exactly what you crave the most. 


Pumped-Up Vegetarian Chili: serves 8-10 
Ingredients:
4 dried de-arbol chiles
4 teaspoons dried oregano
1/4 cup walnuts, toasted
1/4 cup cooking oil
1 large red onion, diced
6 cloves garlic, minced
1 bell pepper, chopped
28 oz. diced tomatoes in juice
4 T. tomato paste

4 cups water
2 T. cornstarch

1-2 jalepeno chiles
8 oz. dried lentils, rinsed and picked over
1 can corn, rinsed and drained
1 can chickpeas, rinsed and drained
1 can canellini beans, rinsed and drained
1 package of soy chorizo (I prefer Trader Joe's brand)
3 T. soy sauce
1 T. ground cumin
optional: fresh chopped cilantro, diced avocado, sour cream, shredded cheese for topping

Directions:
Heat a large pot over medium heat, then add the chiles and walnuts and toast until fragrant and the chiles have gently puffed. Remove from heat and allow to cool. Remove tops and inside seeds from the chiles. Add the chiles, oregano, and walnuts to a spice grinder and grind finely. Meanwhile, heat 1/8 cup oil in the pot, then add the red onion and cook until soft and golden, then add the garlic and stir, 1 minute. Push the onions and garlic to one side of the pot. Add the final 1/8 cup oil to the empty space, then pour the spice mixture into the oil, allowing the flavors to bloom in the oil, 1 minute, then stir together with the onions and garlic. Add the bell pepper and saute 2-3 minutes, then add the diced tomatoes and tomato paste. Stir. In a separate bowl, whisk together 2 T. cornstarch with 1/2 cup of the water to make a slurry. Pour this, as well as the remaining 3.5 cups of water, into the pot. Add the jalepenos and lentils. Bring to a boil, then reduce to a simmer. Simmer until the lentils are soft but still have a slight bite to the edges, about 35-40 minutes. Add in the corn, chickpeas, canellini beans, soy chorizo, soy sauce, and cumin. Stir to incorporate and cover to bring back to a simmer. Salt and pepper to taste, then serve with toppings of choice.

January 10, 2013

Spinach-Spiked Chicken Breast Meatballs


I really love Costco. Like, in a "can't help but spend a couple hundred dollars every time I go there" loving way. There's something magical that happens when you walk through those doors. Suddenly, everything you didn't know you needed is immediately wanted, necessary, and is such a smart buy

I lose all sense of reason in that place.

So that's evidently why I bought bulk packages of boneless, skinless, chicken breast in a quantity that could feed an army. POUNDS and POUNDS of it, in giant packaging. 

Have I mentioned we are a household of two + tiny dog?

What to do with all that chicken breast? Have I also mentioned that I don't particularly like chicken breast? I much prefer fattier, richer cuts of dark meat chicken. My purchase was a problem.

Enter the idea to make meatballs from ground chicken breast! I love grinding chicken breast and sauteeing it in spices for tacos, it's delightful. So why couldn't I use the same method for meatballs? It seemed to be a great way to make this lean, relatively flavorless cut of meat perform like its more succulent counterparts. 

And sure enough, it did. 


And they're healthy! Low in fat and loaded with spinach and whole-wheat breadcrumbs, you'd never guess that these savory, comforting meatballs pack a serious nutritional punch. Plus, they're easy. If you have a slow cooker, simply fill the cooker with the sauce and plop them in to cook. If you don't, no worries. You can use the regular methods of pan browning then sauce simmering, or oven baking. 

We enjoyed these meatballs over penne pasta and over soft, cheesy polenta. If you're looking for new uses for chicken breast (thanks for the surplus, Costco!), you'll want to keep this one in your repertoire!


Ground Chicken Breast Meatballs: makes about 40 1" meatballs
Ingredients:
1 lb. boneless skinless chicken breast
2 T. spice rub for grilled meats
2 t. dried oregano, divided
2 t. dried basil, divided
1 t. dried garlic powder, divided
1/2 t. sea salt, plus 1 t. sea salt set aside
1 t. ground black pepper
1/2 cup frozen spinach
1 egg
1/4 cup grated Parmesan cheese
1 cup fresh whole wheat breadcrumbs
1 - 28oz. can crushed tomatoes in basil
1 - 14.5oz can diced tomatoes
3 T. tomato paste

Directions:
Place the chicken breast in a food processor and process until ground. Add 2 T. spice rub, 1 t. oregano, 1 t. basil, 1/2 t. garlic powder, 1/2 t. sea salt, and 1/2 t. black pepper, the frozen spinach, egg, Parmesan cheese, and breadcrumbs. Process until incorporated, then transfer into a bowl.
Pour the crushed and diced tomatoes, along with all the remaining spices, into the bowl of a slow cooker. Using wet hands, roll the chicken meatball mixture into 1" balls and drop into the sauce. Cook on low 6-7 hours or high 3-4 hours.
*Can be made ahead and frozen. 

October 27, 2012

Quinoa, Spinach and Poached Egg Skillet

This recipe uses the filling from the Quinoa and Black Bean Stuffed Peppers. It's a delightful meal that's cozy, rustic, and substantial while still being light. I love any meal with a soft, barely oozing egg on top. It adds a layer of richness, like velvet, to every bite. 

"Next Night" Quinoa, Spinach, and Poached Egg Skillet: serves 2
Ingredients:
6 cups of raw spinach, chopped
Any amount of leftover filling from the stuffed peppers. (See recipe to make from scratch
Optional: 1 chicken breast cut into 1" pieces
Two eggs, room temperature
1/2 cup quality white cheddar cheese

Directions
Heat a large cast-iron skillet or dutch oven to medium. Add the spinach, filling, and chicken breast if using. Cover. Allow the spinach to cook down and the chicken to just cook through, stirring occasionally, about 8-10 minutes. Distribute the ingredients evenly throughout the skillet, then use a spoon to move some mixture aside to create two shallow "wells." Crack one egg carefully into each "well." It's okay if the whites run over and onto everything else. Cover and allow to cook until the egg is firm around the edges but still soft and runny in the middle. Turn off heat. Use a spatula to transfer half the filling and intact egg on top to each of two bowls. Top with cheddar cheese and serve. 

Slow-Cooker Quinoa Stuffed Peppers


It's been a crazy week. The kind of week where I left work every day and papers were still scattered across my desk. I don't do scattered papers. The scattered papers were like a big red flag -- relax! slow down!  

Enter slow-cooker and these quinoa stuffed peppers, a dish that allowed me to both slow down and relax for an evening. These incredibly nutritious veggie bowls are packed with protein-rich quinoa, meaty black beans, and salty-good cheese. To round it all out, the sweet packaging of bright bell pepper and tomato sauce topping balance those savory flavors perfectly. 

Hmm... Balance. That's another welcome feeling at the end of my day. 

Ingredients:
2 T. butter
1/2 onion, diced
2 cloves garlic, minced
1 small yellow zucchini, diced
1/2 cup uncooked quinoa
1.5 cups quality chicken or vegetable stock
1 can black beans, rinsed and drained
1/2 t. garam masala
1 t. salt
1/2 t. pepper
dash of cumin
1/2 cup quality white cheddar cheese
1 can diced tomatoes in puree
2 t. tomato paste.
2 red or yellow bell peppers, tops cut off and seeds removed inside

Directions:
Preheat a large saucepan over medium-low heat. Add and melt the butter, then add the onion and cook until translucent and soft. Add the garlic and stir, one minute, then the zucchini, and cook another minute more. Add the quinoa and stir to toast lightly, 2-3 minutes, then add the stock, beans, garam masala, salt, pepper, and cumin. Stir and turn the heat to high. Bring to a boil, then reduce to a simmer 15-20 minutes, or until the quinoa grain is translucent and the grain has developed a "tail" off the end. Stir in cheddar cheese at the last moment.

Inside the crock pot, stir together the diced tomatoes and tomato paste. Use a spoon to fill each bell pepper with mixture. Carefully place each pepper into the crock pot and set to low 7-8  hours or high 3-4 hours. Spoon tomato sauce over pepper and serve.

Use leftover filling to create "Next Night Quinoa, Spinach, and Poached Egg Skillet." It's delicious!


October 13, 2012

Peanut & Coconut-Crusted Tofu Nuggets


I didn't know tofu could satisfy the "battered-and-fried" craving, but now I've tasted that it can. Thankfully, these are battered but they are not fried, and they've still got all the crispy flavor of a nugget that's taken a dunk in the oil hot tub.

I first came across some form of coconut-battered tofu at Whole Foods years ago. When I lived in downtown Manhattan I used to wander to the Houston Street Whole Foods daily on my work lunch break. For the better part of an hour I'd find myself cruising through the food-porn library that is publicly known as their prepared food bar (added bonus: the Houston Street Whole Foods has a DESSERT BAR, too. It's just not appropriate. There should be a rating warning on that).

Anyway, back to my point. One day this battered, crisp, coconutty tofu appeared. Since it made its debut years ago (it's been a regular on the prepared food line since) I've been wondering, "how did they make that?"

Prayers/fantasies/longing has been answered.

Dare I say these might rival than the ones I can pick up at Whole Foods? You'll have to try them for yourself. WF, I love you, but this recipe involves peanuts, too, and I love peanuts. Plus the price on that prepared food is kind of steep... No matter how little I put in my container it always weighs enough to be $12 for five, admittedly delicious, bites... I still haven't figured that equation out.

This equation is fail proof: peanuts + coconut + tofu = party for your palate.

Peanut & Coconut Crusted Tofu: makes about 16 "nuggets". Adapted from Cooking Light.
Ingredients:
1 14-oz package water-packed extra-firm tofu
1/2 cup salted, dry-roasted peanuts
1/4 cup unsweetened shredded coconut
1/2 cup Panko breadcrumbs
1/4 teaspoon cayenne pepper (optional)
1/2 cup light coconut milk
1 large egg, lightly beaten
3/4 cup all-purpose flour
3 tablespoons canola oil, divided

Directions:
Cut tofu lengthwise into 4 1/2 inch slices. Place on several layers of paper towel, cover with additional paper towels, and let absorb for five minutes. Cut each tofu slice again in half lengthwise, then cut strips in half crosswise to create 16 "nuggets."
Place peanuts in food processor; process until ground. In a shallow bowl, combine peanuts, coconut, cayenne, and Panko, stirring well. Combine coconut milk and egg in a shallow dish, stirring well. Place flour in a separate shallow dish.
Heat large skillet over medium-high heat. Add 1 tablespoon oil to pan and swirl to coat. Dredge half of tofu in the flour, dip in egg mixture allowing excess to drip off. Dredge in peanut-coconut mixture. Add coated tofu to pan. Sautee a few minutes per side, turning each piece after a few minutes, to allow each side to brown separately. Repeat with the second batch.

Serve as desired. I put them in warm corn tortillas topped with shredded lettuce, guacamole, onions, and cheese. Delish!


September 2, 2012

Baked Quinoa & Broccoli "Mac n' Cheese"


I love it when an entire dish evolves into being because of a single ingredient. I guess you could call it "ingredient inspiration," when you've got one star ingredient and so you create the meal to spotlight and elevate it.

That's how this dish came about for me. I'd like to say that it was because I wanted a really healthy meal, but that's a lie, so I'm not even going to go into all the crazy health benefits of this bowl of gooey goodness -- you already know quinoa is a perfect protein, cheese is high in calcium and protien, too, and broccoli is basically super food of the universe.

To be honest, it all started with my favorite cheese, a sale, and a checkout girl.

Now I know that a lot of people call Whole Foods "Whole Paycheck" because it can be quite pricey to shop there, but I wander its aisles often enough to have noticed that there are certain Whole Foods products that are priced daily at a cost that is more economical than regular grocery brands (and is likely much better quality). But that's in in-depth discussion/love story for another day.

One example, though, is this cheese that keeps going on sale.  This particular Tilamook Farms natural white cheddar cheese is staring me in the face when I walk in the door. And its once again $2.99/lb. When I see this my eyes do that cartoon thing where they bug out. (I think there is a sound cue that goes something like baroooga!) I run to the stack of beautiful, creamy blocks of tightly wrapped cheese and begin to cradle them, deciding which weight I'll be coming home with.

It's a happy love story where I devour the cheese daily in any form I can. Like right now, as I write this, I keep pausing because I'm slicing off giant hunks and eating it atop crisp slices of Pink Lady apple. AMAZING COMBO!

But, back to another amazing combo. This dish. So I'm checking out and the check out girl goes:
 "Isn't it awesome when this cheese is on sale? It's soooo good. I use it in Quinoa Mac n' Cheese and it's, like, the best. I mean, what's not healthy about Quinoa mac n' cheese?"

A credit card swipe later and I'm running home, cheese in arm like a football, and heading straight for the kitchen. NEED-QUINOA-MAC-N'-CHEESE-NOW.


And so do you.

Baked Quinoa & Broccoli "Mac n' Cheese": serves 4
Ingredients:
1 Tablespoon Earth Balance butter
1/2 large Spanish onion, finely diced
2 cloves garlic, minced
3/4 cup quinoa, rinsed well and drained
1 1/2 cups low-sodium chicken stock (vegetable stock for vegetarians)
salt & pepper
1/4 teaspoon ground nutmeg
1 lb. frozen broccoli florets (cut into smaller pieces)
1 large egg
3/4 cup milk
2 Tablespoons grated Parmesan cheese
2 cups shredded cheddar cheese 
1 cup shredded cheese, for topping

Directions:
Heat a medium saucepan over medium-low heat. Add the butter and swirl to coat pan. Add the onions and saute until translucent and slightly golden. Add the garlic and stir, one minute, then add in the quinoa and cook for about five minutes, stirring occasionally.

Add in the chicken stock, salt & pepper, and nutmeg, stirring well.  Bring to a boil, then reduce the heat to low, cover tightly and simmer for 15-20 minutes, until most of the liquid has been absorbed. During the last 2-3 minutes of simmering, add in the frozen broccoli. Turn the heat up to return to temperature, then allow the broccoli to warm through.

While the quinoa is cooking, preheat the oven to 400ºF and lightly grease an 8" or 9" square baking dish.

When the quinoa is done, let it sit off the heat for about 5 minutes and in the meantime, whisk together the milk, egg, and Parmesan cheese. Add 1 tablespoon of warm quinoa mixture to the egg mixture to temper it, then quickly stir the liquid into the pan of quinoa. Add the 2 cups of cheese and pour it all into the baking dish.

Top with the remaining cheese and bake for 20 minutes, or until bubbly and golden brown on top.

August 19, 2012

Spicy Grilled Tuna and Arugula Salad with Creamy Guacamole


Why does Trader Joe's have to sell a bag of four avocados for $3.29? (and why am I complaining about it?) The problem is that it's such a good deal that I can't pass it up, and then I spend my week thinking about avocados. I love guacamole and could eat it daily. But in the name of creativity, and since it would be a crime to allow an unused avocado to go bad, I try to think of new ways to incorporate avocado into a meal.

I was in a meeting at work when I started planning out this spicy tuna and and creamy guacamole salad. There were a few thought processes that went on while I dreamed of dinner at my meeting:

Non-meeting-related thought #1: I love spicy tuna rolls. I wondered how I could somehow pack that fiery flavor into my tuna steak.

Non-meeting-related-thought #2: Oooh, and what about that guacamole served at El Vez? (a restaurant on the street just behind my office). My favorite of their unique guacamole selections includes one with goat cheese and pistachios mixed in. It's unreal.

More non-meeting-related-thoughts ensued. I realized I had feta at home. The feta would add a salty, creamy zing to my creamy avocado topping. Then I secretly surfed recipes on my phone and started mentally concocting a marinade for my tuna steak based on a few different ones I found.

When the meeting ended I looked down at my notepad. What I'd written was....

Ingredients: serves 2
3 large cloves garlic, unpeeled
One jalapeño, stem removed
1/4 cup fresh lime juice + the zest of half a lime
2 tuna steaks
1/4 cup sliced red onion, divided
1 teaspoon chopped basil
1 teaspoon chopped mint
1 teaspoon chopped cilantro
1 ripe avocado
Sea salt

Salad:
4 oz. arugula
2 oz. crumbled feta cheese
Half of the above red onion
2 tablespoons olive oil
3 tablespoons white balsamic vinegar
Salt

Directions: In a dry skillet over medium heat, cook jalapeño and garlic cloves, turning occasionally until each is gently charred (a few minuted less for the jalapeño). Allow to cool, then purée in a blender with the lime juice, zest, and 1/4 teaspoon salt. Pat tuna steaks dry and place in a shallow baking dish. Pour 1/8 cup of the purée over the fish and turn to coat both sides. Marinate 10 to 20 minutes.

Meanwhile, add to the remaining purée in the blender: half the red onions, basil, mint, cilantro, avocado, and a dash of salt. Purée until smooth, salt to taste. Set aside.

Heat a grill pan over medium-high heat. Once hot, add the tuna steaks. Cook 4 minutes on each side for a medium steak, turning only once. Pile half of the arugula on each of two plates. Sprinkle the remaining red onion, and feta cheese, on each. Whisk together olive oil, balsamic, and a pinch of salt in a small bowl to make a dressing. Place one tuna steak atop each salad. Scoop half of the creamy guacamole on top of each tuna steak, then drizzle the olive oil and balsamic dressing on top of the salad. Serve immediately.

July 29, 2012

Orecchiette with Peas & Pesto


Laid back and playful, while still feeling refined and put together. 

I know, the description suits me perfectly. But I'm actually referring to this orecchiette pasta salad with peas and pesto. 

Orecchhiette means "little ears" because the pasta shape is like a mini dish (ears are like little satellite dishes, right?). I'd rather think of orecchiette like little dishes, or perhaps bowls, that are meant to hold all of the wonderful flavors right inside every bite. And that is exactly what this pasta shape does.

In this pasta salad, pea & parsley pesto is garnished with toasted pine nuts, freshly shaved Parmesan cheese, and of course once again, our brightly colored friend the pea in its whole form. The combination of textures and flavors is really lovely. The pine nuts lend a crunch. The Parmesan cheese is like salty, savory ribbons laced throughout. And those peas -- those wonderful little peas -- are tiny bursts of earthy goodness. They like to hide inside the orecchiette "bowls". 


 Eating this is like a delicious and addicting game of flavor hide and seek. This pasta salad brings its A-game. 

Like I said, playful, but still pretty darned classy.

Orecchiette with Peas & Pesto: makes 1 lb
Ingredients: 
1 lb orecchiette pasta, cooking water reserved
salt
about 1 cup prepared pesto
1/2 cup frozen peas
1/4 cup shaved Parmesan cheese
1/4 cup pine nuts, lightly toasted
salt & pepper to taste

Directions: Cook the pasta in a large pot of boiling, salted water, to al dente. In the last two minutes of cooking, add the peas to defrost them. Drain pasta and peas completely, reserving the cooking water. Quickly rinse with a little cold water to stop the cooking. Cool the pasta and peas in the refrigerator for 30 minutes or so. 
Add pasta and peas to a large bowl. Toss with the pesto, then the pine nuts. Top with Parmesan. Salt and pepper to taste, and serve lightly chilled or at room temperature.

July 24, 2012

Summer Squash & Potato Gratin


This recipe was born to incorporate the pea & parsley pesto, but would be really delicious with any pesto variety. I wanted something rich and rustic (pesto + toasty, bubbly cheese), but still relatively healthy (cue loads of veggies).

The combination of bright summer squash and pesto, right along with hearty potatoes and cheddar, was just the right balance of light and heavy for a summer's night.

Comfort food meets summer flavors for match made in heaven!

Summer Squash & Potato Gratin: serves 2
Ingredients:
olive oil
5 small Yukon Gold potatoes
1 small yellow squash
1 small green squash
1/2 cup pesto
1/2 cup grated sharp white cheddar cheese
Kosher salt and freshly ground pepper

Directions: Preheat the oven to 375 degrees. Using a mandoline (or knife, carefully), very thinly slice the potatoes, yellow and green squash, to about 1/8 inch thick. Coat two small baking dishes with olive oil. Spread a tablespoon of pesto at the bottom of each. Beginning at the outside and working in toward the center of the baking dish, layer the potatoes, then zucchini, then spread a couple tablespoons of pesto and sprinkle with a small amount of cheese. Season with a little salt and pepper on each layer. Repeat evenly until all ingredients are used, finishing with pesto and more cheese on top.
Cover each baking dish with tin foil (oiled lightly with olive oil) and bake, covered 30 minutes, then uncovered for 20 minutes or until the cheese is browned and bubbly.

Links

Related Posts Plugin for WordPress, Blogger...