June 30, 2010

Sauteed Kale with Panfried Walnuts

Thank you, Molly Wizenberg, for teaching me how to love kale. In her Bon Appetit article last year entitled, "How I Learned to Love Kale," Molly detailed her hate relationship with this tough, leafy green, and explained how it all turned into love one night when her friend tossed a huge bunch of kale into a piping hot pan with olive oil, toasted walnuts, garlic, and finished it with a squeeze of fresh lemon.

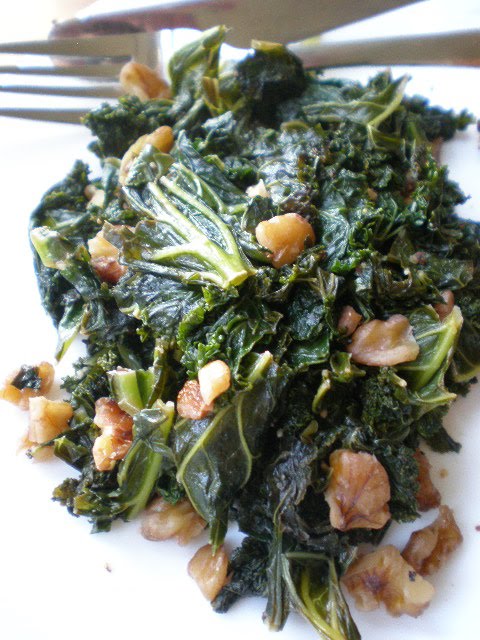
Since reading that article, I approached the raw kale at my local market with some trepitation. But once it hit that pan of oil and garlic, and I heard its comforting crackle as it sauteed down and tenderized, Molly's encounter with kale fully became my own. This isn't your mother's kale... no, this kale is bright and citrusy, lightly salty and deeply aromatic.


I still remember sitting at the kitchen table as a child, staring into a bowl of pasta fagiole soup with big green leaves floating in it. Why couldn't my mom just be like the others who served up chicken nuggets from a box, I wondered, as she floated by and said convincingly, "it's kale, it's full of Vitamin A, E, and great for your health. Eat up!" Seriously? Gross.

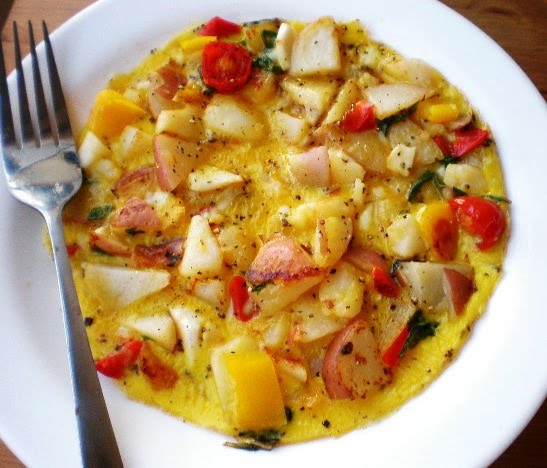
Mom, if you served me that soup right now I would likely ask for seconds. I can't get enough of the stuff. Even M has learned to love kale, and that is a lot to say! We use it in sausage and white bean soup and toss it with spaghetti, but Molly's classic take on kale as a side-dish is still my favorite way to prepare it. Learning to love something has never tasted so good.

Sauteed Kale with Walnuts:
Ingredients: 
2 T. olive oil
1/4 cup coarsely chopped walnuts
4 cloves garlic, minced
1 lb kale, rinsed, cut from the stems, and coarsely chopped
salt to taste
juice of 1/2 a lemon
pepper to taste

Directions:
In a large, deep pot, bring the oil to medium heat until it shimmers. Add the walnuts and allow them to pan-fry until aromatic, then add the garlic and saute until golden brown. Toss in all of the kale, and turn the heat down, tossing frequently to avoid burning. Then, cover and allow to cook until tender, approx. 15-20 minutes. Add the salt and the lemon juice and toss. Add pepper to taste.

Serves 4 as a side.

Gouda Grilled Cheese

It's a winter's meal on a summer night, but I was really feeling like a comforting grilled cheese sandwich and a side of some hot, sauteed kale with walnuts.


Hence, this oozy, gooey, salty gouda stuffed grilled cheese sandwich on hearty, nutty multigrain loaf. Every single chewy bite was heaven. The rich and sturdy Beemster Classic gouda melts just enough -- it's not going to pour out of your sandwich like another cheese (ahem, American), but instead hugs the edges, peeking out of the sides but sticking firmly to where it belongs. Using multigrain bread is a perfect pairing -- it is soft without being overly yielding, and when lightly toasted brings out the sweetness of the grains, which enhances the salty cheese. At the end of the day though, it's a grilled cheese. It's simple, not a big deal, but really is delicious.

Ingredients:
2 oz. Beemster Classic Gouda
2 slices multigrain loaf
1 T. Earth Balance butter

Directions:
Spread the butter on the outside of the toasts, lay hunks/slices of the gouda in between, then place on the griddle, allowing it to brown lightly on both sides as the cheese melts.

Take care not to burn, as I did below! Enjoy!

June 27, 2010

Basil Pesto


This weekend I slowly perused the outdoor market in Rittenhouse Square Park taking in the sights and smells. The produce from local farmers was plentiful: pints of bright yellow, orange and red heirloom tomatoes; ripe, deep purple blueberries; zucchini and squash in all sorts of twisted shapes and sizes. Indulgent baked goods -- sweet breads, oversized cookies, loaves of dough stuffed with pepperoni and cheese -- beckoned to be bought and consumed on the spot. The variety of fresh local cheeses all looked so rich and creamy that I wished I could bring a generous hunk of each home....

Despite the many temptations waiting under each crisp, white tent, I gravitated toward only one item: a large, leafy bright green basil plant sitting in a small cup of dirt. I could smell the plant's slightly tart, slightly citrusy aroma from a few feet away. I knew this plant would be coming home with me.

I snugly tucked the rather large plant in my shoulder bag and proceeded to do a few more hours worth of shopping around town. I am pretty sure that the looks I got at Anthropologie and City Sports had more to do with the giant tree I had growing out from under my shoulder than anything else.

Later, when I got home, I plucked off almost every leaf and used it to make this bright, fragrant, and summery pesto. Then, I potted the plant, gave it a little love, and asked it to sprout some more leaves as soon as possible.

Fresh Basil Pesto: (makes a little over 1 cup)

Ingredients:
4 cups packed fresh basil leaves, washed
1/2 cup pine nuts, toasted until golden and fragrant
1/2 cup freshly grated Parmesan (about 1 1/2 ounces)
2 large garlic cloves
juice of 1 lemon
1/4 cup plus 3 tablespoons extra-virgin olive oil
sea salt

Directions:
Place the garlic and pine nuts into the food processor and pulse, scraping down the sides to chop completely. 
Add the basil leaves and turn the processor on, pouring the olive oil through the top, then the lemon juice, and then the parmesan. Season to taste with sea salt.

Store in a tightly sealed container for a day, freeze, or use immediately.This pesto is wonderful spread on a sandwich, used as a dip for grilled breads and vegetables, or tossed with orichette pasta and ripe, cherry tomatoes.

June 26, 2010

Saturday Grilling: Big Burger Barbecue

This weekend was a great weekend in regard to all things food related. It was great for picnicking, shopping at the market, cooking, grilling with friends, eating....eating some more.... it doesn't get any better than all of the above, really.

M and I had not yet broken in our little grill for the season. What a shame! I had my sights set on Saturday night for some huge, juicy grilled burgers. There is nothing like the smell of grill smoke, the sizzle of grease as it hits the fire, sitting around on a hot summer night with a couple of friends.

My day revolved around this BBQ plan. In the morning I whipped up some edamame dip. Later in the afternoon, my friend and I headed down to Reading Terminal Market to buy the freshest ground sirloin from Giunta's Prime Shop and to peruse the produce at Iovine Brothers.

Is two pounds of ground sirloin enough for four people? I worriedly asked the butcher. Logically, I knew it was the right amount for four giant and thick burgers. I am always worried about under-feeding people. Sure enough, our burgers were huge -- they barely fit on the bun and in our mouths.

Giunta's blend of fresh 85/15 meat produces the most fabulously light in texture, yet hugely juicy and flavorful burger. Seriously, this homemade burger contends with the best burgers I've had out at my favorite restaurants. Be prepared with multiple napkins, or just do as I do: give in to the juice running down your hands and chin and devour the burger without putting it down for even a second. Why risk that it falls apart or shifts around? Just go for the gold and zero in on attacking it. Eat whatever else is on your plate later.


My burger was packed with fresh chopped golden onions, and topped with Beemster Gouda Cheese and hot pickled peppers. No ketchup needed. What is necessary is to grill the hamburger buns so that they can firmly stand up to all the juicy goodness. There will be no soggy buns here! Perfection.

While at Iovine Brothers I picked up a whole fresh pineapple, which I sliced and cored. We threw these on the grill before putting the burgers on:


...And enjoyed juicy, slightly smoky grilled pineapple with our burgers. Grilling the fruit brings out all of the natural sweetness. They are hot, extra juicy, and really festive for a warm summer night.


While M grilled, the rest of us sat around enjoying cold beer, and munching on pita chips and crunchy bread dipped in edamame dip and my friend C's delicious homemade walnut spread.

When the food was ready, we had a serious eating party. Cheeseburgers galore; succulent grilled pineapple; a delicious carrot slaw with golden raisins, apples, pecans, and ginger; rice and beans.

Dessert? Yes, we had room! Earlier in the day I had made "cheesecake strawberry jello" which we topped with fresh sliced strawberries, rainbow sprinkles, and ate with a variety of Thin Mint and Shortbread Girl Scout Cookies.

I would say that even though it was our grill's first appearance of the season, it did a stellar job. I can't wait to break it out again as soon as I possibly can!

Juicy Beef Burgers


Ingredients: (serves 4)
2 lbs 85/15 ground sirloin, fresh from butcher
1 small white or Spanish onion, finely diced
1 T. fresh chopped parsley
1 T. fresh chopped basil
2 T. Worcester sauce
2 t. salt
2 t. freshly ground black pepper 

Directions:
In a large bowl, gently combine all ingredients. Do not overwork the meat, as this will produce a tough burger. Mix only until the ingredients are barely incorporated but evenly distributed.

Score the meat into four approximately even portions, then lightly shape them into 1" thick rounds. Place them down on a disposable plate and make a small, shallow well in the center of each patty. This will keep the burgers from shrinking when cooked.

Preheat your grill until it is very hot. Place the burgers on the grill and allow to cook for 4-5 minutes per side. Cooking over high heat for a shorter amount of time makes for a juicier burger with a well cooked outside and a barely pink center (medium-well). A minute or two before removing the burgers from the grill, add the cheese topping and place the buns on the grill and cook until lightly toasted. Transfer the buns to a plate, add the burgers, and enjoy!

Edamame Dip


It's not guacamole... it's not hummus.... it's not pesto... it's edamame dip!

This is an interesting, unexpected, and super easy dip that is perfect for a party or barbecue. It's really healthy and filling because of the soy protein from the edamame, and is fabulous (and could make a meal) when it is paired with thick and crunchy pita chips or spread on grilled bread. While this dip takes only a matter of minutes to make, you'll find that it gets eaten even faster!

Ingredients:
1 12oz bag of frozen, shelled edamame
sea salt
3/4 cup reserved cooking liquid
1 clove garlic
1/4 cup olive oil
juice of 1 lemon
a few sprigs of fresh basil
salt and pepper to taste

Directions:
Salt a pot of water and bring to a boil. Pour in the frozen edamame and allow to cook for 5 minutes.
Reserve 3/4 cup cooking liquid and drain the edamame.

In the food processor, blend the garlic, edamame, 1/4 cup olive oil, and lemon. While it is processing, pour in the cooking liquid until it reaches the desired consistency. Add salt and pepper to taste, then pulse together with the fresh basil. Do not blend the basil entirely.

Top with some fresh, chopped basil and serve with chips or bread, or use in a sandwich.

June 25, 2010

Friday Night Picnic in the Park

There is perhaps nothing I love more than a picnic on a summer night. I have come to the realization that I am slightly obsessed with eating outside, and if I have the option to do so I absolutely must. Thinking about it logically, it is likely is the result of combining two of my favorite things: eating and being outside. 

This past Friday night, I came home and promptly canceled the dinner reservations we had made at a restaurant. The thought of sitting indoors being waited on, spending the typical two hours over a few courses, and then wandering home, evening over, felt a little sad. I wanted to stretch my lazy, long Friday evening the way I wanted to. After all, I'd just spent my entire day sitting in a windowless office. What could be better than to watch people come and go through the park while munching on a smorgasbord of small dishes? To have the option to stay a while, and then some more, when the food was all gone? Hence, M and I packed up and went to Rittenhouse Square Park.  


Below is my favorite restaurant in Philly, Parc, a perfect French restaurant with the perfect people watching scene. All we needed to do was lay our blankets down nearby, and we could observe the same things all night long as if we had a window seat at Parc. For free. 


We had a bowl of tangy, salty kalamata olives tossed with hunks of creamy feta, shredded lettuce, red wine vinegar, and olive oil. We piled it on top of lightly grilled multigrain baguette. Toasting the bread allowed it to soak up the dressing and olive juices without ever becoming soggy.... what fabulous Greek toasts!


It isn't a picnic without meat and cheese. Layered provolone, turkey, and spicy salami made for a delicious, casual open faced sandwich:


None for the dog! He was so sad. He barely moved the entire time we ate, choosing instead to stare intently at every bite on its way to our mouths.


As the sun went down we munched on crunchy carrot sticks, crackers and cheese, and drank fizzy Pomegranate seltzer.

Then, it was time for a game of scrabble! We played until it was so dark we couldn't see the board. It was perfect timing and we were able to get the whole game in. I think it was just luck, but M beat me for the first time. He deserved it, though! He made some admirable moves. Plus, I got bad letters at the end, and he got some good ones. 


The loser had to make ice cream sundaes for the both of us when we got home. Even if I had won, I would still have wanted to make the sundaes, so it was really a win-win (or lose-win?) for me.

We had huge scoops of Chocolate Hazelnut gelato layered with chocolate chips and whipped cream inside big, toasty and sweet waffle cones.

I couldn't imagine a more perfect night of picnicking in the park!

Greek Olive and Feta Toasts


Ingredients:
1 multigrain baguette
1 cup kalamata olives, pitted and sliced in half if desired
12 oz. fresh feta cheese, cubed
1/2 head iceberg lettuce, finely shredded
1/8 cup red wine vinegar
1/8 cup olive oil
salt & pepper to taste

Directions:
Slice the baguette into 1/2 inch slices, and toast by either laying on a baking sheet under the oven broiler, placing in a pan, or toasting each in the toaster. Allow to cool by laying them out on cookie cooling racks.

Meanwhile, toss together the olives, feta, shredded lettuce, oil, and vinegar. Season with salt and pepper.

Pile the Greek salad on top of the toasts, allowing the dressing and olive juice to soak into the baguette.

June 24, 2010

Southwest Summer Quesadilla


Quesdilla
a vehicle for
lots of summer veggies,
sneaky globs
of melted cheddar and jack,
and toppings
of guacamole,
sour cream,
salsa and anything else
both cool and spicy
as the carefree summer night.


Ingredients: (literally use whatever you have! this is what I happened to have on hand)
serves 2
2 large flour tortillas
cooking spray
1 T. olive oil
1 white onion, cut in half and sliced into 1/4 inch strips 
1 can corn, rinsed and drained
2 Roma tomatoes, seeded and diced
1/2 green pepper, diced
black beans & rice, leftover (or 1/2 can black beans, rinsed & drained)
1/4 head iceberg lettuce, shredded
1/2 cup sharp cheddar cheese, shredded
1/2 cup Monterrey Jack cheese, shredded
1/2 cup chunky salsa
hot sauce, salt, and pepper to taste


Directions:
Preheat 1 T. olive oil in a medium pan. Add the onions and saute for a few minutes. Add the green peppers and tomatoes and saute until the onions are golden and the peppers soft. Add the corn and salsa and stir to warm through. 
Preheat a large pan or griddle with the cooking spray on medium-low. Place each tortilla down in the pan, then spoon half of the hot ingredients above into half of each round, spreading to the edges. Top each tortilla with half of each of the cheeses, beans and rice, shredded lettuce and the salt, pepper, and hot sauce. Fold over the top to form a half moon. When the bottom is golden-brown, carefully use a spatula to flip the quesadilla over. When the other side is golden brown and the cheese is melted, slide from the pan to a cutting board. Cut each quesadilla in half and serve as pictured above, topped with your favorite spreads.

June 23, 2010

Ball Park Eats


I haven't posted much this week because I've been out to dinner almost every night. Partly this makes me sad because I enjoy cooking so much, but it has been a lot of fun at the same time! One of the most fun nights this week involved ball-park food. There is no doubt about it: food just tastes so much better when it is consumed from the stands of a baseball game on a warm summer night. There is the excitement of being at a game, combined with the fact that the stands are lined with a hundred completely greasy, indulgent, and delicious food options. There is simply nothing like the feeling of total relaxation as you cool off with a giant ice cream sundae inside a baseball helmet bowl (and forgetting there is work the next day).

We were at Citizen's Bank Park, home of the Philadelphia Phillies, for this week's game against the Indians. I love the Phillies' home stadium because there is literally no bad seat in the house. It's totally fun! Even from our far-off seats, you still feel close to the action:


Can't you just hear those crazy fans screaming? The Phillies won, by the way. I don't dare mention that I'm a transplanted Mets fan while I'm sitting in that stadium. I made that mistake once at my first game, and I will never make it again.

Anyway, we ate:
salty, juicy, deeply browned sausages topped with heaps of sauteed onions and peppers, encased in a huge semi-soft bun designed to soak up all the flavorful juices without getting one bit soggy;
grilled hot dogs in soft buns, smothered with ketchup;
buttery soft Philly pretzels speckled with hail-sized salt pieces, and dipped in grainy brown mustard;
the salt of which had us drinking down lots of thirst-quenching ball park beer!;
Philadelphia water ice, mango flavored, please!;
and waffle cones heaped with vanilla ice cream, fudge sauce, and peanuts.

Thank god for the Subway or we might have had to roll ourselves home. Eating at ball parks also makes one throw inhibition into the wind. Tomorrow is for health! Today is for sausages! Now, play ball!

June 22, 2010

Cheese and Vegetable Pie with Sweet Potato Crust


Another hot summer night, and we're still settling back in after a whirlwind weekend of my sister's wedding in Connecticut. I have not gone grocery shopping, nor do I intend to, so I'm looking to use what I have on hand for dinner... there are sweet potatoes in the produce bowl, a carton of cottage cheese in the refrigerator. We have eggs, fresh feta, and some frozen and pantry staples. Time for a vegetable and cheese pie with sweet potato crust!

This pie is a savory creation that only tastes rich -- it's actually a very light on calories and fat, but has amazingly deep flavor and texture. I'll warn you right now that you are going to want to eat the whole pie in one sitting. If you did, it wouldn't be the end of the world, but the leftovers the next day are possibly even more delicious than when it comes hot out of the oven. The flavors have the chance to settle together  and blend overnight. Plus it looks neater the next day: since the cheese and egg isn't so hot, a slice of pie actually comes out in one piece, as you can see from the below picture.


Perhaps best of all is the fact that the whole thing is incredibly easy to make. It's a pretty pie, with it's orange crust, layers of spinach and onion on the bottom, cheese in the middle, and tomato and feta on top, and so it only looks labor intensive. Enjoy this as dinner, bring it to a brunch, or do as I did and bring a slice to work for lunch! P.S.- my crust was not pretty or evenly rolled, since I threw this together for dinner, so if you bring it somewhere you might want to even out the edges on top!

Cheese and Vegetable Pie with Sweet Potato Crust:
Ingredients:
Olive-oil cooking spray
1/2 cup diced onion
8 oz (about 8 cups) baby spinach, or 10 oz. frozen chopped spinach
3 whole eggs
1 cup fat-free or 1% cottage cheese
1/3 cup feta cheese, crumbled and divided into 2 portions
4 tbsp finely chopped fresh basil or dill, or 3 tsp dried basil or dill, divided into 2 equal portions
1 t. garlic powder
1 t. sea salt
1 t. freshly ground black pepper
3 Roma tomatoes, sliced into 1/4-inch rounds, or 1 can of diced tomatoes, rinsed and drained
1 1/2 tbsp grated Asiago or Parmesan

Directions:
Heat oven to 350°. Coat a 9" pie plate with cooking spray. Line the bottom of the plate and 1" up the sides with the sweet potato crust. Bake 12 to 15 minutes. Remove from oven and set aside. Coat a sauté pan with cooking spray and sauté onion over low heat until tender, about 5 minutes. Add spinach to pan and let wilt, about 2 to 3 minutes. Remove from heat. Drain excess fluid from onion and spinach mixture. In a bowl, beat eggs, then stir in cottage cheese and half the feta. Add half the basil or dill and set aside. Spoon onion and spinach mixture into pie plate over the crust. Layer on egg mixture, then  top with the tomato. Bake 45 to 50 minutes or until egg is set and a knife inserted into pie comes out clean. Turn off the oven, then sprinkle the grated Parmesan and the rest of the feta evenly over top of pie and top with remaining basil. Return to oven for 5 minutes or until cheese melts. Remove from oven and let sit for 5 minutes. Cut pie into 4 wedges. Serve immediately.
Adapted from an Epicurious recipe

Sweet Potato Crust

This sweet potato crust is a great way to add wonderful color and depth of flavor to a savory pie. It can be used for the cheese pie, but would also work well for a chicken pot pie or a quiche. Another bonus is that you get added nutrition from the sweet potatoes!

Sweet Potato Crust: (makes crust for 1 pie bottom. double if using on top, too)
Ingredients: 
1 cup whole wheat white flour
1 t. baking powder
1/4 t. salt
1 t. ground red pepper

1 cup cooked sweet potatoes
1/3 cup vegetable oil
1 egg, beaten

Directions: 
In a food processor, process the sweet potatoes until smooth. Add all of the dry ingredients and process again, scraping down the sides. Add the wet ingredients and process until a ball forms in the bowl. Remove the ball, roll it out, and line your baking dish with it.

Pre-cook your crust in a 350 degree oven until set, approx. 15 minutes, for most recipes.

June 16, 2010

Potato and Vegetable Frittata


This frittata for one is a perfectly yummy and filling way to start the day. Loaded with lightly crispy new potatoes and sweet yellow and red peppers, it is savory and full-flavored but also easy to make. It's a one pan, one plate meal that's got all your essential food groups in it. Plus, it's a breakfast that feels so much more special than a bowl of cereal.

Frittatas always bring me back to breakfasts at my Nonna's house. Almost without fail, I  will walk in through the side door that leads from the garden to the kitchen and straight into the smoky smell of a fresh egg, sausage, and vegetable frittata sizzling in a sea of olive oil. Although my Nonna will have been expecting only me for breakfast, I can still count on her to cook as if she is feeding her family of six.  When we sit down  together at her table she will fill me with stories of her life in Italy as I single-handedly consume a huge, perfectly crisped frittata, strong coffee,  and soft,  sweet, Stella Doro cookies.

In reality, my Nonna lives a few states away and I was dining alone on a far smaller  and lighter frittata. Yet with each bite I was comforted by the same earthy and deep flavors that greet me when we are together. I was quite sad when it was all gone and my plate was clean, but it was so satisfying  that I didn't find myself raiding the pantry afterward per my usual bad habit... now, that's a lot to say for this powerful little breakfast!

Potato and Veggie Frittata for One: 
Ingredients:
1 T. Earth Balance butter or regular butter
3 small to medium sized red bliss or new potatoes, scrubbed and chopped into bite sized pieces
1/4 each yellow and red bell pepper, cut into bite sized pieces (I use frozen peppers)
1/4 cup arugula
1 large egg, scrambled together with 1 T. of water
1 T. Italian seasoning
1 T. salt
1 T. freshly ground black pepper

Directions:
Boil the potatoes, or microwave in water (covered), until just soft. Drain.

Preheat the butter in a small pan over medium heat. Add the potatoes and turn the heat to medium high. Stir only occasionally, allowing the potatoes to crisp and brown. Add the peppers and stir, let cook another minute. Add the arugula and stir, then shake the ingredients to spread evenly across the pan.

Scramble the egg, water, Italian seasoning, and salt in a small bowl.
Turn the heat down to low and pour the egg mixture over all of the ingredients. Grind fresh black pepper over the top. When the sides of the frittata are firm, turn off the heat and gently run a rubber spatula around the sides to loosen and then underneath. Slide from the pan onto a plate and enjoy!

June 15, 2010

Pasta with Spicy "Meat" Sauce


The words "meat" are in quotation marks, which I apologize in advance for. It instantly imparts a certain sketchy and questionable quality to the name. What exactly is this "meat" I speak of in quotations? I promise, it's not sketchy at all, it's actually just the soy chorizo of last week's burritos, which we already know is, in my eyes, the star of all meat substitutes.

I had a few Roma tomatoes hanging out in my produce bowl, as well as the wrapped up half casing of leftover soy chorizo, both of which I needed to use last night since I'm gone for next few days (my sister is getting married!) and they would have otherwise gone bad. I hate wasting food and instead prefer to dream up new uses for leftover odds and ends.

I wanted to use the soy chorizo in a pasta sauce, since its crumbly consistency makes it the perfect candidate for a sauce that would taste and feel as if it had been cooked with ground meat. However, the soy chorizo is already wonderfully flavored and spicy, and I did not want my pasta to taste as if it had been topped with chili. The whole thing would need to be pulled away from its Mexican flair and over into the direction of Italian food. I did this by using generous amounts of garlic, lots of Italian seasoning, and topping each bowl of pasta with a blend of Italian herbed cheese.

All in all, this dinner took as much time to prepare as it did for the pasta to cook and boil. Everything was on the table in 15 minutes, which meant that M and I were able to play a full set of tennis after work and still sit down to a warm, hearty, and thoughtful meal. Now that's how I like my weekday nights!

Pasta with Spicy Meatless Meat Sauce: (serves 2)
Ingredients:
1 T. olive oil
3 cloves garlic, minced
2 Roma tomatoes, chopped
1/2 a casing of Soy Chorizo
1 8oz. can of tomato sauce
1 T. dried Italian seasoning
1/4 cup of shredded Italian cheeses, divided
1 3/4 cups gemelli pasta, cooking water reserved
salt and pepper to taste

Directions: 
Generously salt the pasta water and put it to boil.

Meanwhile, heat the olive oil in a pan over medium heat until it shimmers. Add the garlic and chopped tomatoes and cook together until fragrant and just sauteed, about 4 minutes. Add the soy chorizo and stir together, then add the can of tomato sauce. Simmer while the pasta cooks.

When the pasta is al-dente, reserve 1/2 cup of the cooking water, then drain. Return the pasta to its pot to keep warm, and add a scoop of sauce to it to keep the noodles from sticking. Meanwhile, add the desired amount of reserved cooking water to your pasta sauce to slightly thin it out. Add the Italian seasoning and salt and pepper to taste.

Divide the gemelli into two bowls, ladle out the sauce on top, then top with half of the shredded cheese for each.

June 14, 2010

Apple Bread with Walnut Crumb Topping


Hot, soft, fragrant apple bread with walnut cinnamon crumb topping.


It was a cloudy, sleepy Saturday. My apartment was quiet, kitchen clean, dog and M up in the loft snoozing . What to do?

I looked around. Tart, bright green apples sat patiently, expectantly in the large Italian ceramic fruit bowl.  I swear that my oven silently begged me to open its door, to fill it with goodness and let it work its magic. Before I knew it, my kitchen counters were not so clean anymore and those apples were not where they had been sitting. The oven was starting to warm, its occasional click and creak like the chatter of company as I silently leveled scoops of flour, whisked eggs, measured cinnamon.


Before long, the apartment was filled by the most comforting smells. The scent of tangy apples, toasty walnuts, sweet brown sugar and hints of spices being baked together into a pan of pure goodness.

I couldn't wait to steal it back out of the oven and slice it right up while it was at its most soft and warm. Perhaps I would top it with some slowly melting vanilla ice cream. It took all of my will to let this loaf cool properly enough to wiggle it out of the pan.

I eagerly scooped up any cinnamon crumb toppings that just happened to drop off the top in the process of turning it over. Boy, were they delicious!


Then, I wrapped it up and let it sit overnight to allow the flavors of the bread to settle together and develop an even greater complexity. Yes, I really did.

And it was just as good, if not even better, the next day than I even imagined it was going to be. I ate a thick slice on its own. The walnut cinnamon crumb topping sat thick and high on the top of each slice of moist, sweet apple bread underneath. And then I topped it with vanilla ice cream and let it melt slowly over each side. Bite after bite I could not tell which way of eating it was better, so I may just have to try it all over again. And again, and again....and again.


Apple Bread:
Ingredients:
1 1/2 cups all-purpose flour
1 t. ground cinnamon
1/2 t. baking soda
1/2 t. salt
1/4 t. baking powder
1/4 t. ground nutmeg (I used apple pie spice instead)
1 egg, beaten
1 cup sugar
1 1/2 cups finely shredded, peeled apple (I used Granny Smith, but you can mix any varieties)
1/4 cup cooking oil
1/2 cup chopped and toasted walnuts or pecans, optional

Directions: Preheat the oven to 350 degrees. Grease the bottom and 1/2 inch up the sides of an 8x4x2-inch loaf pan and set aside. In a medium bowl combine the flour, cinnamon, baking soda, salt, baking powder, and nutmeg. Make a well in the center and set aside.

In another medium bowl combine egg, sugar, shredded apple, and oil. Add the wet mixture all at once to the flour mixture. Stir until just moistened, the batter should be lumpy. Stir in nuts if desired, spoon batter into prepared pan and sprinkle the crumb topping over the top (see below for recipe).

Bake for 50-55 minutes or until a wooden toothpick inserted in the center comes out clean. Cool in the pan for 10 minutes or until it can be gently loosened with a knife. Invert from pan gently and turn right side up again onto cooling rack. Cool completely and then wrap and store overnight before slicing.

Walnut Cinnamon Topping:
Ingredients:
1/4 cup flour
3 T. brown sugar
1 T. cinnamon
2 T. butter
4 T. chopped walnuts

Directions: In a small bowl combine flour, brown sugar and cinnamon. Cut the cold butter into the dry ingredients until it resembles a coarse crumb. Stir in the chopped nuts.

Avocado Hummus

When buying avocados, I tend to go a little overboard. Instead of being rational and taking a moment to think realistically that there are only so many nights in a week that we can eat guacamole, I get carried away and before I know it I have multiple avocados all going ripe at the exact same time.

Rewind to about a month ago when I saw an ad for "new avocado hummus" in my Trader Joe's Fearless Flyer. I jetted to the store to buy it, and sure enough it was a delicious refreshing spin on hummus. I couldn't tell whether it tasted more like guacamole or hummus, and that was not a bad situation to be in. I used it to top bean burgers and turkey sandwiches, and used it as a dip for everything from crackers to chips, and when it was all gone it was a sad moment.

Now, with one too many ripe avocados on hand in the kitchen, I decided to take the plunge and make my own avocado hummus. It turned out great, and I have a new favorite use for my extra avocados! The avocado adds an irresistibly creamy quality and a richer, brighter dimension than usual. It also makes it much more versatile than a traditional hummus because it is essentially a hybrid of guacamole and hummus -- as I mentioned above, it's just as easily eaten with a burrito as a sandwich, and as naturally with tortilla chips as pita chips. It looks like I don't have any reason to curb my avocado buying habit!

Avocado Hummus:
Ingredients:
1 ripe avocado
1 can chickpeas, rinsed and drained
2 cloves garlic
1/2 medium Spanish onion
1 lime, rolled and sqeezed
1 t. cumin
1 T. hot sauce
2 t. salt

Directions:  Food process the first five ingredients together until completely smooth, occasionally scraping down the sides of the bowl. Add the cumin, hot sauce, and salt, puree again and taste. Adjust and add any seasonings to taste.

June 11, 2010

Big-Bite Garden Guacamole

Hot summer nights in Philadelphia beg for homemade guacamole. Well, it isn't yet actually summer,  but since I moved to here I have realized that spring in Philly  does not actually occur. It skips straight from winter to summer,  immediately bringing weather that feels like the humid, sticky  depths of summer... Where evenings don't cool down, but instead it just gets dark and any breeze simply shuffles around the warm air. I sound like I'm talking about Savannah, Georgia, but no, this is actually what it's like over here in the home of Benjamin Franklin.

Last night, I had two deliciously ripe and creamy avocados waiting for me at home. I knew I would be making soy chorizo burritos, and I couldn't wait to make guacamole as part of this summery and festive Mexican dinner. All day I did not know what to look forward to more: those spicy, meaty burritos or the fresh, cool guacamole that would accompany it. What I did know, though, is that I wanted my guacamole to have loads of ripe, juicy tomatoes folded into it, not only to increase its volume (feels like we have twice as much guac to eat when there are tomatoes doubling the size of the bowl!), but also to make each bite feel like a big, substantial mouthful.


This guacamole tastes like a fresh garden jumped into a mixing bowl. The tart, tangy flavor of abundant limes meddles with the cool chunks of tomato and richly creamy avocados to create a summer guac as bright and complex as a Van Gogh. 


Have I mentioned yet that I really, truly love summer?!

Garden Guacamole:
Ingredients:
2 ripe avocados, pitted and scored
3 Roma tomatoes, seeded and diced into 1/4 inch cubes
2 limes, freshly squeezed
1/4 white onion or shallot, minced
2 cloves garlic, minced
1 T. hot sauce
1 T. red pepper flakes or seeded dried Ancho chiles
Sea salt to taste

Directions:
In a medium sized bowl, combine onion, garlic, lime juice, and avocado. Mash with a fork until the avocado is mostly smooth, and is fully incorporated with the other ingredients. Stir in the tomatoes and the hot sauce. Add the red pepper flakes and salt to taste. Enjoy with your favorite chips, preferably a strong chip that can hold the weight of the tomatoes. My favorites are Trader Joe's Organic White Corn Chips and Tostitos Gold or Scoops.

Soy Chorizo Burritos


Soy chorizo has kind of revolutionized my life. After having been slightly disillusioned in the past by other soy products claiming to be meat, I was skeptical when I pulled this sausage shaped package out of the fridge case at Trader Joe's. I thought I'd give it a try, though, and thank goodness I did! This was a little over a year ago, and sad but true, soy chorizo might just be one of the most amazing discoveries I have ever made. When M took his first bites, he raved about how delicious it was. Ten minutes later, I told him he wasn't eating meat. After getting over the initial shock, he continued eating and hasn't stopped to this day.

Unlike meat chorizo, the soy version won't stay together as a solid. It can't be sliced or cut into neat chunks. It generally remains the consistency of a sloppy joe, which is fine by me. Although I haven't used other brands of soy chorizo, the Trader Joe's brand packs big flavor. You don't even need to add any other spices when you use this chorizo -- all on its own, it is boldly spicy, complex, and robust. Simply cut open the package and dump it into a pan with some sauteed onions, a can of beans, and a few cans of diced tomatoes and you have yourself the most meaty meatless taco filling or bowl of chili you'll ever eat. Get ready to pile on the guiltless deliciousness!

Meaty Meatless Soy Chorizo Burritos: (serves 2)
Ingredients: 
1/2 package Soy Chorizo
1/2 large Spanish onion, coarsely chopped
1/2 a carrot, shredded
1 T. olive oil
2 oz. shredded Monterey Jack or other mexican cheese
2 Habenero Lime tortillas
Spicy Black Bean Dip
1/2 cup tomato salsa, any brand you like

Directions:
Heat olive oil in a skillet. When hot, add the onion and saute until soft and golden, approximately 5 minutes. Add the carrots. Turn the heat down to medium and add the soy chorizo and stir. Here, you can add any spices to taste that you like, including extra hot sauce, oregano, cumin, etc. You can also add in an 8 oz. can of tomato sauce if you like a wetter consistency to the mix.

Spread 2 T. of Black Bean Dip on each tortilla, then lay 1 oz. of cheese on top. Spoon half of the chorizo mixture into each tortilla, splitting it evenly. Top with salsa. Wipe the pan with a cloth and spray with non-stick spray, then roll each burrito either completely or halfway as in the picture and gently place back into the pan so that the burrito can get crispy and all of the ingredients inside can melt and warm together.

Serve topped with guacamole, sour cream, extra cheese, or sauce.

June 10, 2010

Crunchy Polenta Chicken Fingers


Crispy chicken fingers were supposed to be part of a Glee date. I know, I just wrote this publicly on the internet. I had planned to make a dinner of "school lunch," consisting of chicken fingers and fries to go along with the season finale of Glee. Yes, I had even sent M a personal Evite to alert him to our Glee themed stay-at-home-date. Hey, a girl needs something to look forward to. 

M and I kind of love Glee in the way that you love something that is so awkward at times it can be hard to watch, but still secretly makes you want to get in touch with your inner diva. Also awkward. It's a good week if the episode has us singing along from the couch... What can I say -- M and I were both acapella singing geeks in college, which now makes us perfect candidates to be total Gleeks.

Anyway, I guess my Evite wasn't cute enough or something, because our Glee date got derailed . By CHIPOTLE.  M , who was starving after 36 hours at the hospital, inhaled a giant burrito at approximately 5:00pm, and there went dinner plans! Despite the lack of school lunch fun, we had some decent kettle corn and enjoyed what was by far the best episode of Glee yet.

Long story short, I bumped school lunch to an evening later, and thank goodness I did because  I needed this simple and satisfying comfort food more than ever. It had been a tough day, and crispy, juicy pan-seared chicken fingers dipped in loads of ketchup brought me back to my inner child  with each bite.  These crunchy strips are a grown up version of a childhood favorite: they are a reminder of the days when lunch was a 20 minute obstacle before recess, utensils were optional, and feet  still dangled a distance from the cafeteria floor.  Although they might not be served up by a lady wearing a hair-net, I think you'll find that this pretty healthy and truly delicious version is even better, perhaps because, although we live in a more complicated adult world, it means that we have the power to make things like crispy chicken fingers for ourselves -- without waiting for every other Wednesday, tater tots on the side. And it means that now, eating is recess, because we're able to finally take the time to enjoy our food for the comfort it brings with the people we love.

Crunchy and Crispy Polenta Coated Chicken Fingers: (serves 2)
Ingredients:
2 boneless, skinless chicken breasts
1 T. olive oil
1 T. butter or Earth Balance
1/4 cup flour
1/4 cup polenta meal, preferably quick cooking
2 t. salt
2 t. cayenne pepper
1 egg
1/2 T. hot sauce

Directions:
Rinse each chicken breast and pat dry. Between two pieces of wax paper, pound the chicken to 1/2 inch thin, then slice into strips of about even size. 

Preheat the oil and butter together in a large non-stick skillet over medium high heat until they shimmer and sizzle together. Take care not to burn the butter. While the skillet is preheating, whisk the egg and hot sauce together in a shallow bowl. Mix together the flour, polenta, salt, and cayenne together in a plate.  (Optional, sometimes I like to mix in some Kick'n Chick'n rub!)

When the pan is hot, dip each piece of chicken one by one in the egg mixture, allowing any excess to drip off, then into the polenta mixture, coating each piece completely. Place each piece in the pan and don't move them until you check to find a crispy light brown coating on one side. Gently flip each piece over with tongs.

When your chicken fingers are browned and crispy, serve with your favorite side and dipping sauces.

June 8, 2010

Tuscan Seared Tuna Steak


Tuna steak... one of my favorite things. It cooks in 4 minutes total, is totally delicious, healthy, and filling. Definitely my kind of dinner. Since M doesn't really love seafood, this is another dinner I cook for myself when he's on call.

The Tuscan "marinade" for this tuna steak is fresh and light, perfect for a summer night. The olive oil  infuses the fish with loads of juicy, buttery goodness. It's a meddling of  bright citrus with herbaceous basil and  fragrant garlic, and would be wonderful served over a puree of garlic and lemon white beans, or a garlicky saute of spinach or kale. Take care not to overcook the tuna so that it stays tender and flaky. Serve with a generous squeeze of fresh lemon, too!


Tuscan Tuna Steak: (serves 2)
Ingredients: 
2 (1 inch thick) tuna steaks
2 T. olive oil
2 cloves garlic, minced and crushed
zest of one lemon
2 T. freshly chopped Italian basil
freshly ground salt and pepper

Directions:
In a small dish, combine the olive oil, garlic, lemon zest, and basil. Rinse each tuna steak and pat dry. Brush each side of the tuna steak with the olive oil marinade and allow to sit for 10 minutes.
Crank up the heat in your pan to medium-high and allow to pre-heat. Once the pan is piping hot, generously salt and pepper each side of the tuna and place it down in the pan. Sear for 2 minutes per side, then serve with fresh lemon.

June 7, 2010

Cheddar, Bacon & Onion Biscuits


I was heading down to the D.C. area this weekend for a summer birthday bash dinner. The menu involved lots of delicious pulled pork, barbecued chicken, grilled pineapple and romaine hearts... you get the picture. Anyway, I knew I wanted to bake something that would transport to another state without a fuss, wouldn't need refrigeration, and would match the theme of the food. Hence, cheddar and bacon biscuits! 

These huge nuggets of flaky, golden buttery goodness were truly delicious. Each biscuit was as large as my hand, which made them perfect for slicing in half and sandwiching with loads of piping hot, juicy pork. Craters of crusty, melted sharp cheddar cheese cushioned the hunks of smoky applewood bacon for a seriously savory combination that was rounded out by a mild hint of freshly chopped white onions. Drizzling the top of the biscuits with clover honey before serving added a really nice touch of sweet flavor, too.

These biscuits are pretty much fail proof. You can't really mess them up, even if you don't have a processor and need to mix the ingredients by hand. And, of course, the flavors in them can't be beat -- who doesn't love bacon and cheddar? Use extra-sharp for the cheese. This biscuit batter is mild flavored and moist, and it turns from regular biscuit to a special one when it's all enhanced by a strong, quality cheddar. 


All in all, these are truly a fabulous comfort food addition to any meal. But they certainly give enough reason to barbecue some ribs or slow simmer some pulled pork because, let's be honest, we all need a good excuse to eat these with the other fantastic comfort foods of summer.

Cheddar, Bacon & Onion Biscuits: 
Ingredients:
6 thick-cut bacon slices
3 3/4 cups bread flour
1 1/2 tablespoons baking powder
1 1/2 teaspoons baking soda
1 1/4 teaspoons salt
1 T. garlic powder
1/2 cup (1 stick) chilled unsalted butter, cut into 1/2-inch cubes, plus melted butter for brushing
2 cups (packed) coarsely grated extra-sharp cheddar cheese (about 12 ounces)
1/2 cup grated colby cheese
1/3 cup chopped fresh white onion
1 3/4 cups chilled buttermilk or homemade buttermilk
Honey  for drizzling

Directions: 
Position rack just above center of oven and preheat to 425°F. Line heavy large baking sheet with parchment paper. Cook bacon in heavy large skillet over medium heat until crisp and brown. Transfer bacon to paper towels to drain, then chop. 

Combine flour, baking powder, baking soda, garlic powder and salt in processor; blend 5 seconds. Add butter cubes. Blend until coarse meal forms, about 30 seconds. Transfer flour mixture to large bowl. Add cheddar cheese, onion, and chopped bacon; toss to blend. Gradually add buttermilk, stirring to moisten evenly (batter will feel sticky). 

Using lightly floured hands, drop generous 1/2 cup batter for each biscuit onto prepared baking sheet, spacing batter mounds about 2 inches apart.Bake biscuits until golden and tester inserted into center comes out clean, 18 to 20 minutes. Brush biscuits lightly with melted butter. Let cool 10 minutes. Serve biscuits warm or at room temperature with honey.
Adapted from a recipe on Epicurious.com

Homemade Buttermilk

Who keeps buttermilk lying around in the fridge? I sure don't. And usually, when a recipe calls for buttermilk, I get all flustered and start looking for an alternative recipe that will allow me to avoid the need for this obscure ingredient. 

Well, buttermilk is not a big deal. Really. Its consistency is different from regular milk, but there is no need to fret about not having it. There is likely not even any need to bother going out to purchase some, even if you do have the time or energy. Simply make your own -- the consistency will be slightly different, but the taste will be the exact same. 

Pour 1 tablespoon of white vinegar or lemon juice into a measuring cup. Then, add enough milk until it becomes 1 cup total of liquid. Stir, and allow to sit for five minutes. Done! Use in a recipe as it calls for buttermilk.

June 2, 2010

Rotini Salad with Shaved Beets & Carrots

A unique and refreshingly cool pasta salad that is perfect for a summer BBQ! This dish is coming along with me to our Book Club barbecue tonight. It's hot and humid here in Philly, and I can't wait to eat this flavorful pasta salad with a huge, juicy burger! Admittedly, I balked at my own idea of bringing a pasta salad to book club. Pasta salad!? There is something about pasta salad that screams uninspiring, mundane, or just plain unappetizing....overloaded mayo of questionable origin, noodles drenched in Kraft Italian,  overcooked pasta... it's a simple dish but somehow so much can go wrong.

It's like coleslaw or potato salad: most often, it is made without love and thus goes untouched by all.  Everyone's summer slaw or salad is made differently and we each undoubtedly have our own preference in taste (which are usually not fulfilled unless we make it ourselves). It's kind of like how I won't eat anyone's potato salad except for my Nonna's (a perfect blend of homemade mayo and tart vinegars, she somehow hits the nail on the head every single time) --a pasta salad needs to be the right pasta salad to win my heart, and a place on my plate.

But, perhaps this creation will be my very own pasta salad exception. The tangy balsamic ranch dressing is what enhances everything: the bite of the vinegar balances the sweetness of the carrots, while its creamy consistency brightens the deep flavor of the beets. The beets turn the dressing light purple, but don't be alarmed. It is colorful and completely delicious!

*Post-pasta salad eating report: The girls at book club loved this, and it was an all around pasta-salad eating hit! Looks like this might be a winner for many people's palates!

Pasta Salad with Shaved Beets & Carrots: (serves 6 as a side)
Ingredients:
1 lb. Barilla Tri-Color Rotini Pasta
1 or 2 large raw carrots
1/2 cup quality creamy ranch dressing
1/4 cup quality balsamic vinegar
2 T. cream cheese
1 T. salt
1 T. freshly ground black pepper
a few sprigs of fresh parseley, chopped

Directions:
Set a pot of generously salted water to boil over high heat. Once it is rolling, add the pasta, stir, and return to a boil. 

As the pasta cooks, pour your ranch dressing into the bottom of a large mixing or serving bowl. Add the cream cheese and whisk together until the cream cheese is completely incorporated. Next, pour in the balsamic slowly as you whisk. The dressing will be a light brown. Adjust the dressing to your taste.

Peel the carrots and grate them into your bowl. Shave or thinly slice the beets and also add them to your bowl. Gently turn to coat the vegetables with the dressing. 

When the pasta is al-dente, drain immediately and rinse with cold water. Drain thoroughly, and add to your bowl. Fold all of the ingredients together, coating the pasta well with the dressing and vegetables. Season generously with salt, freshly ground pepper, and add the chopped parsley. If you need more dressing, add a bit more ranch or balsamic. 

Refrigerate and/or serve!

Sunny Fried Eggs & Pita


A super easy, super yummy breakfast with some fruit on the side, or light dinner with greens on the side. This little sandwich is ready in minutes and is really satisfying! The warm and fluffy pita holds the eggs like it was made for the job, and catches the yolks perfectly when they run a little bit.


This week, these egg pitas were dinner. On the evenings when M is on call at the hospital, I spend more time on things other than cooking, like letting Carlin play at the dog park or puttering around the apartment cleaning up. Somehow, there's a bit more purpose to cooking dinner when there is someone else to enjoy it with. And, although I spend much less time preparing my own dinner, it doesn't mean it is any less tasty . It's just different. Okay, I'll admit to eating four bowls of cereal in milk for dinner when I'm on my own. On more than one occasion. Cereal is just divine. But in an effort to prepare myself a simple, yet still nutritious and thoughtful meal, eggs are another go-to. Breakfast is the best meal of the day, and when I have it for dinner again it's a total treat!

Sunny Fried Egg Pita Pocket: (serves 1)
Ingredients:
1/4 white onion, sliced or chopped
1 T olive oil
2 large eggs, brought to room temperature
1 T. Earth Balance butter
Salt & Pepper to taste
Feta Cheese, crumbled, optional
Any additional veggies you have on hand

Directions: Pour the olive oil into a medium sized pan and bring it up to medium-high heat. Add the onions and allow to saute lightly for a few minutes. Add any other desired veggies, too, and let them saute for a minute. Crack both eggs over the onions and allow them to fry until lightly browned. Season with salt & pepper. Flip the eggs over, turn off the heat. Place the pita pocket over the eggs in the pan to allow it to warm up and absorb some of the moisture and become fluffy. Carefully open one side of the pita pocket and lightly butter the inside. If desired, put the crumbled feta cheese inside, then transfer both eggs and the onions into the pita pocket with a spatula. Enjoy!

Links

Related Posts Plugin for WordPress, Blogger...