March 6, 2014

"Greek with Greens" Pasta


Our favorite local restaurant, Dmitris, is a special place for M and me. It's been a long favorite, with authentic and amazingly prepared Greek small plates. It's located on Fitler Square park, where M proposed to me, and we always smile when we remember all the days while M was a first year medical student. We'd walk by and stop to read the menu, always dreaming of being able to afford a night out at such a cozy, intimate spot. 

Years have passed with Dmitris as our special place. We've had anniversaries, dinners with both our parents, countless dates, and milestone celebrations at almost every table there. On March 9th, our Dmitris will be closing. They lost the lease, and for M and me, it's the end of an era. We're silently thankful for our upcoming move to NYC to lessen the ongoing grief over this loss!

Among our favorite dishes there includes what they call "Greek with Greens." It's a bright and perfect salad loaded with hunks of briney feta, zesty kalamatas, and crisp greens. This pasta dish is my homage to those flavors, which we crave regularly.


These cold nights call for a piping hot, comforting pasta bowl with all those fabulous Greek flavors we love. This rigatoni is simmered in a lightly creamy sauce and tossed with bright spinach, hot pepper flakes, feta, and chopped kalamatas olives... Oh, and don't forget the juicy slices of sweet basil turkey sausage!

Although we'll have to fiercely protect our wonderful memories of long chats and laughter over fried smelts, hummus and grilled pita, lamb, and of course, Greek with Greens, it is some small consolation to channel those memories over my own stove and serve them at my home table.


Greek with Greens Pasta: serves 2
Ingredients:
2 cups rigatoni *reserve pasta water
1/2 bag frozen spinach
2 sweet basil pesto turkey sausages, sliced (Trader Joe's)
1/4 onion, halved and sliced
1/4 cup olive oil 
1/4 cup light whipped cream cheese 
1 T. red pepper flakes
1/2 t. garlic powder
1/2 t. cumin
1/4 cup kalamata olives, lightly chopped
4 oz. feta cheese, crumbled
Salt to taste 

Directions:
Boil pasta according to directions, adding the frozen spinach once pasta turns al dente, and turning off heat. Once spinach is thawed in the pasta water, drain and reserve the water.

Meanwhile, heat a sauté pan over medium heat. Add a couple T. of your oil to coat, then add sausages and onions to brown. Turn heat to medium low and add the olive oil and cream cheese. Stir to blend as it heats, then stir in the pepper, garlic, and cumin. Pour your drained rigatoni and spinach into the saucepan and stir to combine. Add some of the pasta water and bring to a simmer until sauce thickens further. Stir well and salt to taste. 

Divide into two pasta bowls, squeeze with lemon if desired, and top with feta crumbles.
 

March 2, 2014

Pumpkin Raisin Breakfast Bulgur


As an oatmeal lover, I've had the oats in all forms and fix -- from banana peanut butter oatmeal, to strawberry almond, to carrot raisin and everything in between.

As much as I love oatmeal for it's thick consistency, I admit that it's often just a vehicle for some other morning flavor craving (like those above). So when I discovered savory bulgur salads at the local fine prepared foods grocer, my mind naturally turned to other ways I could jazz up this chewy, nutty grain.


I have a feeling that this pumpkin raisin bulgur is only the start of my love affair. And for those of you who especially like the bite of steel cut oats, there might be a new show in town. Bulgur has the same bite, but with a bouncy, pillowy texture surrounding each wonderful nugget.

So, pumpkin, raisins, apples, raspberries, nuts.... Nothing is off the table. With bulgur, everything is on the table.

Pumpkin raisin breakfast bulgur: (serves 1)
Ingredients:
1/3 cup 10-minute bulgur (sold at Trader Joe's)
2 T. Thompson seedless raisins
1 cup water w/pinch of salt
1/2 t. cinnamon
1/4 cup canned pumpkin purée
A dash of milk
A drizzle of maple syrup

Directions:
Bring bulgur, raisins, and water to boil in a small saucepan. Turn down and simmer for 10 minutes. Then add the rest of the ingredients through the milk and stir, heating through another minute or so. Pour into a bowl and top with maple syrup. Eat while piping hot!


December 30, 2013

Best Chocolate Chip Cookies

 
These are no regular chocolate chip cookies. Can we talk about browned butter? Salt on top? Extra vanilla extract?
 
Yes, yes we can.
 
 
I suggest making these cookies extra big, and under baking them so they're especially soft. They'll be chewy and positively luscious, while still having that conmpletely addicting crisp outer edge.
 
Adding a sprinkling of kosher salt on top before baking is insanely good.
 
You'll never want to bake cookies without salt on top again.
 
 
We had to hide these cookies in a cabinet so that they wouldn't all get eaten immediately... And once they were out on the table they lasted all of about a minute.
 
Feel free to eat while warm with ice cream on top! Happy New Year!
 

Best Chocolate Chip Cookes (with salt!)
Ingredients:
1¾ cups unbleached all-purpose flour
½ teaspoon baking soda
14 tablespoons unsalted butter, divided
¾ cup dark brown sugar
½ cup granulated sugar
1 teaspoon salt
2 teaspoons vanilla extract
1 egg
1 egg yolk
1¼ cups semisweet chocolate chips
2 T. kosher or other large flake salt

Directions:
Preheat oven to 375 degrees. Line 2 large baking pans with parchment paper and set aside.
In a medium bowl whisk together flour and baking soda. Set aside.
Heat 10 T. of the butter in a skillet over medium high heat, swirling constantly until the butter is dark brown and has a nutty smell. Remove the skillet from heat and pour the butter into a heatproof bowl. Stir the remaining 4 T. butter into the hot butter until melted. Cool to room temperature. Add both sugars, egg, egg yolk, and vanilla and whisk until there are no lumps. Let stand for 3 minutes then stir for 30 and repeat this twice. Then stir in the flour mixture until just combined, then stir in the chocolate chips.
Use an ice cream scoop or big spoon to divide the dough into about 16 big cookies, 2 inches apart on the cookie sheets. Sprinkle and gently press the salt onto the tops of each of the cookies evenly.
Bake 8-10 minutes each, rotating halfway through. Cook on the sheets 5-10 minutes before transferring to a wire rack to cool completely.

November 23, 2013

Waffle-Maker Fritatta


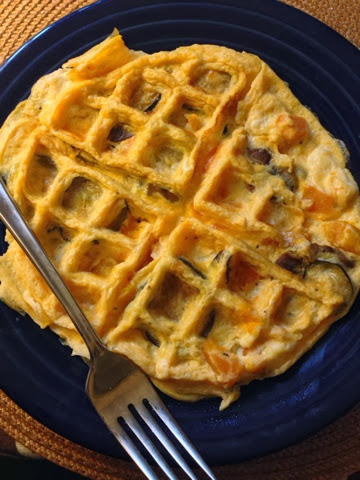
I tried it! Using my waffle maker for eggs that were deliciously fluffy, veggie and cheese laden, and piping hot.

This was not my idea -- I saw it this past Wednesday morning on a segment of the Today Show. I am so glad I saw it because I was about to toss my waffle maker for lack of versatility. It seemed to take up too much space while lacking versatility. I'm kind of just over one-purpose gadgets (except for you, coffee maker).

Now I know my waffle maker is a secret multi-purpose gadget! I'm so excited, and so is the waffle maker since he won't end up on the curb in this week's trash pick up.


Ingredients:
2 large eggs, beaten together with 1 T. water and a pinch of salt
1/2 cup of cooked veggies of choice (or well diced raw veggies)
2 big tablespoons crumbled feta cheese
Non-stick spray 

Directions: preheat waffle maker (I used setting 4) then spray the top and bottom with non stick coating. Meanwhile, whisk together the eggs, veggies, and cheese. Pour evenly over the waffle pan and move the veggies around if they all landed in one spot. Close the top gently and don't turn it over, just let it cook an both sides. After 3-4 minutes you've got a wonderful, quick Fritatta to enjoy.

November 2, 2013

Freezer Cleanout Challenge: Slow Cooker White Bean Chicken Chili


A couple of weeks ago I opened the freezer and almost broke my toe. Sadly, this freezer attack (this time, the perpetrator was a sliding slab of rock hard bacon) was subconsciously expected. I jumped back quickly and the bacon slab slammed to the ground, slid a few inches, and stopped. Then began an avalanche of every other frozen, odd shaped, stuffed-into-any-available-crevice food item.

This avalanche was the equivalent of a sit-down intervention, just a bit more active (and frantic).

I knew my tendency to freeze everything was catching up with me in a big way. Not only was there no  more room, but the whole freezer screamed "open me and risk a trip to the E.R.!"

Oh, and there was also the whole part about not having any idea what's in there anymore or how long it's been in there.

Please tell me you know what I'm talking about.

Please.

Freezer addicts, you know who you are. We're the breed that hates to waste food and just knows we'll have some better use for the rest of that bacon slab at a later date... that may just never come because now the bacon is hidden behind half a steak, some broccoli spears, and that chipotle-cilantro butter you made for steaks last Thursday.

As I shoved the freezer door closed, crinkling bags and shifting containers still precariously moving inside, I made a vow: for the next month (at least) I'd cook dinner only with items out of the freezer -- no adding!

Thus this chicken chili was born. It uses some frozen boneless skinless chicken thighs, some of the bacon that attacked me, and a few fridge and pantry items. I was proud of myself for making a dent in the freezer.... It was a step forward, post-intervention.


If we're going for honesty here, a few days later I took a step back as I packaged up leftover chili into little containers and... yes... froze them.

Hey, awareness is the first step toward change, right?

My freezer challenge isn't over. Future posts are TBD as I make my way through the cavern of cold! Hopefully someday soon I won't open that little door with fear for my life, but confidence about what's inside. Stay tuned!


Slow Cooker White Bean Chicken Chili: makes 6-8 generous servings
Ingredients:
1 bag dried white beans (cannelini), rinsed
about 6 cups water
2 strips thick cut bacon, diced
4 boneless, skinless chicken thighs
salt + pepper
olive oil for the pan
1 large red onion, diced
2 carrots, peeled and diced
1 T. dried oregano
1 T. chili powder
1 T. cumin
1 t. dried basil
1 t. garlic powder
1/2 t. cayenne pepper
1/2 t. paprika
2 large Idaho potatoes, diced into 1/2" pieces
2 cups chicken stock
3 bay leaves
salt + pepper to taste
hot sauce and shredded cheddar, optional

Directions:
In a large slow cooker, add the dried beans and 6 cups water (enough to cover the beans by a couple inches), and turn the cooker onto low and cover. Preheat a large pan or dutch oven to medium heat and spray with cooking spray. Once hot, add the bacon and cook until just crisp. Set aside. Add the chicken thighs to the bacon grease and sprinkle with salt and pepper. Brown the chicken on both sides a few minutes, then add this and the bacon to the slow cooker.

Add olive oil to the pan and again allow to heat through. Then add the onion and carrots and stir. Make a clearing in the middle of the pan/pot and add a little more oil. Then add all of the spices to the oil clearing and allow to heat, about 1 minute, before stirring in with the carrots and onions. Once the vegetables are slightly golden, add these to the slow cooker along with the diced potatoes. Return the pot to the stove and use the chicken stock to de-glaze the pan, scraping up all the flavorful bits before pouring this into the slow cooker and adding the bay leaves.

Slow cook on low 6-7 hours, or high 3-4 hours. Remove the bay leaves, salf + pepper to taste, and top with hot sauce and shredded cheese.

October 22, 2013

Night Market Challenge: Peanut Butter Bacon Cannoli Cupcakes


What happens when you're out with a fellow dessert-loving blogger and you eat a sweet treat that just doesn't deliver? You go home and remake it, but better!

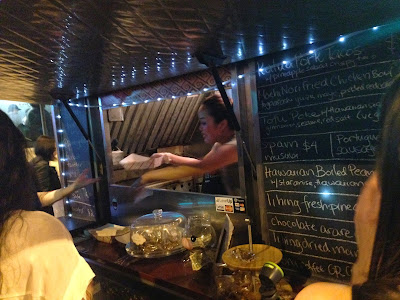
Blogger buddy Alyssa of Suitcases and Sweets and I were out trolling the Food Trust's Night Market, our favorite, and by far most gluttonous, activity together. It's blocks and blocks of diverse food truck offering a wide range of unique comforts. The scene is hopping and the demand (ahem, lines) can be intense. 


We are strategic in what we select to eat. 
We divide and conquer.
We share like siblings. 
And we critique like a nightmare.
 

After trolling hard-core and assessing our options, we committed to the most interesting savory foods and, as stated above, tasted, indulged, commented, considered strengths and weaknesses, and carried on.


Then came time for a sweet bite. Cupcake trucks? Meh. Alyssa bakes a mean cupcake and it wouldn't have been fair. Avante garde chocolates? Sigh. Mini key-lime pies? Sold out.

My eyes settled upon a distant chalkboard. Down at the bottom was scribbled a sugary offering of interest: bacon peanut butter cannolis. Now that was new! Bacon? Peanut Butter? In a cannoli? We were mildly concerned, maybe even a little scared, but we threw inhibition into the wind.


And it didn't deliver! The flavors were muted, the peanut butter was meek, the bacon was bland... the cannoli shell delivered, but hey, there had to be a saving grace to the thing! Sad and disappointed, we vowed to recreate those crazy flavors but better. 

Hello!


These cupcakes are full of bright, bold flavors -- a moist, fluffy cannoli flavored cupcake is filled with thick chocolate bacon ganache and then topped with a creamy peanut butter cream cheese frosting. 

It's a nutty flavor combination that combines the absolute best of sweet and savory. Bacon? Peanut Butter? Cream Cheese? Chocolate? Vanilla and Almond? 

All are front and center in this delightful remake of the Night Market original. I'm so glad that Alyssa and I were able to collaborate on something new and improved! And the best part about it was the lack of food truck to sell these out of... which meant we had every last crumb for ourselves (and a few lucky friends)!

Peanut Butter Cannoli Cupcakes: makes 24
Ingredients:
For the cake:
2 1/2 cups flour
1 teaspoon salt
1 tablespoon baking powder
2 cups sugar
8 ounces (2 sticks) unsalted butter, room temperature
4 eggs, room temperature
1 teaspoon vanilla extract
1/2 teaspoon almond extract
1 cup milk

For the Filling:
4 ounces semisweet chocolate morsels
1/3 cup heavy cream
1 tablespoon butter, room temperature
3 strips crispy bacon, crumbled

For the Frosting
8 ounces cream cheese
4 ounces (1 stick) unsalted butter, room temperature
1 cup peanut butter
1 teaspoon vanilla extract
2 cups powdered sugar
1 strip crispy bacon for garnish, optional

Directions:
Cake:
Preheat oven to 350 degrees and line cupcake trays with 24 liners. Combine flour, baking powder, and salt in bowl and set aside. With an electric or standing mixer, cream the sugar and butter on medium speed until light and fluffy. Add eggs, one at a time, scraping after each addition. Add vanilla and almond extracts. On low speed, add the flour mixture and milk in alternating parts, beginning and ending with dry ingredients. Mix until smooth.

Fill each cupcake liner about 3/4 full with batter. Bake about 15 minutes or until golden and a toothpick comes out clean. Cool in the pan on a wire rack about 5 minutes, then remove onto the wire rack to cool completely. Meantime, make the ganache and frosting, below.

Chocolate-Bacon Ganache Filling:
Pour chocolate chips into a medium bowl. In a small pot on the stove, add the cream and butter and heat until just simmering (do not boil). Pour cream mixture over the chocolate and stir until smooth.Add the 3 strips of crumbled bacon.

Peanut Butter Cream Cheese Frosting: 
With an electric mixer beat together the butter, cream cheese, and peanut butter on medium speed until light and fluffy. Add vanilla and powdered sugar and beat until smooth. Switch stand mixer to high and beat for another 2-3 minutes until fluffy.

Assembly:
Use an apple corer to remove the center of each cupcake, then spoon or pipe the ganache into the holes to fill. Use a piping bag to pipe the frosting onto each cupcake, then top with a small crumble of crispy bacon. Serve, or refrigerate the extras (there won't be any!).


September 8, 2013

Celebration Cake: S + P Get Engaged


I'm ecstatic for my friends Sarah and Patrick, because they've just gotten engaged! It's a cause for celebration, colorful cake, and sprinkles on top!

When Patrick tipped Sarah's friends off that he was planning to propose and wanted to gather in celebration afterward, my first question was, "what can I do to help get this shindig off the ground, please?" I couldn't have been more pleased when his initial response of "nothing" was changed a few hours later to, "actually, how about a cake? for 30?"

Celebration challenge accepted. Let's go.


I hemmed and hawed over how to best feed a crowd. I'm used to baking round layer cakes, but ultimately (after much paralysis and an emergency phone call to my resident baker friend/blogger Alyssa in the baking aisle of Walmart) decided on a 4-layer, 9 x 13 inch cake.

Later, I got to work doubling the already big recipe for fail-proof vanilla cake. When I got done with the butter and sugar creaming steps I realized there was no way I'd fit the rest of the ingredients in my standing mixer.

A 53 second crisis emerged. I looked around my kitchen, scouring for a solution. Crapppp, I always do stuff like this!

My eyes landed on my enormous lobster pot-slash-wedding registry item I thought I couldn't live without but really won't have use for until I maybe have 10 children to boil pasta for.... except for now.

When it's time to call in the big guns.


Hee hee. That standing mixer bowl looks like a dwarf. 

Okay, so after mixing the batter I divided it up into about 7 cups each in two bowls. Sarah and Patrick met at the University of Delaware, colors blue and yellow. I also wanted a way to party-up this traditional white on white bridal style cake, so boom, let's go throwback to kindergarten finger painting time and mix it up with primary colors.


Pour each bowl into a separate pan, smooth out and bang on the counter to release those pesky air bubbles. 


Then bake. 

This is the ultimate surprise party cake, because the cake itself is hiding its own party surprise. Creamy white on the outside, quiet, unassuming.... suggesting nothing but the norm inside.... Then wham! Layers of color! 


There are a bunch of pictures missing of... how burned this cake was on the very outer parts. I admit it, I'm not going to pretend I baked this flawless, picture perfect thing. Through much stress, wondering how the heck I could have burned the cake, wondering whether I would have to start again, I was ultimately able to rescue this cake. 

It involved shaving off lots of sad, completely overdone pieces. My garbage was quite full. It also involved brushing the cake with a delightful mix of vanilla, sugar, and water, which addressed my fear that the cake I saved would be somehow overdone. Which I don't think it was. It was just a weird situation where for the first time ever the outer parts of the cake got incinerated. 

Well, it wouldn't be a party without someone hitting their head on the ceiling fan while dancing on the table, would it? 


After an entire day and night in my kitchen, the time was nearing 11 PM and I hit a wall. I simply could not bring myself to color more frosting to pipe a message on top of the cake. 

For the millionth time that day, I looked around my kitchen for an escape to the corner I'd backed myself into.
Sprinkles.

I used the squared off end of a fondue skewer to carve a path of S + P into the frosting (this way, if I messed it up I could simply smooth it out and trace the initials again.) I then used a tiny spoon to carefully fill the message with colorful sprinkles. Fun!

You could use any sort of sparkly, sugar, or chocolate sprinkles for this. 

It's your party, you can do what you want to. 


After all was said and done, the cake weighed as much as a third grader.

Sarah was surprised twice in one weekend, a party was had, dessert was a hit, and love was all around.

Congrats Sarah and Patrick!


Celebration Cake: makes one 9 x 13 inch four layer cake
1, 2, 3, 4 Cake:
Note: to make two 9x13 inch panfulls, you must make this recipe twice in two batches.

1 cup (2 sticks) butter, room temp
2 cups granulated sugar
4 eggs
3 cups sifted self-rising flour
1 cup milk
1 t. pure vanilla extract
food coloring of choice

Prepare 9x13 pan with nonstick spray and dust with flour. Preheat oven to 325. In an electric mixer, cream butter until fluffy, then add the sugar and continue to cream for about 8 minutes. Add eggs one at a time, beating well after each addition. Add flour and milk alternately, beginning and ending with the flour. Add vanilla and beat until just incorporated. Color with food coloring as desired. You can either use one mix for a smaller cake and divide into two colors, or use one color for this batch. Mix well but don't beat or the batter will become tough.

Pour into prepared pan and drop several times on the counter to release air bubbles. Bake 25-30 minutes or until the center is set. Cool in the pan 10 minutes before releasing gently onto a cooling rack. Flash freeze 1 hour in the freezer once its completely cooled, as cake is easier to work with when firm.

Meanwhile prepare frosting:

Thick Buttercream Frosting: I quadrupled this recipe for my 4-layer 9 x 13 inch cake.
1 cup (2 sticks) butter, room temperature
3-4 cups confectioner sugar
1-2 T. pure vanilla extract
1 T. milk

Cream the butter, then turn the mixer on low add in the sugar one cup at a time. Once the sugar is all barely incorporated, add the vanilla and milk and turn the mixer on high and beat until fluffy and smooth.

Cake assembly: Once my two sheet cakes were frozen, I sliced the tops horizontally to make them flat (its ok if they aren't perfect, I simply stack up thinner sides with thicker sides of the next layer when stacking and it all events out), and stacked the cakes on top of each other and trimmed the sides so the sizes matched.

I then carefully sliced horizontally through the center of each cake to produce 4 separate layers: two yellow, two blue.

I added a dollop of frosting to the bottom of my cake base, then placed my thickest layer, a yellow one, on the bottom. I smoothed out about 1.5 cups of frosting on this layer, then put a blue layer on top, repeating this process until I ended with a blue layer on top. I then coated the entire cake in a thin layer of frosting, the crumb layer, and set in the fridge to stiffen.

A couple hours later, I frosted the entire cake again to ensure a smooth and level outside with no crumbs. I decorated it and put it back in the fridge until ready to eat!

Links

Related Posts Plugin for WordPress, Blogger...